A cursor that suddenly feels too fast or frustratingly slow can make even simple computer tasks feel harder than they should.
Small changes in mouse movement often go unnoticed until precision starts to matter, whether that means selecting text, navigating menus, editing files, or playing games.
The challenge is that cursor speed is influenced by several settings working together behind the scenes, making it difficult to know what is actually causing the issue.
Understanding how mouse sensitivity works can help eliminate guesswork and restore a more comfortable experience.
If you are wondering how to check mouse DPI, knowing where to look and how these settings interact is the first step toward better control and smoother navigation.
What is Mouse DPI?
Mouse DPI means dots per inch. It tells how far the cursor moves on the screen when the mouse moves one inch on a desk.
For example, a mouse set to 800 DPI moves the cursor 800 pixels per inch. A mouse set to 3200 DPI moves the cursor much farther with the same hand movement.
DPI is not a measure of mouse quality. A higher DPI does not automatically mean better performance. It only changes how fast or slow the cursor feels.
This matters when learning how to check mouse DPI because the setting being tested should match the active DPI stage, not just the maximum number printed on the box.
Mouse software, DPI buttons, system pointer speed, and pointer acceleration can all change how movement feels, so checking under clean conditions gives a more reliable result.
Best DPI Settings for Different Uses
Before running any test, it helps to know where you are trying to land. Use this as your target reference after you check your mouse DPI and decide whether to adjust it.
| Use Case | Suggested DPI Range | Why It Works |
|---|---|---|
| Office work | 800 to 1200 | Fast enough for navigation, controlled enough for text selection |
| General gaming | 800 to 1600 | Good balance of speed and accuracy across most game types |
| FPS games | 400 to 800 | Lower DPI reduces jitter and improves fine aim at close range |
| MOBA or MMO games | 1000 to 2000 | Faster cursor movement supports map clicks and ability targeting |
| Photo or video editing | 400 to 600 | Precise cursor placement matters more than speed at this level |
| Large or multi-monitor setup | 1600 to 3200 | Higher DPI covers more screen space, pairing this with the right monitor connection types keeps image quality consistent across displays |
A 1600 DPI mouse does not always behave like 1600 DPI.
Manufacturing tolerances, driver changes, and surface texture can shift the actual measured DPI by 10 percent or more from the advertised value. That is exactly why testing matters.
If you are building out a gaming setup from scratch, pairing the right mouse DPI with a gaming headset that keeps up with fast-paced sessions makes the whole peripheral stack feel more cohesive.
Quick Estimate with Windows Paint
This method works best when pointer acceleration is off and the pointer speed is set to the middle notch in Windows. It will not give a decimal-precise result, but it gets you within about 100 DPI of the real value.
- Open Windows Paint from the Start menu and zoom to 100%.
- Place your cursor at the top-left corner of the canvas (coordinates 0, 0 shown in the bottom-left status bar).
- Using a ruler as a guide, draw a horizontal line exactly 1 inch (2.54 cm) to the right.
- Check the pixel width of the line in the status bar. That number is approximately your DPI.
For example, a line measuring 1600 pixels wide corresponds to roughly 1600 DPI.
This is a useful sanity check before running the full DPI Analyzer test, especially on an office machine where installing third-party tools is not an option.
How to Check Your Mouse DPI in Windows?
Windows does not display DPI directly in its settings panel, but there are multiple solid methods you can use right now without buying anything.
Step 1: Open Mouse Settings
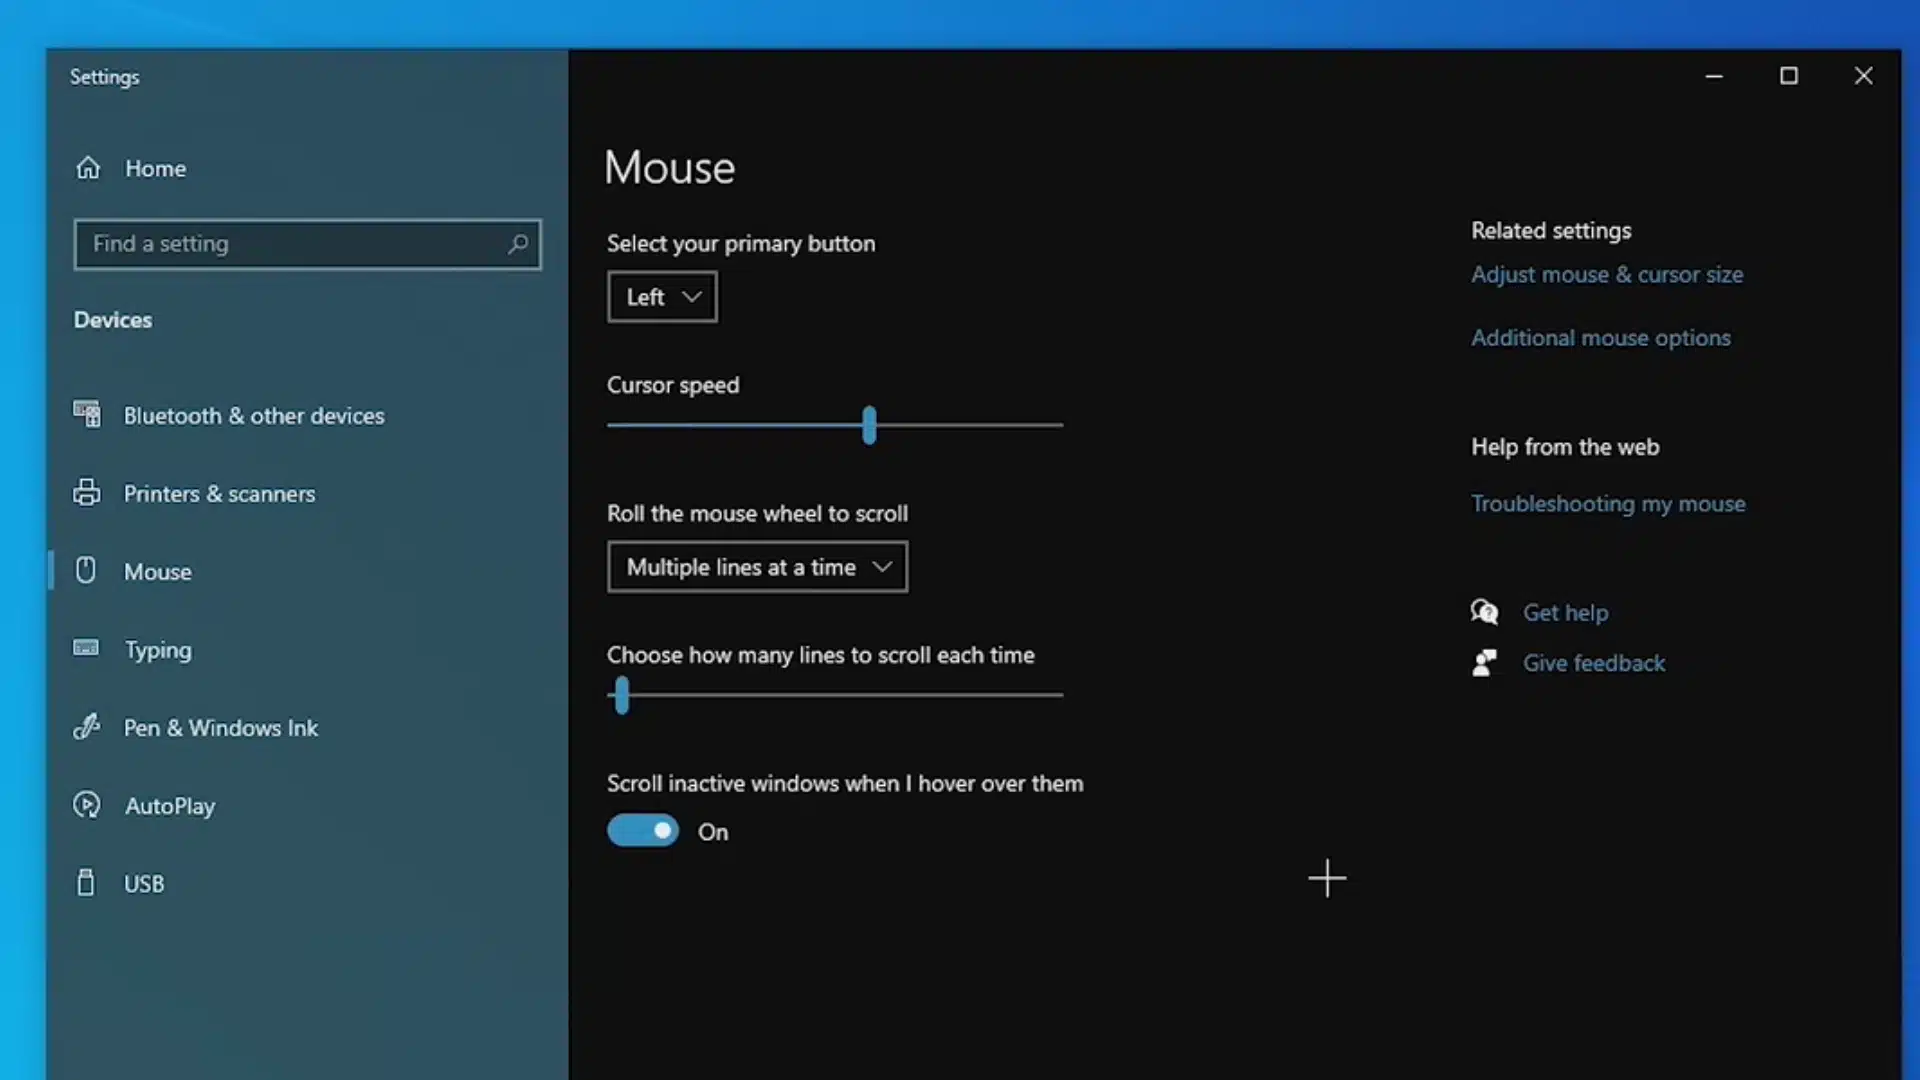
Start from the Windows search bar at the bottom left of the screen. Type “mouse settings” into the search box. Select the result labeled “Mouse settings”.
This opens the main Windows mouse settings page. This part is needed before testing DPI because Windows settings can change how mouse movement feels.
If the system changes pointer behavior, the DPI result may not match the actual mouse movement. Keep the settings window open for the next step.
Step 2: Open Additional Mouse Options
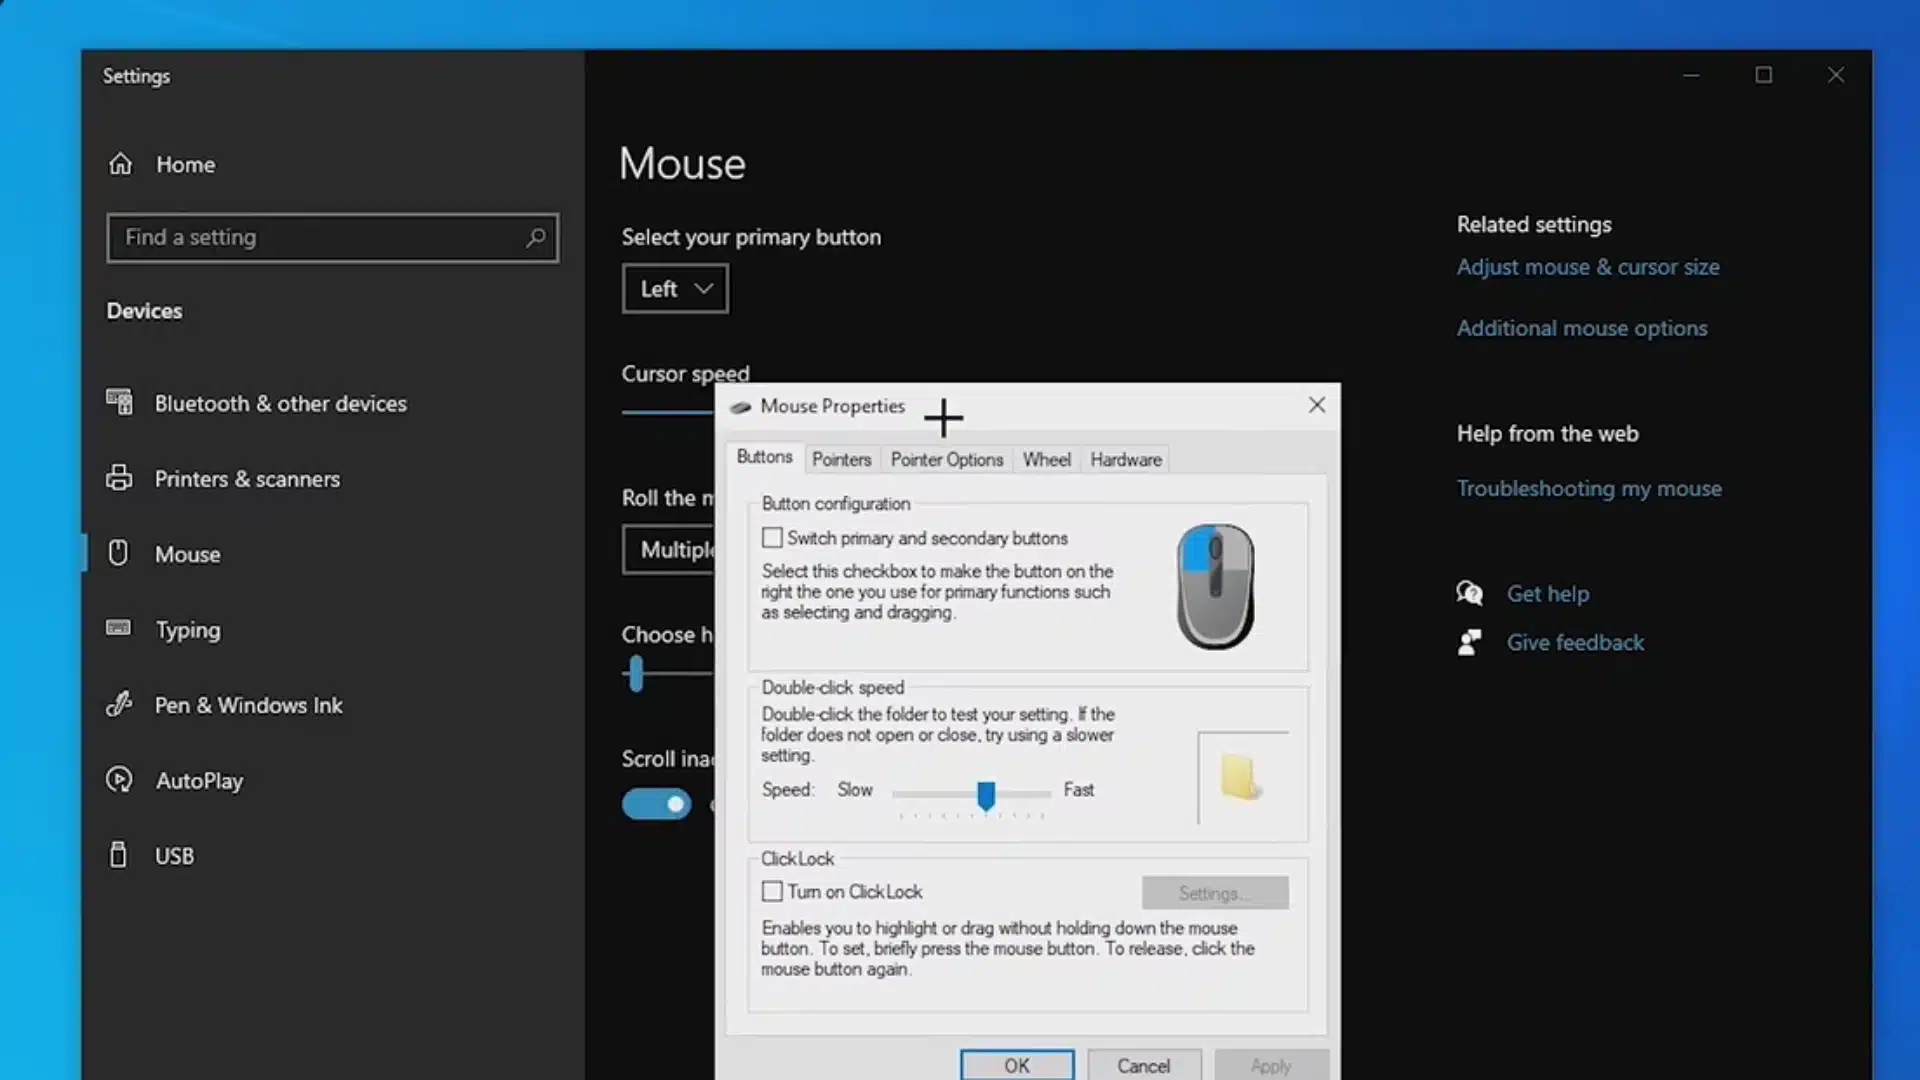
On the Mouse settings page, look toward the top right side of the screen. Select Additional mouse options.
A small Mouse Properties box will appear. This box has several tabs across the top. The next setting is inside this older Windows menu, not the main settings page. This is why this step matters.
The DPI test should be done only after checking the pointer settings inside Mouse Properties.
Step 3: Turn Off Enhance Pointer Precision
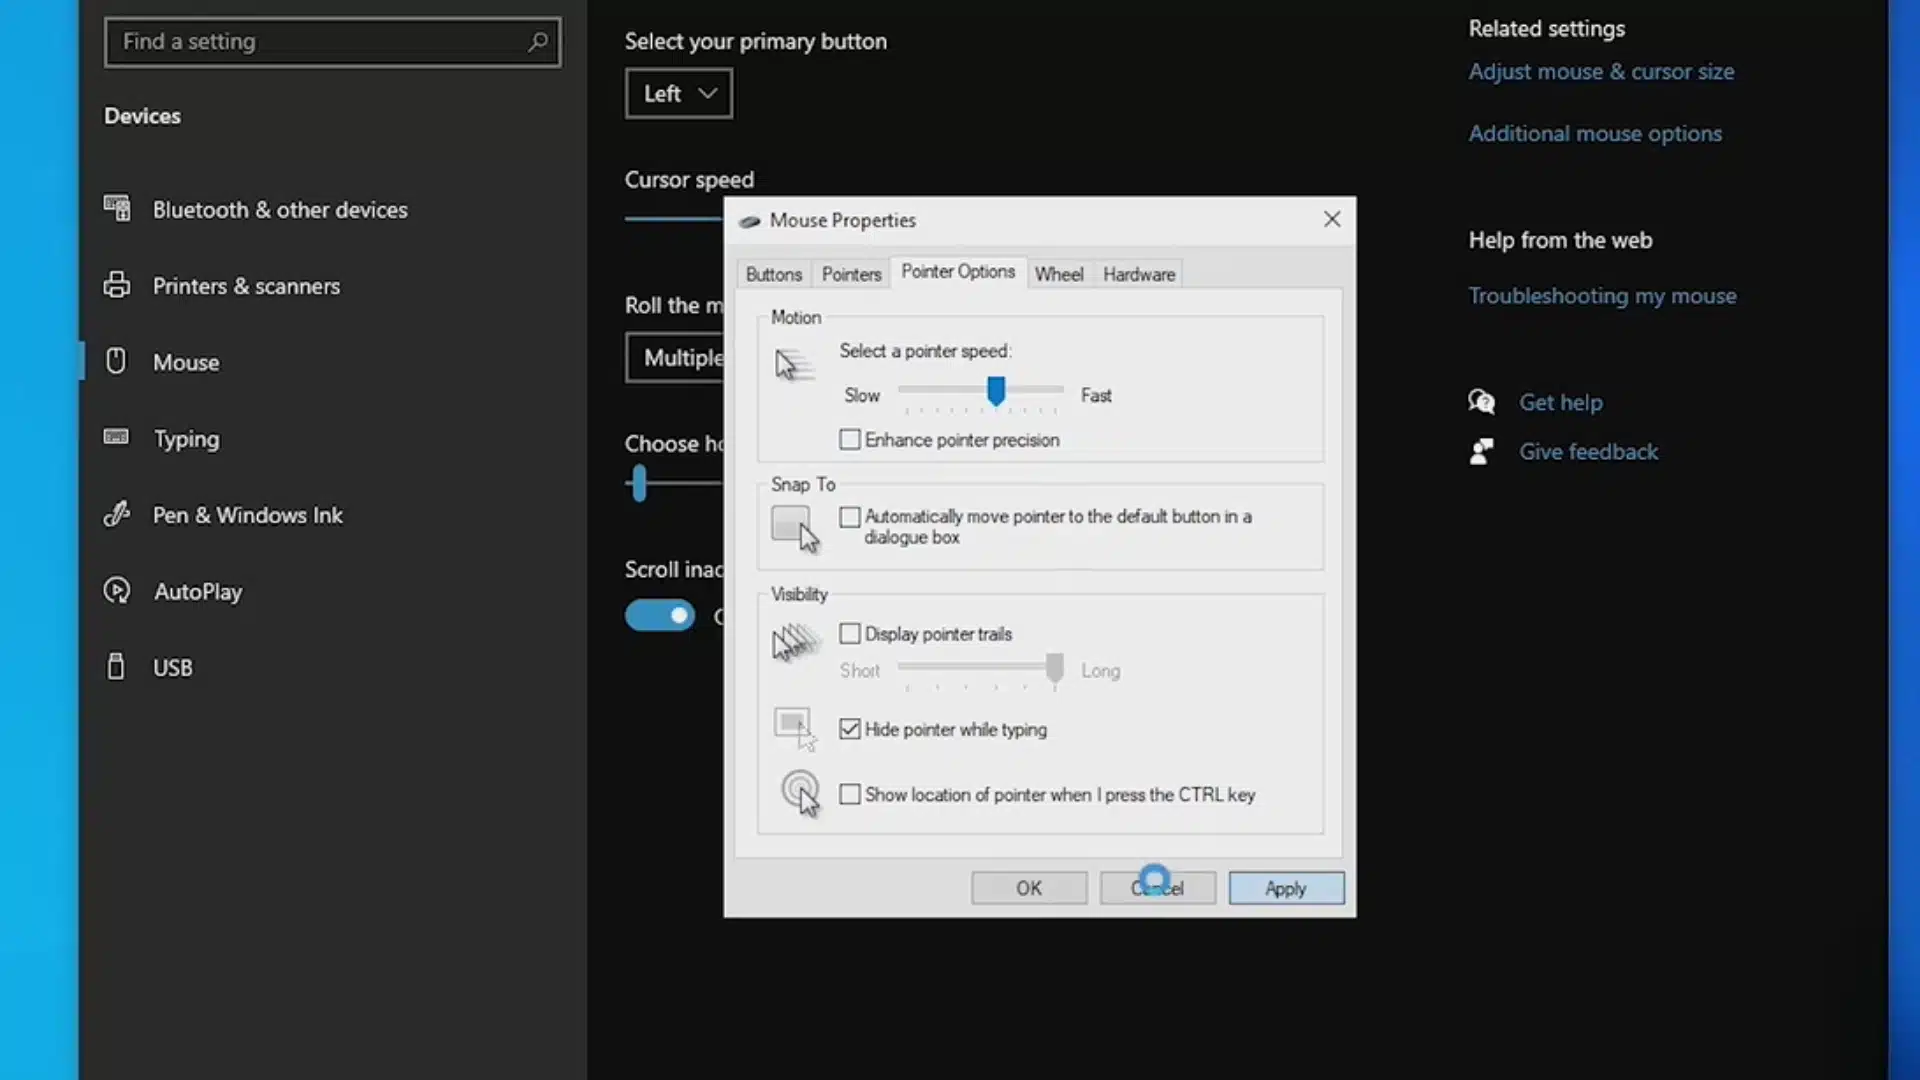
In the Mouse Properties box, select the Pointer Options tab. Under the Motion section, find Enhance pointer precision. Make sure this box is turned off. This setting is mouse acceleration.
It changes cursor movement based on how fast the mouse moves, so the same physical distance can produce different screen distances depending on speed.
That inconsistency skews DPI test results. After turning it off, close the settings windows. Now the mouse movement is cleaner for the DPI analyzer test.
Step 4: Open the DPI Analyzer Website
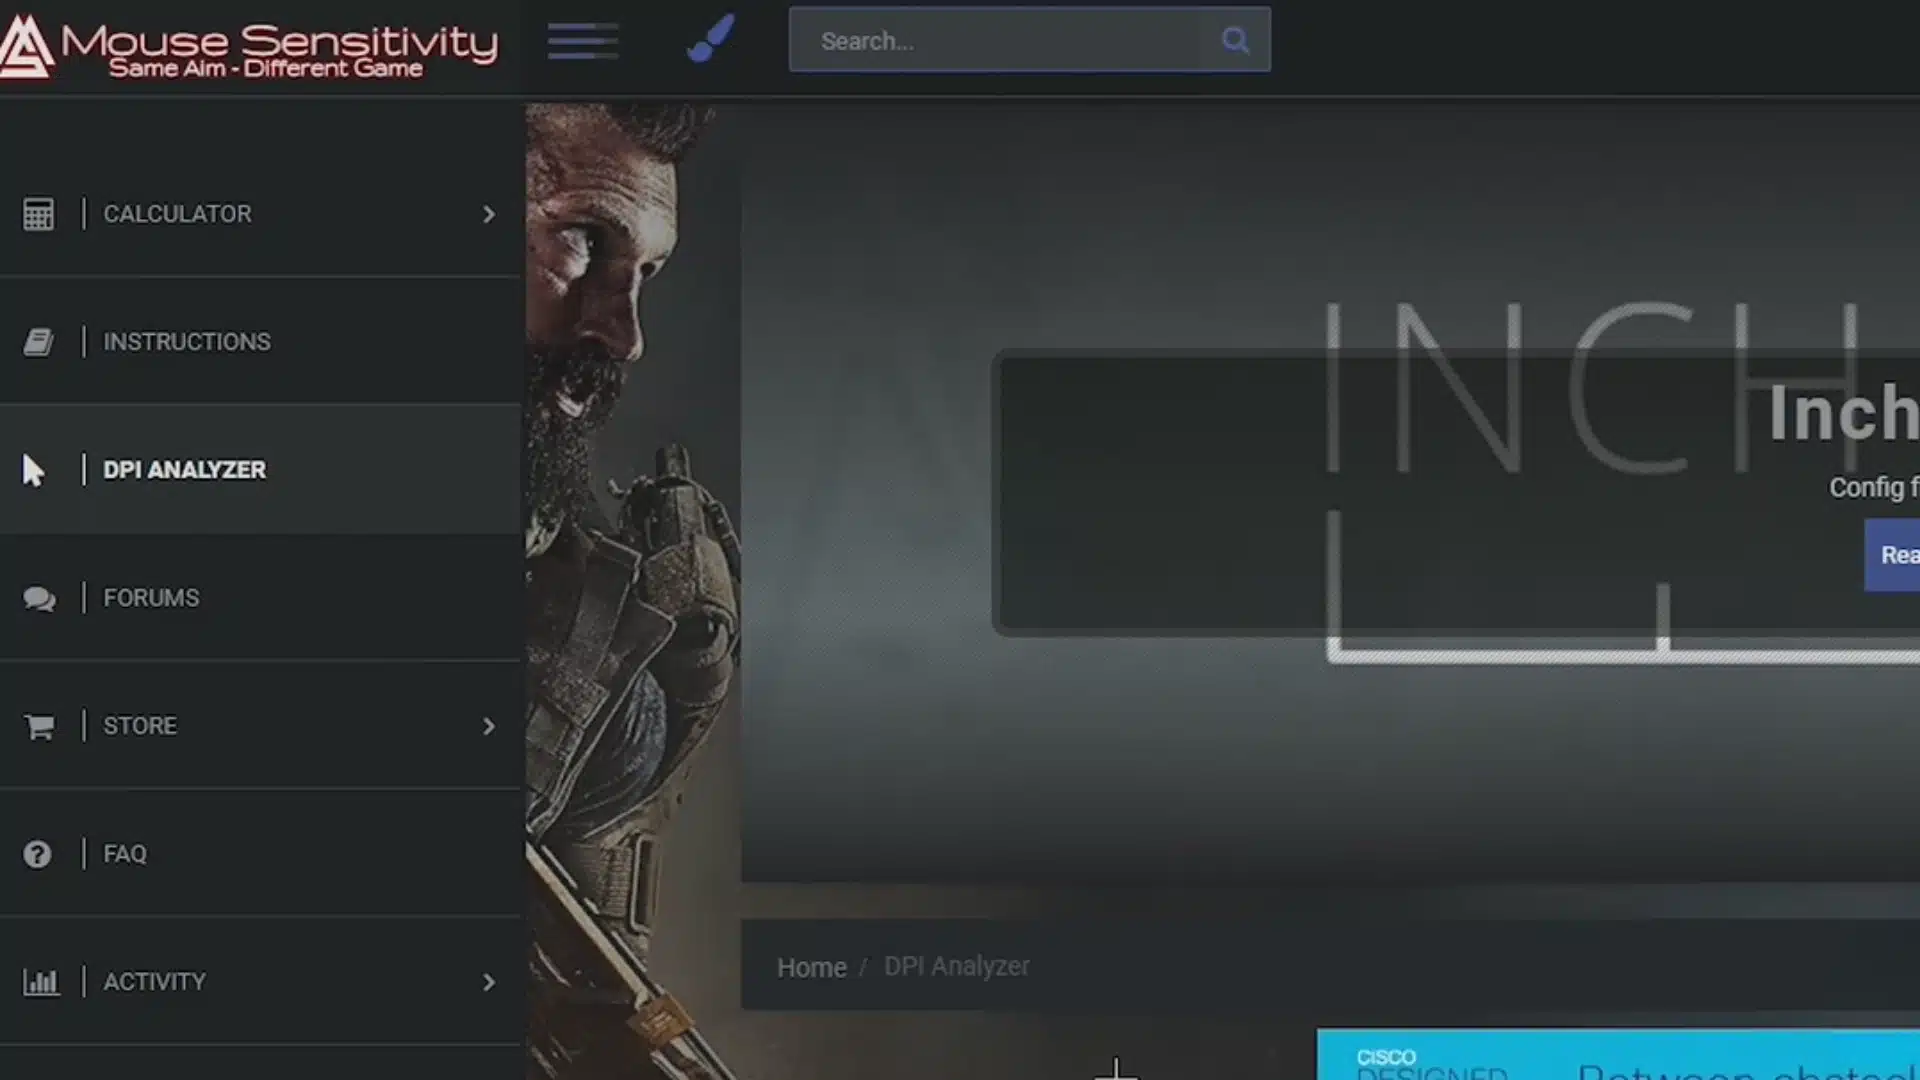
Open any browser, such as Google Chrome. Search for “DPI analyzer” and press Enter. From the results, open the page titled ” DPI Analyzer Mouse Sensitivity Community“.
This tool helps measure the real DPI of a mouse by comparing screen movement to physical mouse movement. After the page opens, scroll down until the table and ruler appear.
The test area includes a red target and a target distance box, which will be used in the next step.
Step 5: Set the Target Distance to 1 Inch
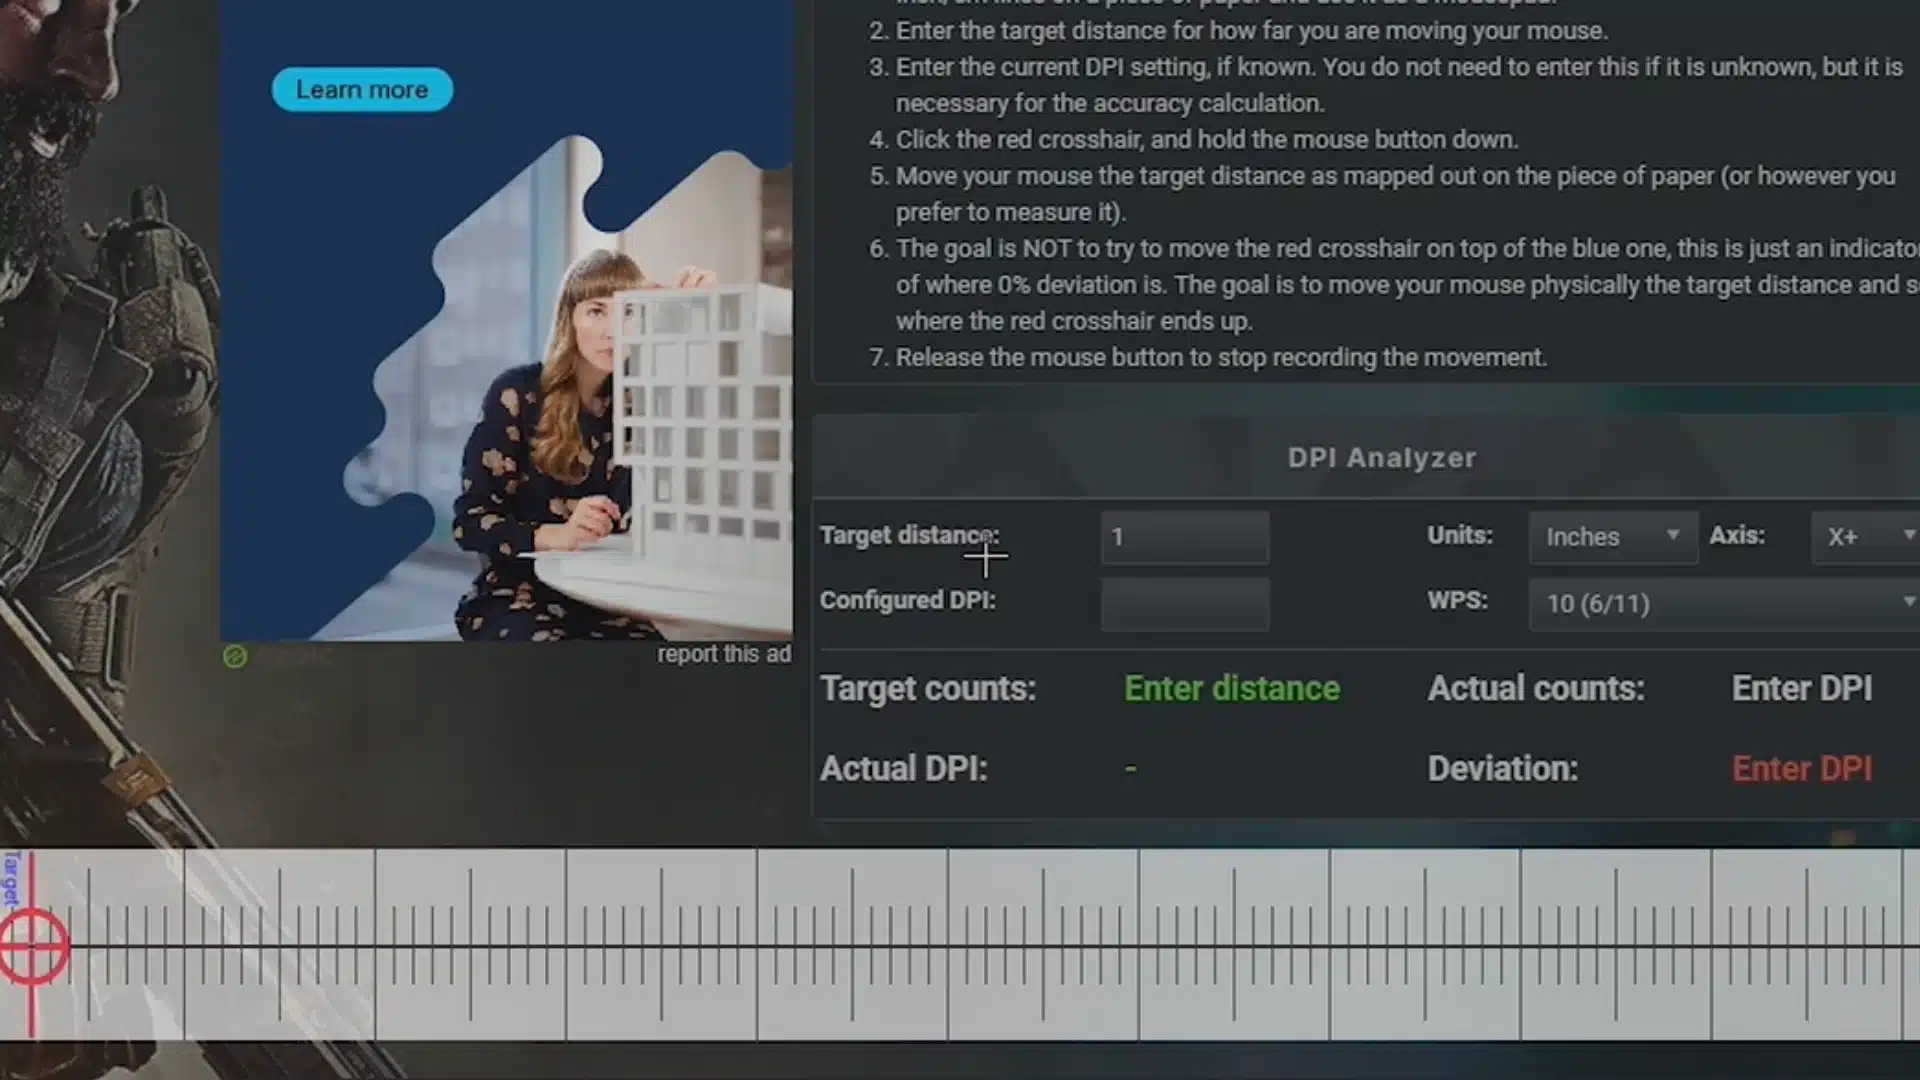
Find the Target distance box on the DPI analyzer page. Enter 1 in that box. This means the test will measure DPI based on one inch of real mouse movement.
A ruler or measuring tape should be placed beside the mouse on the desk or mouse pad. The goal is to move the mouse exactly one inch to the right.
Setting the distance first helps the analyzer calculate how far the cursor moved relative to the actual movement.
Step 6: Drag the Red Target and Read the DPI
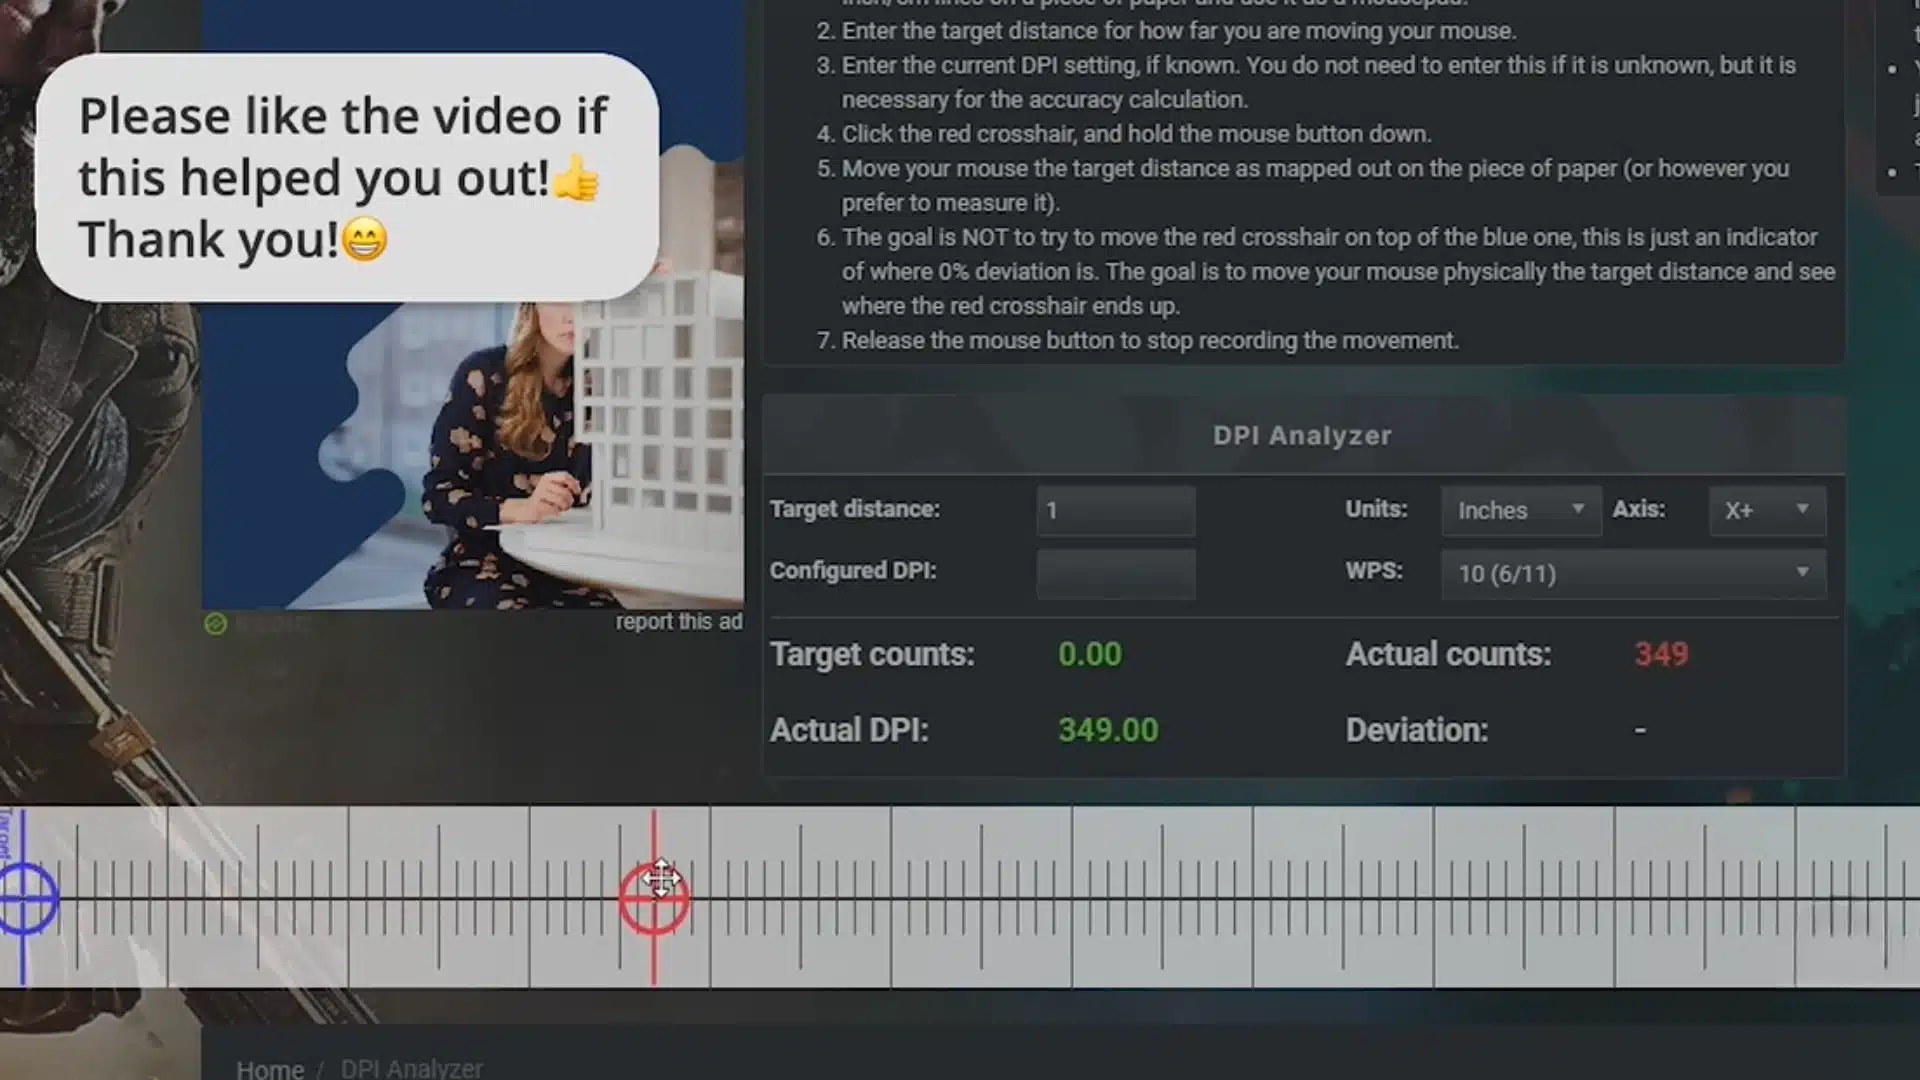
Click and hold the red target on the ruler. Move the mouse one inch to the right in real life, then release. Try to move in a straight line.
The first attempt may not be perfect, so repeat the test a few times.
Once the movement is within 1 inch, the tool displays the actual DPI in green under the table. This number is the real tested output, not the setting shown in software or on the box.
This tutorial is based on a helpful video by Digitut. You can check out the original video on their YouTube channel here or watch it below.
Checking DPI via Manufacturer’s Software
Manufacturer software gives the clearest DPI reading because it shows the active stage, custom presets, profiles, and exact sensitivity settings.
- Logitech G HUB: Open G HUB, select your mouse, click Sensitivity, and check the highlighted DPI stage. Adjust the slider or add up to five presets.
- Razer Synapse 3: Open Synapse 3, go to Performance, select Sensitivity, and check the highlighted DPI stage. Separate X and Y values can be set.
- Corsair iCUE: Open iCUE, select your mouse, go to DPI under mouse settings, and check the active stage. Presets and Sniper mode can be adjusted.
- Other brands: Glorious uses Glorious Core under Performance and DPI. Zowie uses a bottom DPI button with LED indicators. Generic mice may need vendor utilities.
Why DPI May Feel Wrong or Not Match the Specs?
A tested DPI can look right but feel wrong. In games, feel also depends on sensitivity, screen resolution, and mousepad space.
That combined speed is eDPI (effective DPI). DPI affects movement distance, while polling rate controls how often the mouse reports movement.
If the tested DPI does not match the specs, check these points:
- The mouse may be set to a DPI different from the one listed by the brand.
- Turn off Enhance pointer precision before testing; otherwise, the reading may be incorrect.
- Open the mouse app and confirm the active profile.
- Use a plain mousepad for cleaner tracking.
- Use a hard ruler and mark one inch clearly.
DPI vs CPI: What Is the Difference?
DPI and CPI usually mean the same thing in mouse specs. DPI and CPI are close enough that most people use them the same way.
| Category | CPI | DPI |
|---|---|---|
| Full form | Counts per inch | Dots per inch |
| Main use | Sensor measurement | Common mouse setting name |
| Meaning | Counts recorded by the mouse sensor | Cursor movement shown in settings or specs |
| Used by | Sensor makers and technical specs | Mouse brands, software, and users |
| Practical difference | A more exact technical term | More familiar consumer term |
| In daily use | Usually means the same as DPI | Usually means the same as CPI |
| Not the same as | Polling rate | Polling rate |
Checking DPI with Manufacturer’s Specs
Manufacturer specs are the quickest way to confirm what DPI values a mouse is designed to support before testing the real output.
- Check the product box: Look at the back or side panel for DPI range, tracking resolution, or preset stage details.
- Visit the brand website: Search for the exact mouse model and open the specifications section for DPI range or sensor DPI.
- Read the manual: The manual usually lists preset DPI stages and explains which button switches between them.
- Match indicator lights: Some mice use LED colors or blinking patterns to show the active DPI stage.
- Use spec databases: RTINGS, Mouse Specifications, and Sensor Database can help when official pages are unclear or removed.
Tips for Getting an Accurate DPI Test Result
A DPI test can yield inconsistent results if the setup is unstable. These small checks help reduce errors before trusting the final number.
- Use a plain mousepad: A cloth surface helps the sensor track smoothly. Glass, glossy, or patterned surfaces can create uneven readings.
- Measure the distance carefully: Use a hard ruler and mark the start and end points before moving the mouse.
- Move in a straight line: Diagonal movement can add tracking errors. Slow, straight movement gives a cleaner DPI reading.
- Repeat the test multiple times: One result may be slightly off. Testing several times gives a more reliable average.
- Keep pointer speed at default: The middle Windows pointer speed setting avoids software scaling that can change the DPI result.
For gaming setups where this interaction matters most, the way the mouse connects to your display chain can also affect overall responsiveness, something worth reviewing in our overview of monitor connection types.
Conclusion
Mouse DPI can be checked through brand software, the DPI button on the mouse, system settings, or an online test tool. Any of those methods gives a working number to act on.
The best DPI is the one that feels controlled, comfortable, and steady during actual use, and that setting will be different for a competitive FPS player than for someone doing retouching work or managing a multi-monitor setup.
Once the real number is confirmed, compare it against the manufacturer’s specs, check eDPI if gaming is involved, and adjust from there.
Small changes tend to make a bigger difference than expected. Keep the tested number saved so that any sudden change after a software update or profile reset is easy to catch.
Tried this already? Drop your tested DPI and mouse model in the comments below.
Frequently Asked Questions
Can I Check My Mouse DPI on a Mac without Third-Party Software?
MacOS does not display hardware DPI directly. The Tracking Speed slider under System Settings adjusts cursor feel but does not reflect the true sensor DPI.
For an accurate reading, use official mouse software if available for your model, or run the DPI Analyzer at mouse-sensitivity.com after disabling any acceleration in macOS settings.
Will a Higher DPI Setting Reduce Mouse Acceleration?
No. Higher DPI does not reduce acceleration. Turn off Enhance Pointer Precision in Windows to remove mouse acceleration.
Does Mouse DPI Affect Battery Life on Wireless Mice?
Higher DPI may slightly affect battery life, but RGB, polling rate, and sleep mode matter more. For most wireless mice, the difference is minimal.