Accidentally changing formulas or important spreadsheet data can create problems, especially when multiple people edit the same Excel file.
Learning how to lock cells in Excel helps prevent unwanted changes while still allowing others to enter information where needed.
Excel allows users to lock selected cells, protect formulas, and control editing permissions without restricting the entire worksheet.
Below, it’s explained how to lock specific cells, protect cells in Excel, unlock editable areas, and fix common issues when worksheet protection does not work as expected.
Why Lock Cells in Excel?
Locking cells helps prevent accidental changes to important spreadsheet content while allowing users to edit specific areas when needed. This is useful for worksheets containing formulas, calculations, or important data that should remain unchanged.
Learning how to lock cells in Excel is helpful when creating reports, templates, financial sheets, or shared team workspaces. For example, users can keep formula cells protected while leaving input sections available for updates.
Cell locking works together with worksheet protection to control editing permissions. Microsoft explains this process through its official guide on protecting a worksheet, which covers how protection settings prevent unwanted changes.
How to Lock Only Certain Cells in Excel
Locking only specific cells always follows the same three-part sequence, and skipping any one of these steps is why the setup usually fails on the first try. Follow these steps to lock specific cells while keeping other areas editable in Excel:
Step 1: Unlock Cells that Users Need to Edit
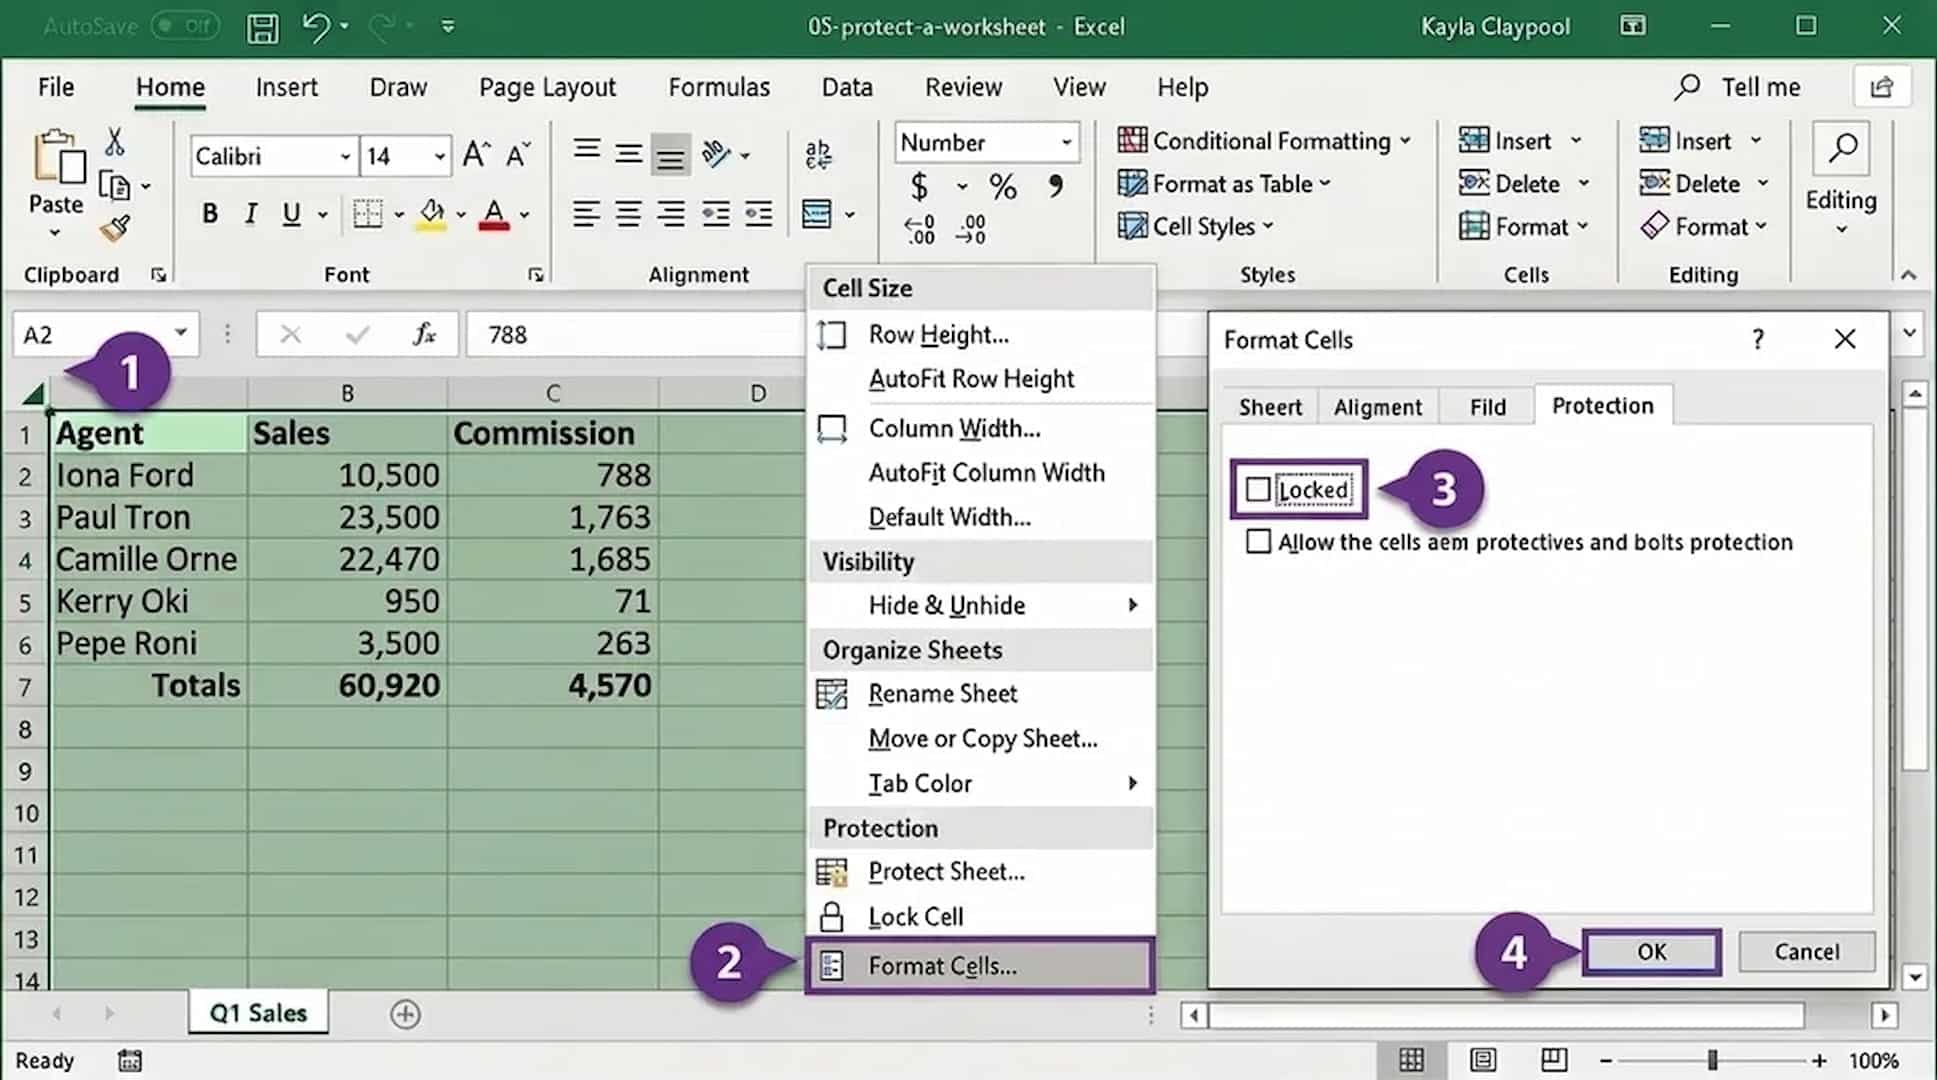
Since Excel marks all cells as locked by default, first remove the locked setting from areas where users should enter information, much like setting up time-saving productivity apps before building a workflow around them. This creates a clean starting point where you can decide exactly which cells should remain protected.
- Select the entire worksheet using Ctrl+A, or click the corner button above row 1.
- Right-click and choose Format Cells.
- Open the Protection tab.
- Remove the checkmark from Locked.
- Click OK.
Step 2: Lock Just the Cells You Want Protected
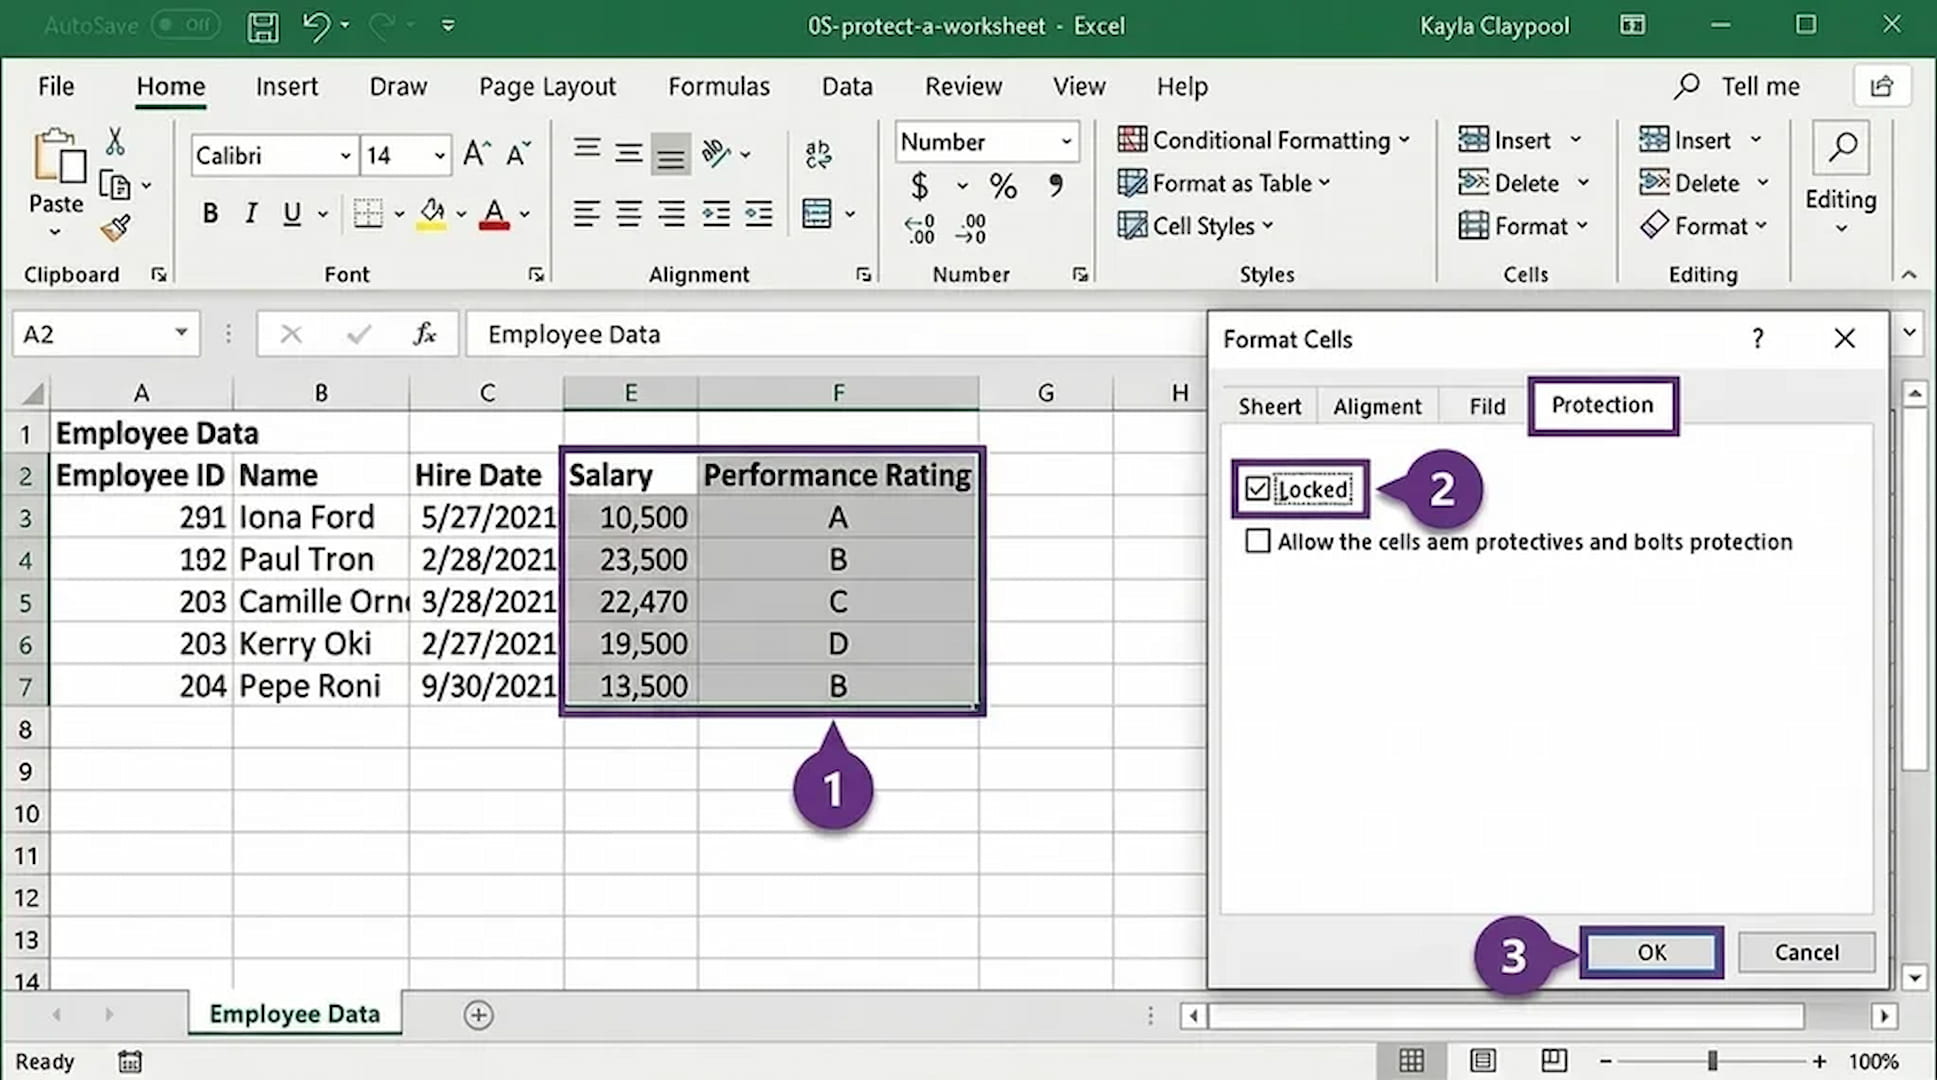
Now select the cells that should not be changed. You can select multiple separate areas by holding the Ctrl key while choosing cells. At this stage, the cells are marked as protected, but the protection is not active yet.
- Select the required cells, rows, or columns.
- Open Format Cells using Ctrl+1.
- Go to the Protection tab.
- Select the Locked option.
- Click OK.
Step 3: Turn On Sheet Protection
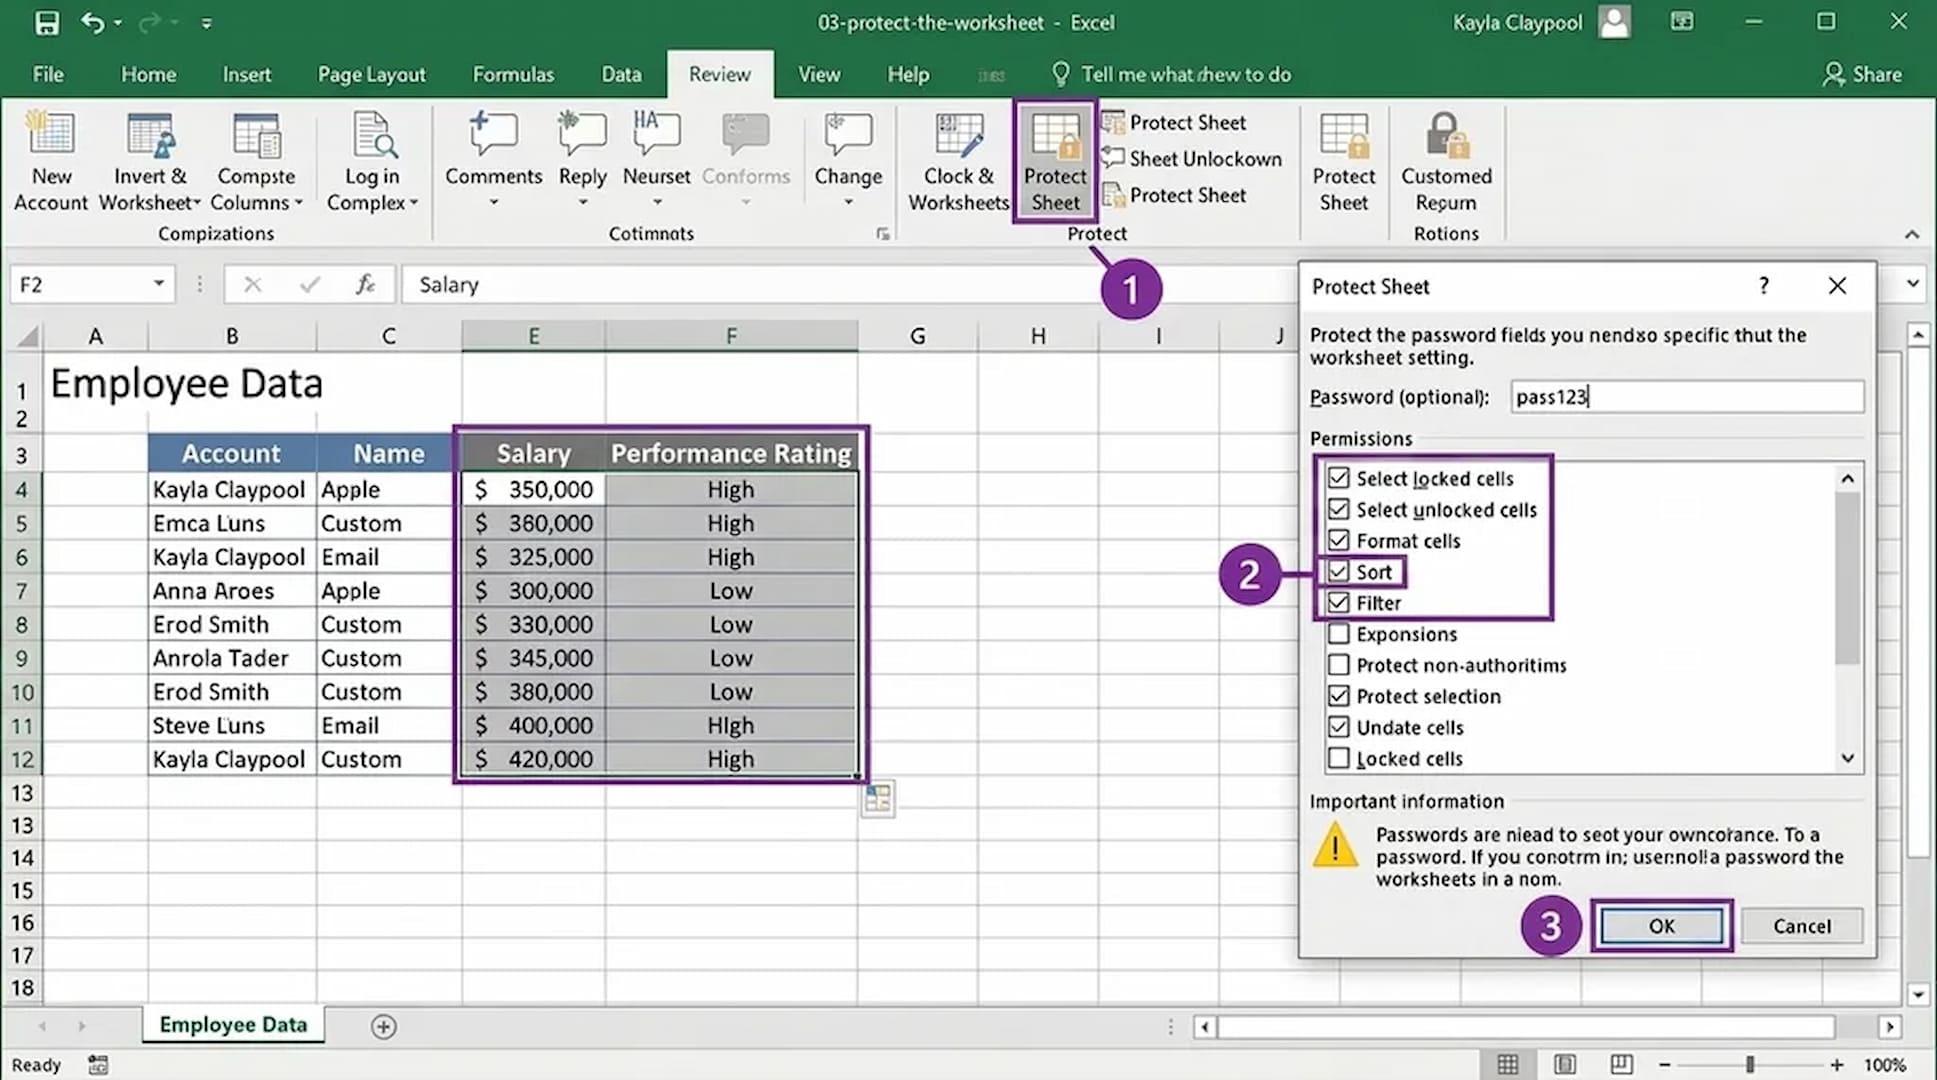
The final step activates cell protection. After protection is enabled, locked cells cannot be edited, while unlocked cells remain available for updates.
- Open the Review tab.
- Click Protect Sheet.
- Choose the actions users can perform.
- Add a password if required.
- Click OK.
Tip: Use different formatting, such as a background color or border, to identify unlocked cells. This helps users quickly recognize where they can enter information in a protected worksheet.
How to Protect Cells in Excel with a Password
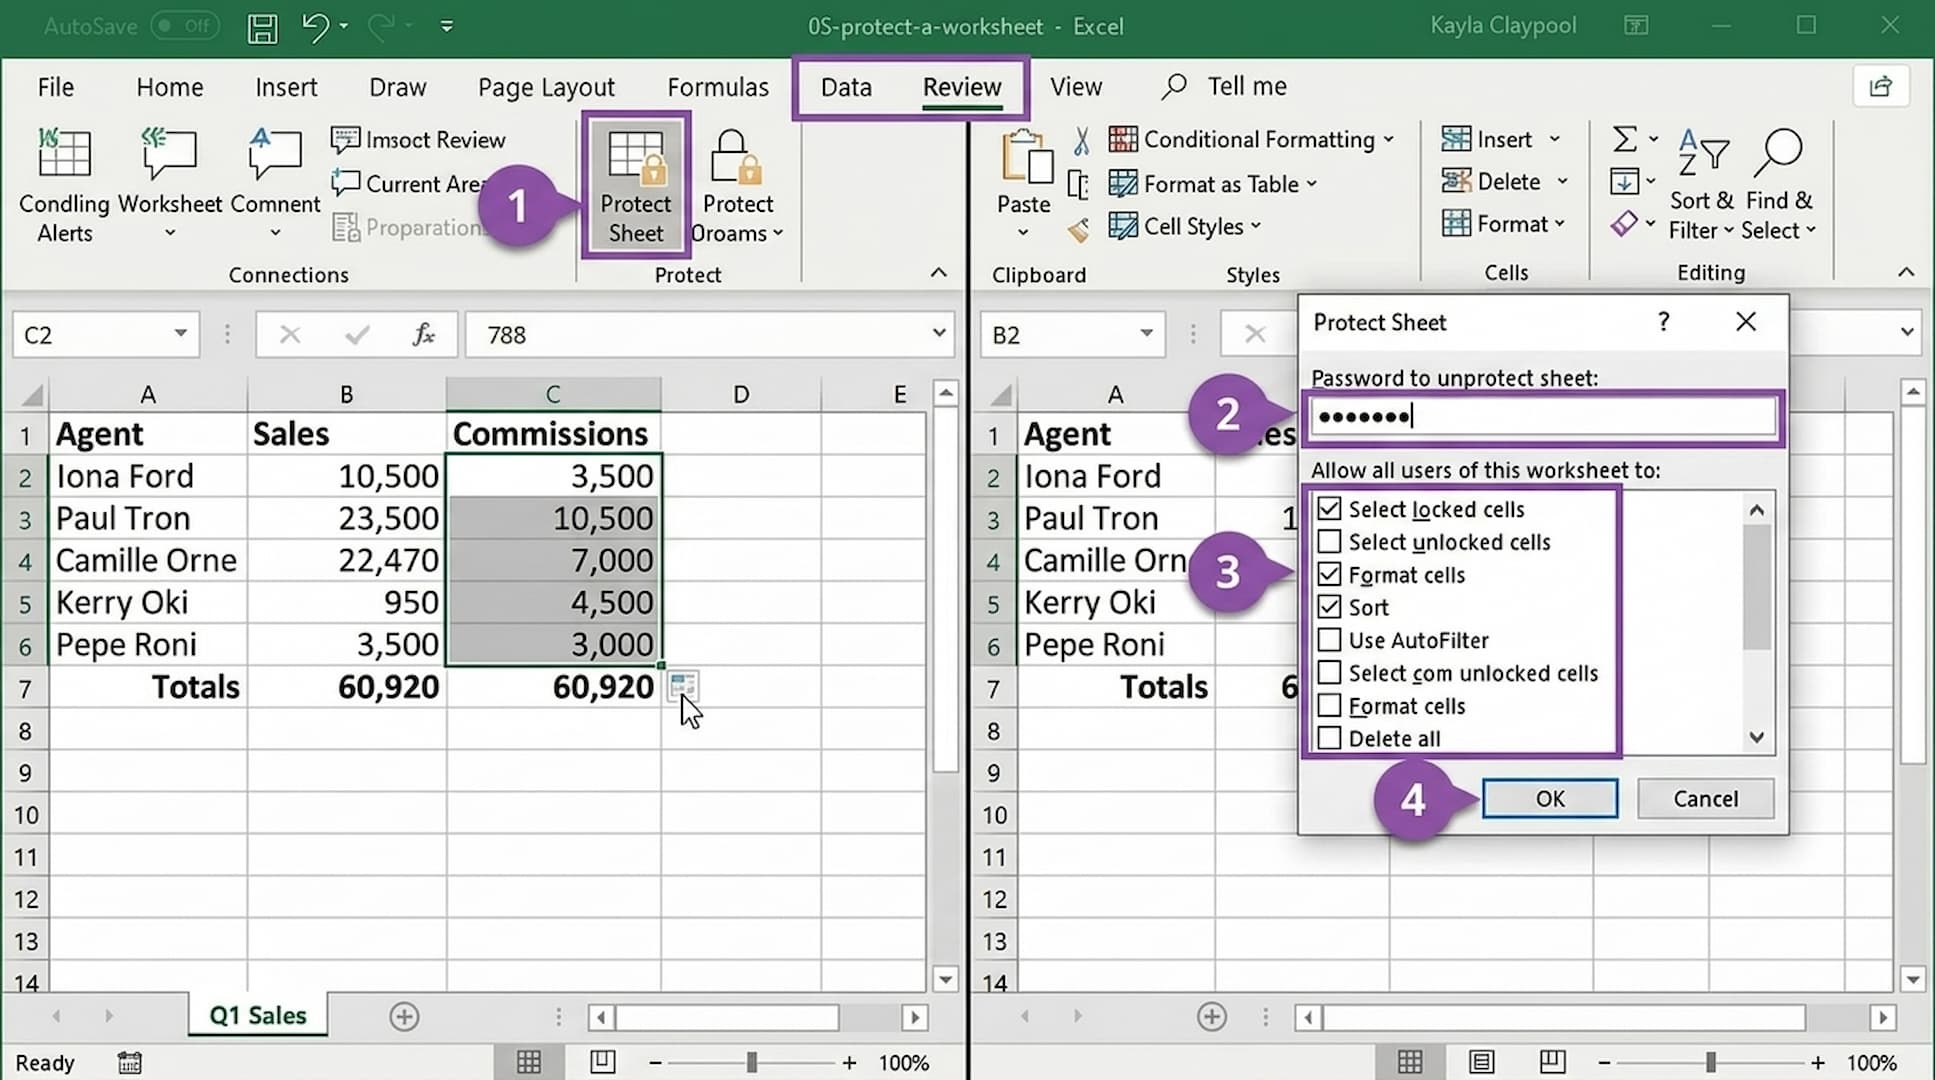
Adding a password is optional, but it’s the piece most people actually want when they search how to protect cells in Excel from a coworker or collaborator making changes.
The password gets set during the Protect Sheet step, in the same dialog where you choose which actions to allow, and it’s required any time someone wants to unprotect the sheet and edit the locked cells directly.
It’s worth knowing this isn’t strong security in any real sense, echoing broader guidance on safeguarding data that treats a password as one layer of protection rather than a complete solution.
Microsoft’s own documentation on protection and security states plainly that sheet protection is meant to prevent accidental changes, not to secure sensitive data from someone determined to get around it.
How to Unlock Cells In Excel
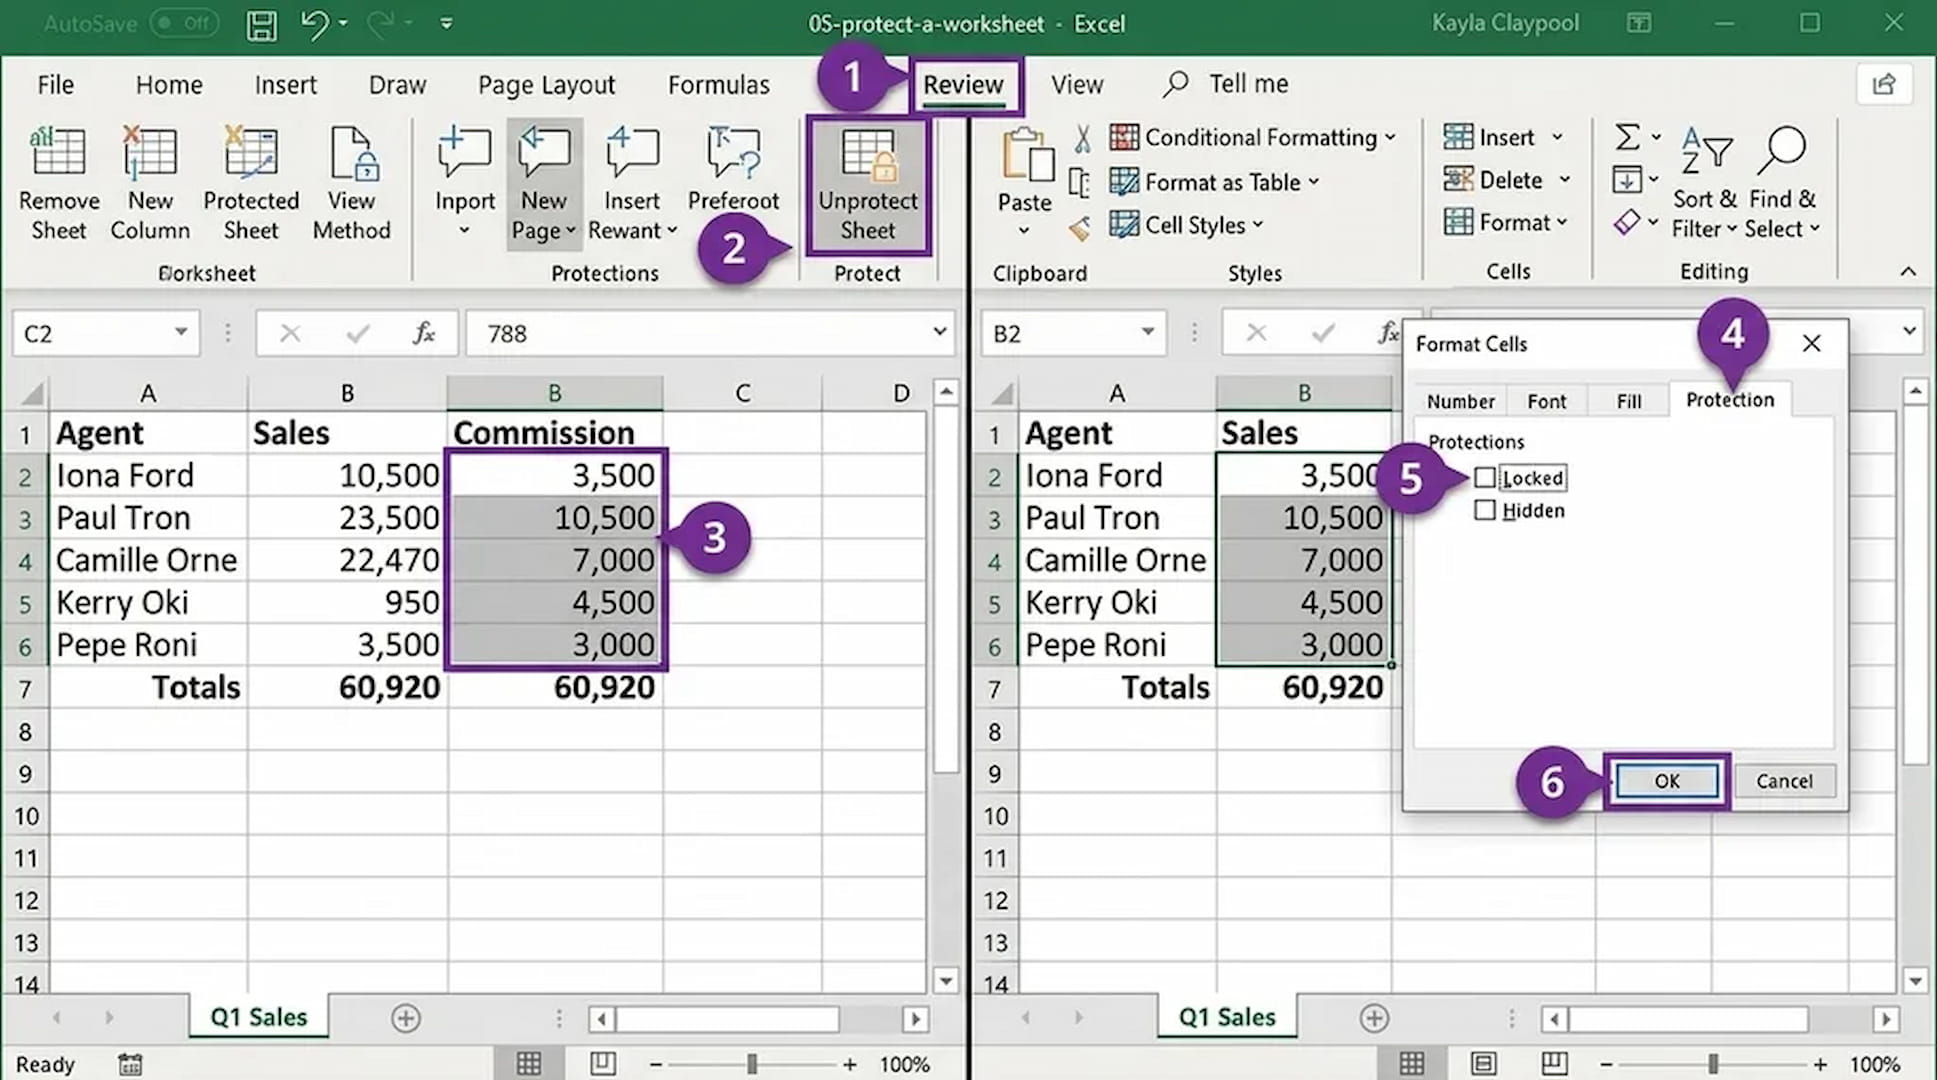
Unlocking cells is useful when a protected worksheet needs specific areas available for editing again, much like maintaining stronger password habits over time.
This allows users to update selected fields while keeping other important sections protected. Follow these steps to unlock cells in Excel:
- Remove Worksheet Protection: Open the protected worksheet, go to the Review tab, select Unprotect Sheet, and enter the password if one was added.
- Select The Cells You Want to Unlock: Highlight the cells that should become editable, such as input fields or sections where users need to make updates.
- Change The Cell Protection Setting: Right-click the selected cells, choose Format Cells, open the Protection tab, and remove the checkmark from Locked.
- Enable Protection Again: Turn worksheet protection back on to keep other cells protected while allowing edits in the unlocked areas.
Unlocking cells gives flexibility when updating protected worksheets. By changing only the required areas, users can maintain protection for important data while keeping necessary sections available for editing.
How to Lock Cells in Excel Without Protecting the Entire Sheet
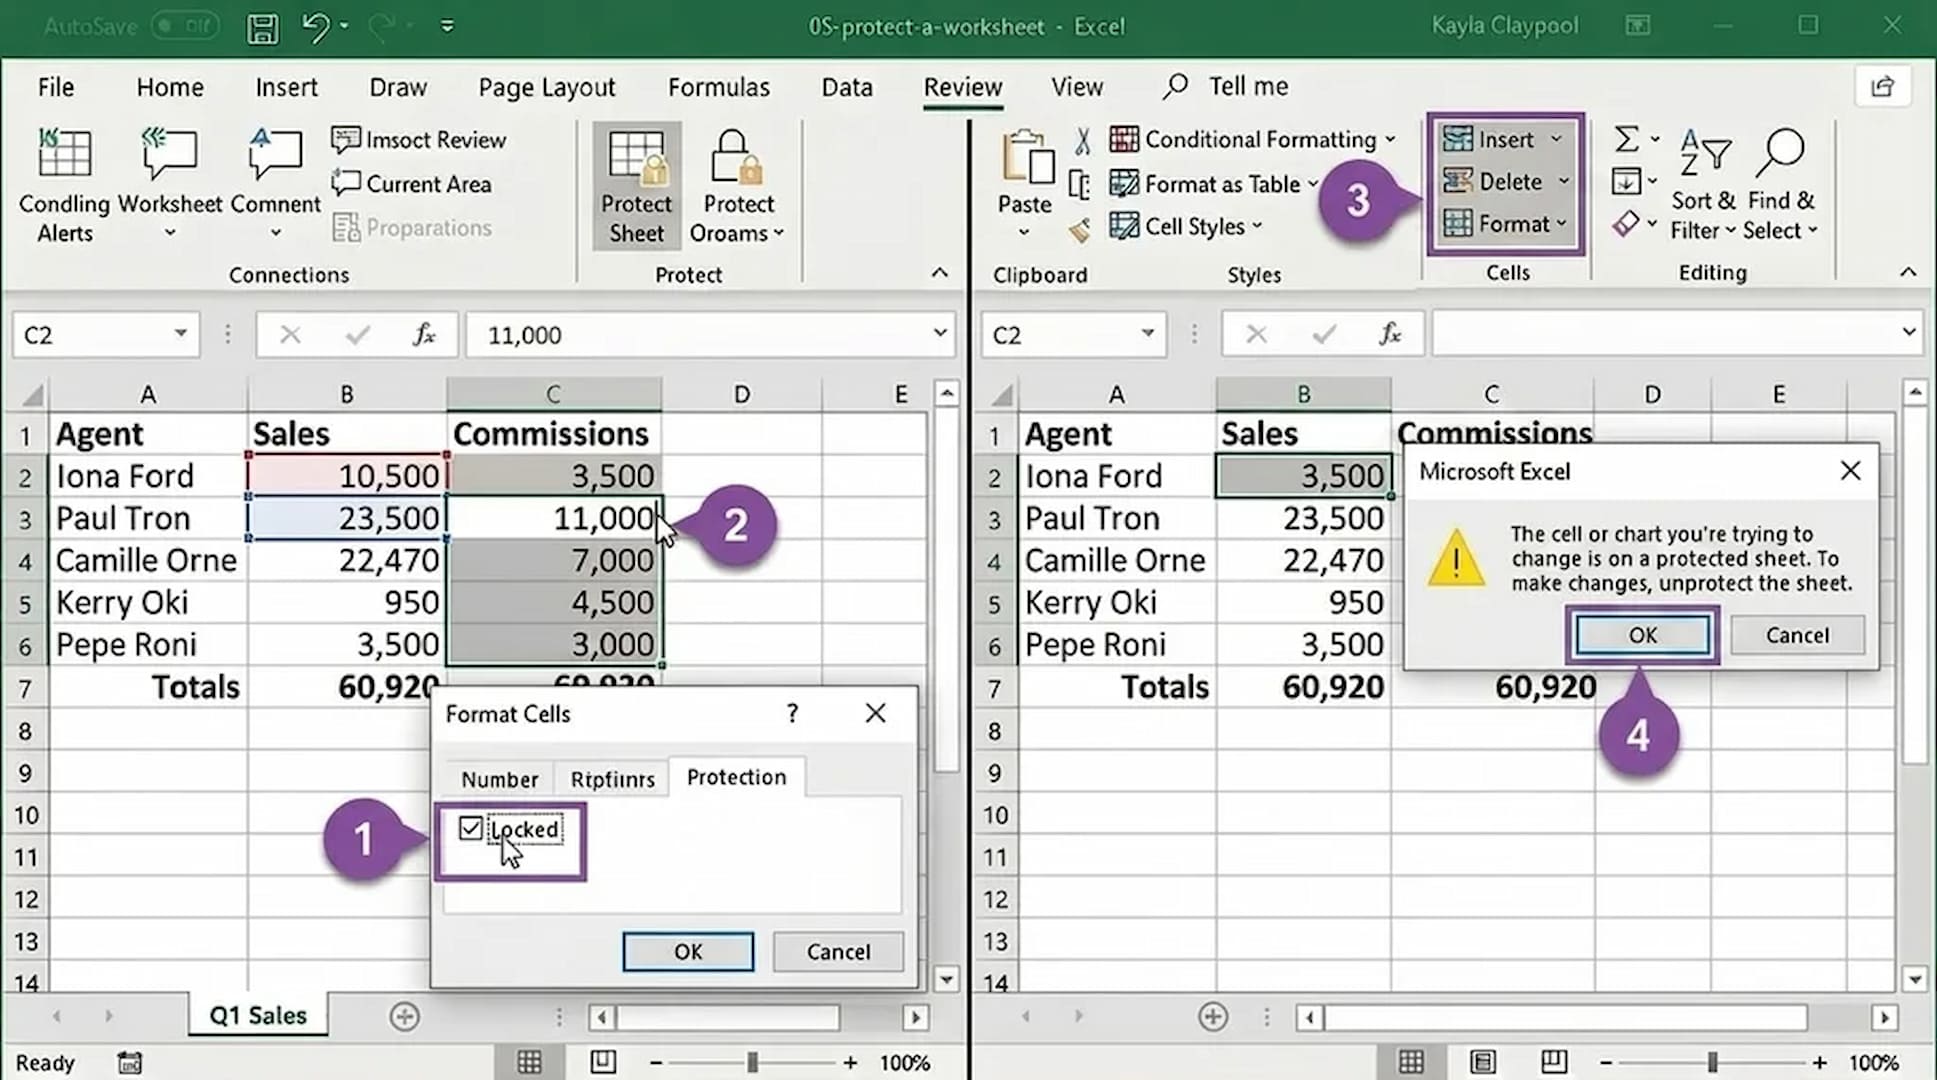
Excel does not apply cell locking by itself because the Locked setting only takes effect after worksheet protection is enabled.
This means users cannot truly restrict editing of specific cells while leaving the entire sheet unprotected.
If you do not want to protect the whole worksheet, consider alternatives such as limiting file access, sharing a read-only copy, or following a general guide to protecting information.
For regular spreadsheet protection, combining locked cells with worksheet protection remains the most reliable option.
Tip: Before sharing an Excel file, test the protection settings using a copy of the worksheet. This helps confirm that users can edit the intended areas without changing important formulas or data.
Cell Locking vs. Freeze Panes vs. Data Validation: Key Differences
These three features get confused constantly because they all sound like they control what users can do with a cell, in the same way basic tips for creating passwords often get mixed up with broader security steps, but they solve completely different problems.
| Feature | What It Actually Does | Common Mix-Up |
|---|---|---|
| Cell Locking | Prevents editing once the sheet is protected | Confused with just checking “Locked” alone |
| Freeze Panes | Keeps rows or columns visible while scrolling | Mistaken for locking cells from editing |
| Data Validation | Restricts what values can be typed into a cell | Assumed to block editing entirely, it doesn’t |
None of these three features overlap in function, so using the wrong one is usually why a spreadsheet doesn’t behave the way someone expected.
Common Mistakes that Make Cell Locking Not Work
Common Excel cell locking issues usually happen because of simple setup mistakes. The table below highlights frequent problems and quick fixes to ensure protection works correctly.
| Common Mistake | Why It Happens | Quick Fix |
|---|---|---|
| Locking cells without protecting the sheet | Locked settings stay inactive without worksheet protection | Enable Protect Sheet after selecting locked cells |
| Forgetting to unlock editable areas | The entire worksheet becomes restricted | Unlock cells users need to edit before protection |
| Losing the protection password | Excel does not provide simple password recovery | Keep passwords saved securely or use an earlier file version |
| Protecting before finishing edits | Future changes require repeated unprotecting | Complete updates and formatting before enabling protection |
Checking protection settings before sharing an Excel file helps avoid editing issues and keeps important data protected while allowing required updates.
Best Practices When Protecting Excel Cells
A protected worksheet should prevent mistakes without making normal work difficult.
Follow these practices:
- Lock only important cells that need protection.
- Keep editable areas clearly marked.
- Test protection settings before sharing the file.
- Keep a backup copy before applying major protection changes.
- Store passwords securely.
- Review user permissions before sharing.
Good protection settings make shared spreadsheets easier to manage and reduce accidental changes.
Final Thoughts
Once you understand that every cell starts locked by default, learning how to lock cells in Excel really comes down to one sequence: unlock everything, relock just what matters, then protect the sheet.
The same logic applies to figuring out how to protect cells in Excel from accidental edits, or setting up a shared workbook where only certain people can touch specific ranges.
Skipping the unlock-first step is the single most common reason this setup doesn’t work as expected.
Try it on a copy of your actual worksheet first, confirm the right cells stay editable, and only then apply it to the version you plan to share.
Frequently Asked Questions
Can Locked Cells Still Be Copied or Viewed?
Yes. Locking a cell only prevents editing once the sheet is protected; it doesn’t stop anyone from selecting, viewing, or copying the cell’s contents.
Does Locking Cells Work in Google Sheets the Same Way?
Not exactly. Google Sheets uses its own separate protection system under Data > Protect Sheets and Ranges, and the two aren’t interchangeable if you’re switching between platforms.
What Happens If You Forget the Sheet Protection Password?
In most cases, there’s no built-in recovery option, and you’d need third-party password-removal tools or to rebuild the sheet’s protection from scratch.