Not every good photo survives a bad background. You can nail the lighting and the pose and still end up with something unusable because a trash can or a stranger’s elbow is sitting right behind the subject.
I have spent enough time nudging a lasso tool around stray hair strands to appreciate when software handles that mess for me.
That is the draw behind learning how to remove the background in Canva well, and Canva’s built-in tool makes it a one-click job.
If you searched BG Remover Canva hoping for a quick, simple fix, this covers exactly that. Here is how to pull backgrounds out of both photos and video inside Canva, plus where the tool struggles and what fixes it.
How Canva Background Removal Works
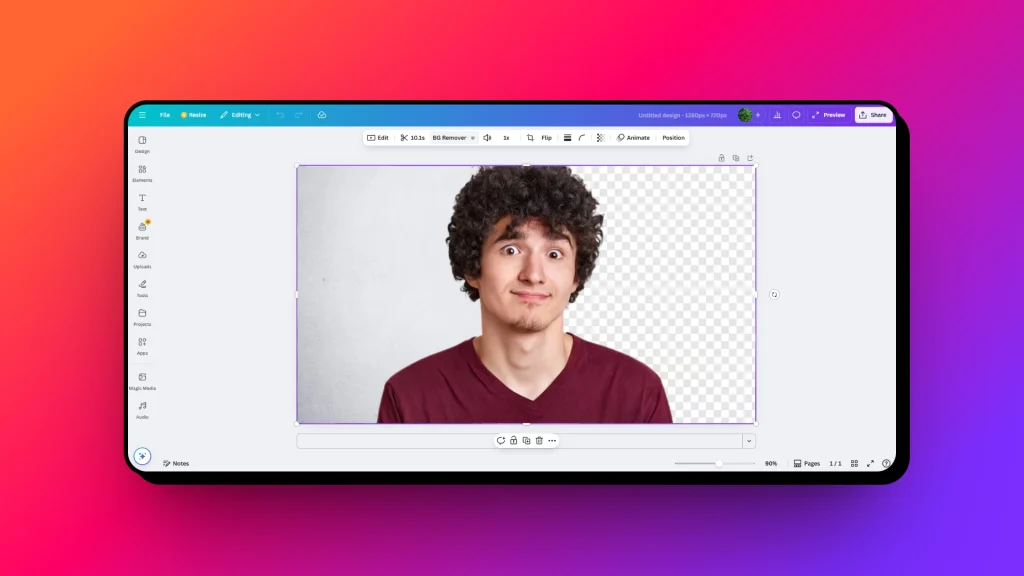
Canva’s background remover uses AI to spot the main subject in a photo or clip and lift it away from everything around it. It’s part of the Background Remover tool built into Canva Pro, and it’s also included with Canva for Teams, Canva for Education, and Canva for Nonprofits. The tool works best on images with a well-lit subject and a background that contrasts clearly against it.
In my own use, it handles product shots and simple portraits well, and it starts to struggle wherever the edges get complicated- think flyaway hair, sheer fabric, or a subject wearing colors close to the background.
That’s not the tool being unreliable; it just means the source photo does most of the work before you ever click a button. A sharp, well-lit image with clear separation between subject and background will almost always give you a cleaner cutout than a dim or cluttered one.
How to Remove Background in Canva: Step by Step
Removing a background in Canva only takes a few clicks, but the process changes slightly depending on whether you are editing an image or a video. Follow the steps below to use Canva’s background removal tools correctly.
1. Remove Background from Photos in Canva
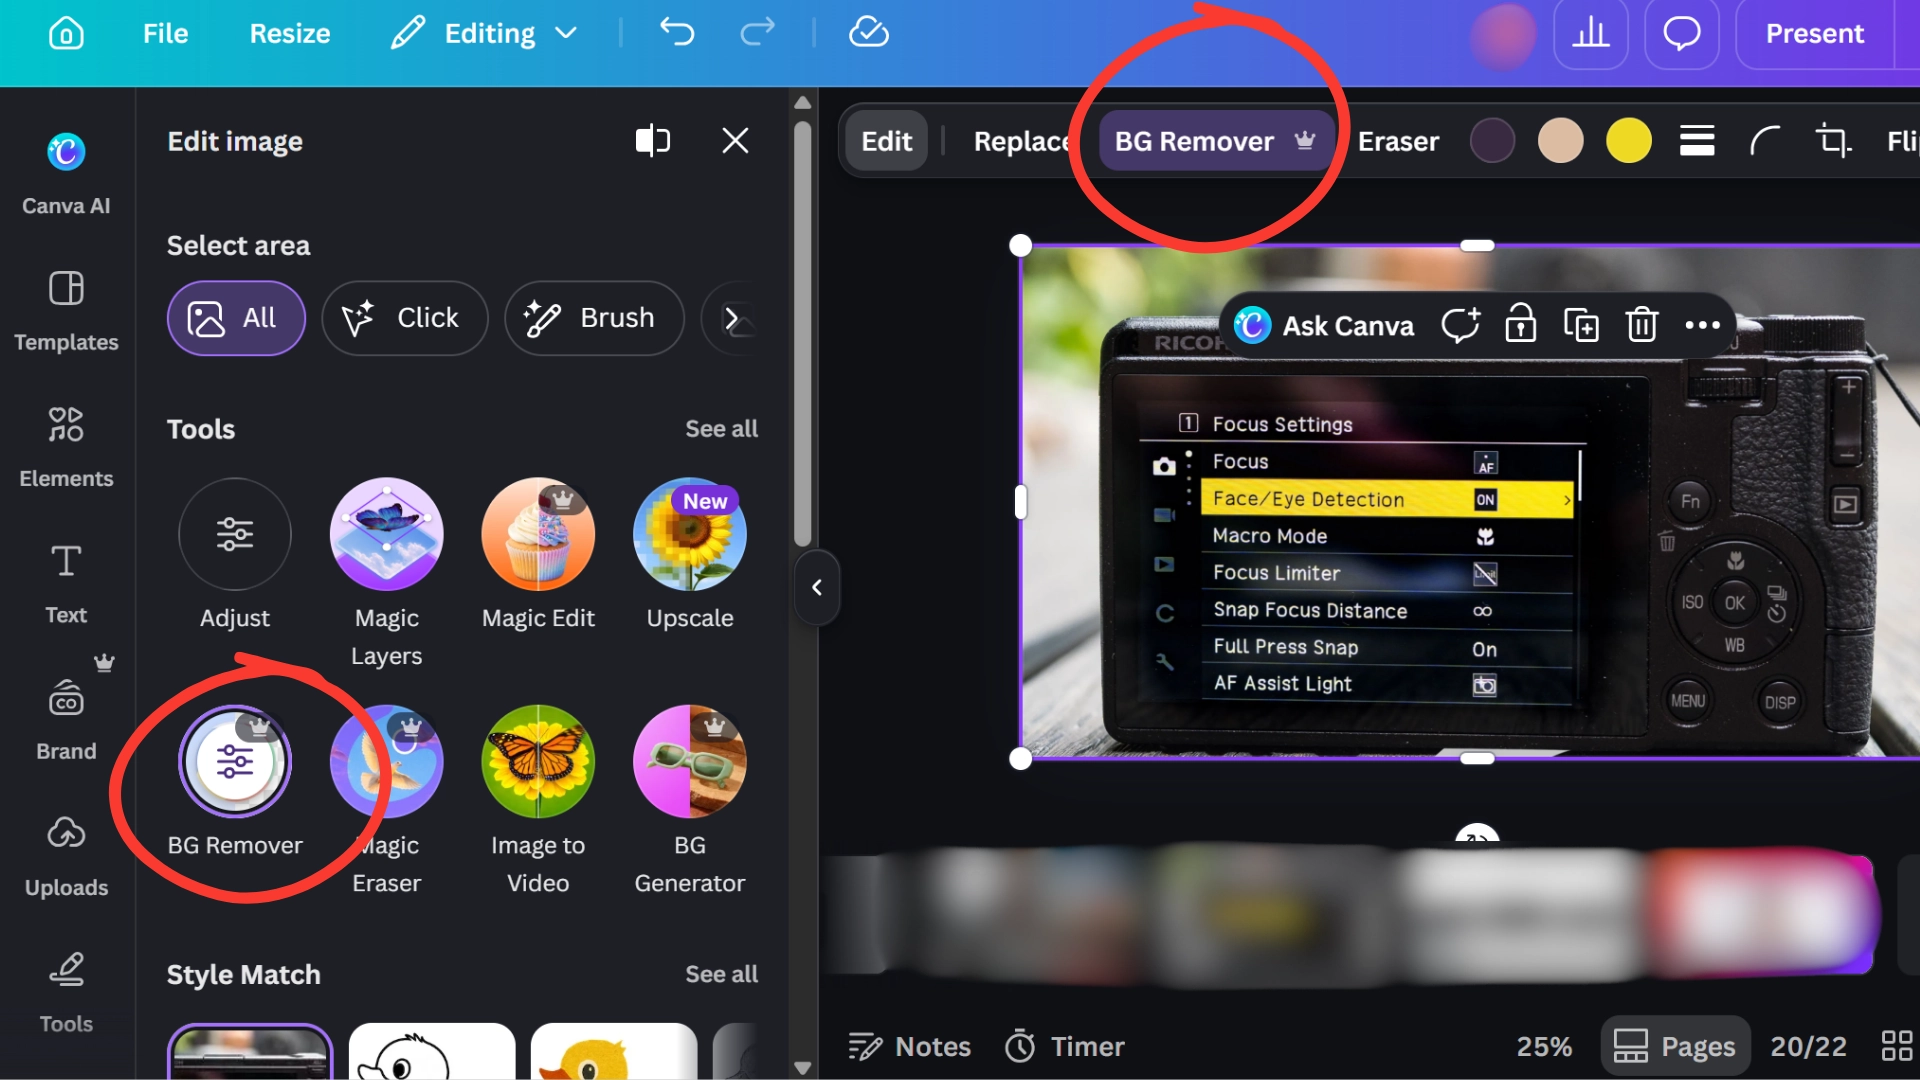
Most people searching for BG Remover Canva want the same thing: a way to swap a busy photo background for something cleaner without opening a separate photo editor.
- Open Canva and select an existing design or start a new one.
- Upload the photo you want to edit.
- Click the image to select it.
- Choose Edit Photo from the toolbar.
- Select BG Remover.
- Wait a few seconds while Canva processes the image.
- Review the cutout and refine the edges if needed.
- Download the finished file.
On the Canva mobile app, the option sits inside the Edit Photo panel rather than a floating toolbar, but the rest of the process is the same.
Once the background is gone, you can place the cutout on a new background, add design elements, or reposition it however the project needs.
2. Remove Background from Video in Canva
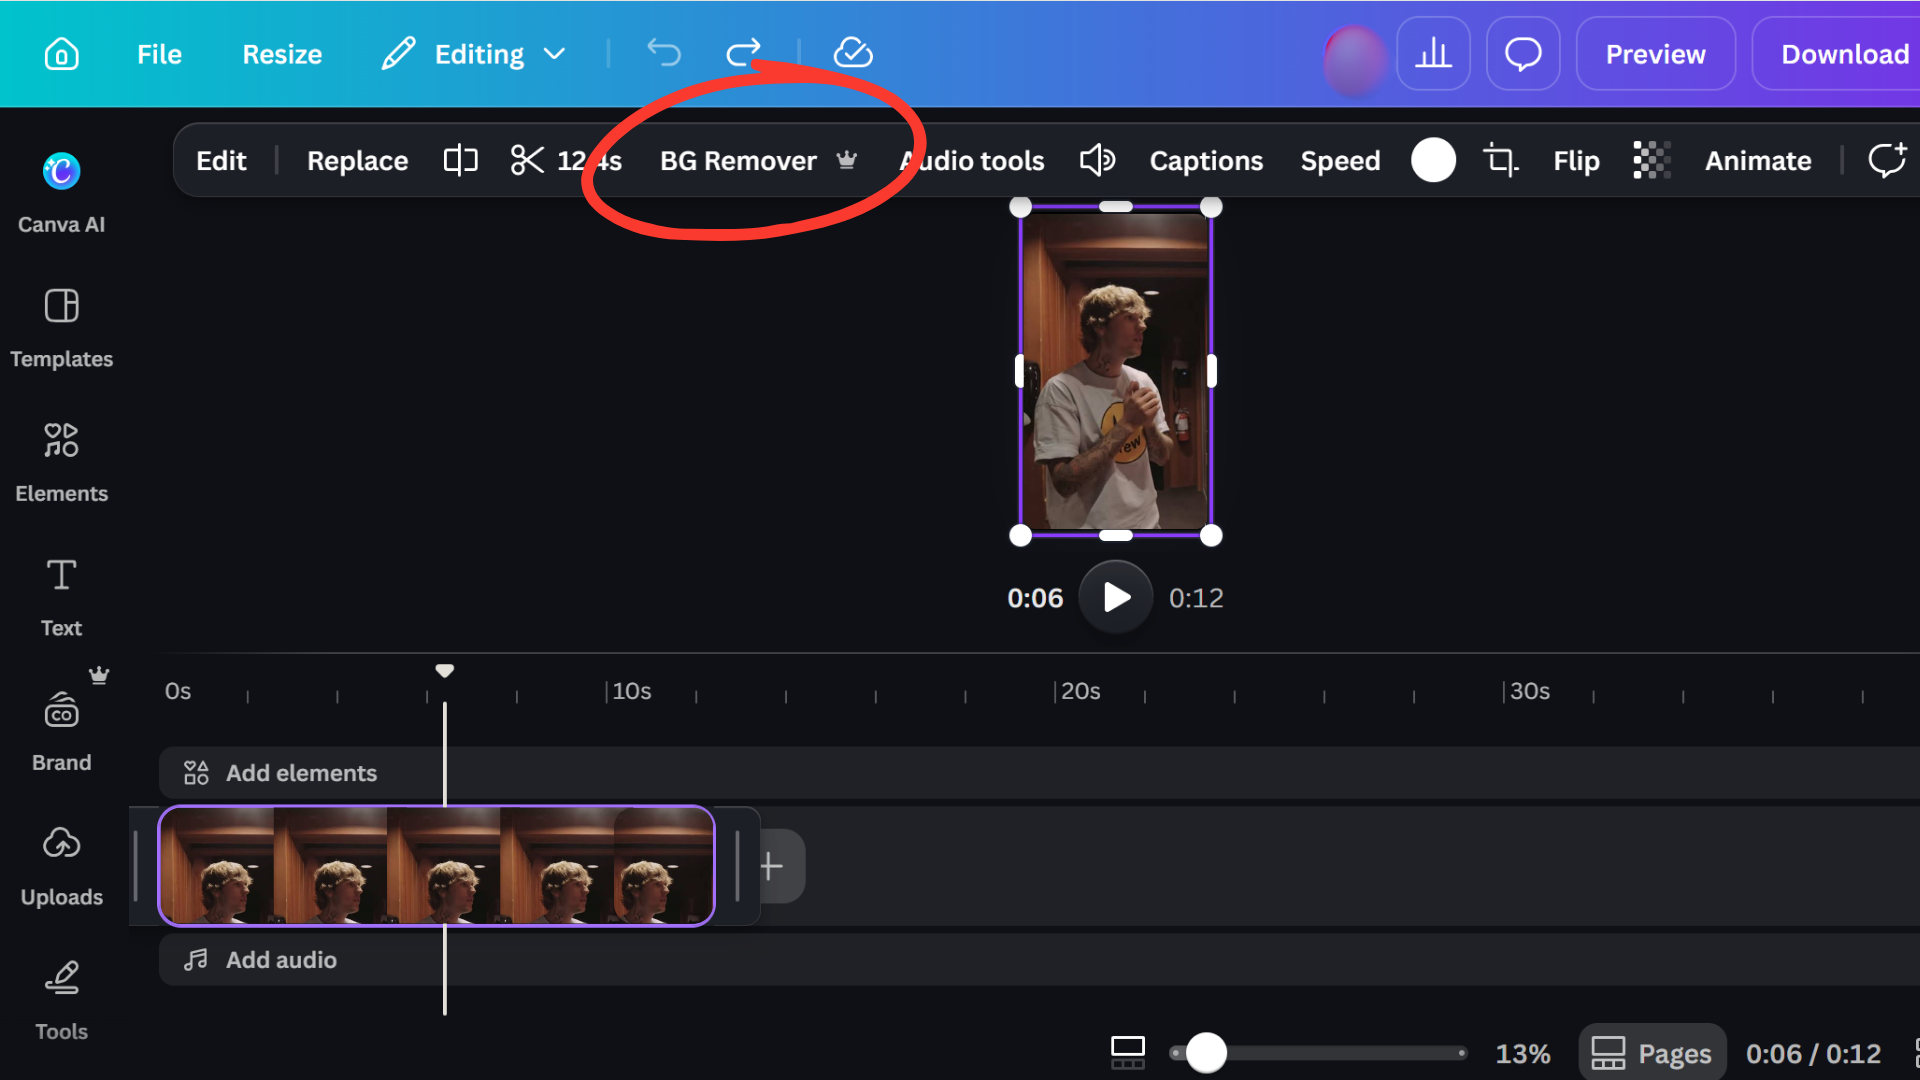
Canva can also remove backgrounds from video clips, which is useful for tutorials, presentations, and short-form content.
- Open Canva and start a video project.
- Upload your video file.
- Select the clip on the timeline.
- Click Edit Video.
- Choose Background Remover.
- Let Canva process the clip.
- Add a new image, color, or video behind the subject.
Video backgrounds are pickier than photos. Steady footage, even lighting, and a subject who isn’t moving in and out of frame all lead to a cleaner result. Shaky or dim clips are the most common reason a cutout looks inconsistent from one frame to the next.
Tips for Cleaner Background Removal Results
A handful of things affect how clean a cutout turns out, whether you’re using Canva or any other AI background remover.
- Contrast: the subject and background should differ enough in color and brightness that the edge between them is obvious.
- Lighting: even, diffused lighting reduces the shadows that AI tools sometimes mistake for part of the background.
- Resolution: a higher-resolution original gives the tool more detail to work with, especially around hair and fine edges.
- Edge complexity: hair, fur, sheer fabric, and patterned backgrounds are the hardest cases for any automatic tool, Canva included.
In my experience, the single biggest improvement isn’t fixing a bad cutout after the fact; it’s retaking the photo against a plain background in better light. Ten extra seconds at the camera saves ten minutes of manual erasing later.
Best Ways to Use Canva’s Background Remover
Background removal is most useful anywhere a busy or inconsistent background pulls attention away from the subject. Common uses include:
- Product photos for online stores and marketplaces
- YouTube and blog thumbnails
- Social media graphics
- Presentation slides
- Profile pictures and headshots
- Flyers and marketing materials
A few examples of how this plays out: an online seller can pull a product out of a cluttered stockroom photo and drop it onto a clean, on-brand background.
A real estate agent can remove a distracting background from a headshot before adding it to a listing flyer. A teacher can lift a diagram out of a photographed worksheet to reuse it cleanly in a slide deck. In each case, the point isn’t the removal itself, it’s what the clean cutout lets you build afterward.
Canva Background Removal Problems and Fixes
Automatic background removal can save time, but some images and videos may need extra adjustments. Understanding common issues helps users improve their final designs.
|
Problem |
Why It Happens |
Fix |
|---|---|---|
|
Hair or fine details look uneven |
AI struggles to trace very fine or wispy edges |
Use a clearer source image and refine edges manually |
|
Background pieces remain around the subject |
The tool can miss areas too close in color to the subject |
Use Canva’s erase and restore brushes to clean up leftover pixels |
|
Background Remover option isn’t showing up |
It’s a Pro-only feature; free accounts won’t see it |
Confirm your plan, or start a Pro trial to access it |
|
Transparent PNG looks solid or shows a background |
Wrong export settings |
Export as PNG with transparent background enabled |
|
Video cutout flickers between frames |
Uneven lighting or a moving subject makes frame-by-frame detection inconsistent |
Use steadier, evenly lit footage, or trim to the calmest section of the clip |
How to Save a Transparent Background in Canva
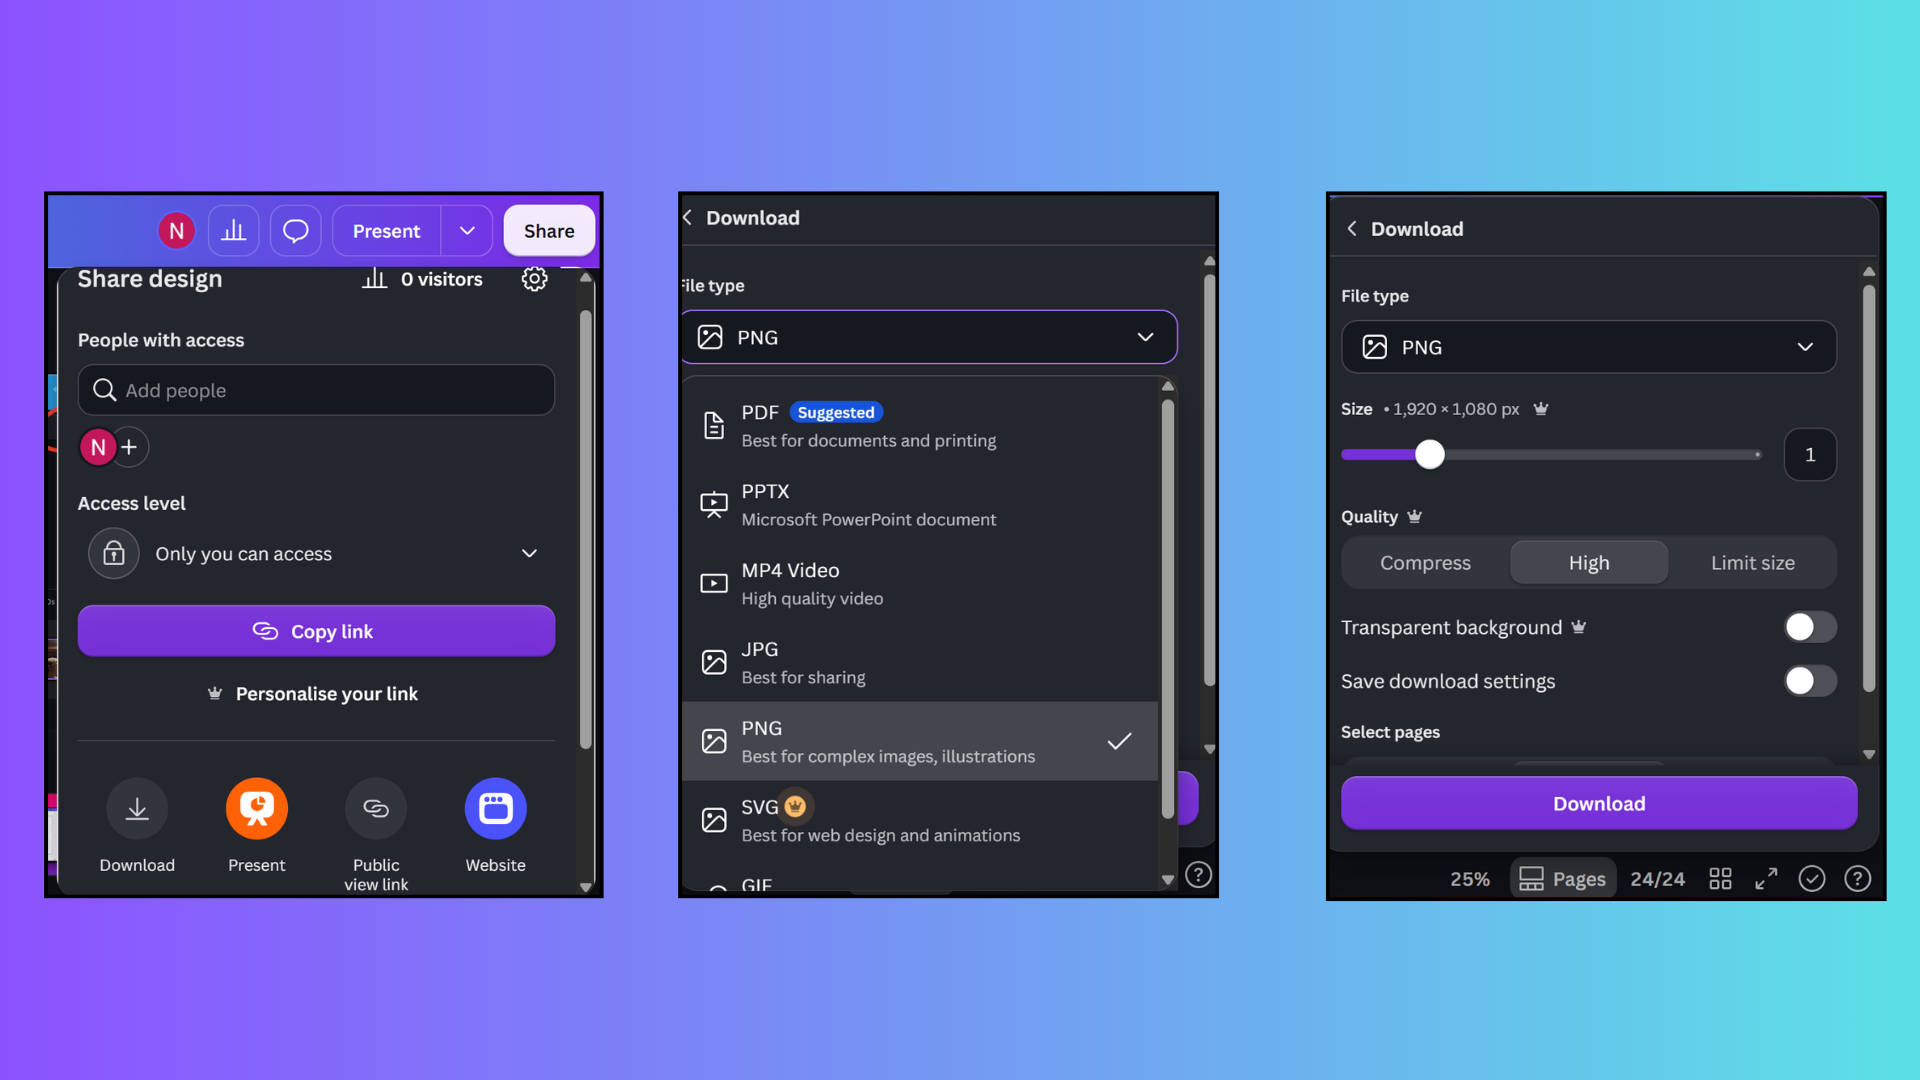
Removing the background only solves half the problem; the export settings decide whether the transparency actually holds once you download the file.
|
File Format |
Best Use |
|---|---|
|
PNG |
Logos, product cutouts, overlays, transparent designs |
|
JPG |
Regular images without transparent backgrounds |
To save a transparent image:
- Click Share
- Select Download
- Choose PNG
- Enable transparent background settings if available
- Download the file
PNG files are useful when the image needs to be placed over different designs without showing a solid background.
Canva Background Remover Alternatives
Some people need another option, either because they’re on Canva’s free plan or because a specific image needs edge detail Canva doesn’t quite catch. These fill that gap:
- Remove.bg: fast, automatic cutouts, good for a single quick edit
- Photoroom: built around product and ecommerce photos
- Fotor: simple background edits and basic adjustments
- Pixelcut: mobile-first, aimed at product photos and marketing graphics
If you use one of these, the usual workflow is to remove the background externally, then bring the finished cutout back into Canva for layout and design.
For a closer look at how Canva stacks up against these tools on price and accuracy, see our full comparison of background remover apps.
Canva Background Remover: Free vs Pro
Background Remover is a Canva Pro feature. It isn’t part of the free plan. It comes with these plans specifically:
- Canva Pro, the paid individual plan.
- Canva for Teams
- Canva for Education, free for eligible teachers and students
- Canva for Nonprofits, free for eligible organizations
If you’re on the free plan and don’t qualify for one of the free education or nonprofit tiers above, your options are a Canva Pro trial or one of the external tools listed above, used as a workaround before you bring the image back into Canva for layout.
Final Takeaway
Removing a background well comes down to two things: a clean starting photo and picking the right export settings once the cutout is done.
Canva’s tools handle both photos and video without needing a separate editor, and the fixes for common issues- patchy edges, leftover color, low resolution- are usually quick once you know where to look.
Even if you’re prepping product photos, cleaning up a portrait, or wondering if BG Remover Canva is worth a Pro upgrade, the short answer is that it earns its place for anyone editing images regularly.
That covers how to remove the background in Canva. Try it on your next project, and drop a comment if you hit an edge case this did not cover.
Frequently Asked Questions
Can I Remove the Background from More than One Image at Once in Canva?
Canva processes background removal one image at a time. There’s no native batch option, so working through several images means repeating the steps for each one.
Does Removing the Background Lower Image Quality?
Not on its own; the cutout keeps the resolution of your original file. Quality loss usually comes from starting with a low-resolution photo or from heavy manual erasing around the edges afterward.
Can I Use Background Remover from The Canva Mobile App?
Yes, it works the same way on mobile. You’ll find it inside the Edit Photo panel rather than a floating toolbar above the image.
Will Canva Keep My Original Photo After I Remove the Background?
Yes, Canva edits non-destructively, so your original upload stays available. You can undo the change or re-upload the source file if you need the unedited version.