Every iPad has its own screenshot shortcut, and getting it wrong costs you the exact moment you were trying to capture. On most models, it’s a quick press of the Top button and the volume button at the same time.
Older iPads with a Home button use Top plus Home instead. Press both, release fast, and a flash on screen tells you it worked. That’s just the start.
There’s also a way to capture screenshots without pressing any buttons at all, what to try when the shortcut refuses to cooperate, exactly where those screenshots get saved on your device, and a simple method for capturing an entire scrolling webpage in a single, clean image.
Know Your iPad Before You Start
Not every iPad works the same way, and that’s exactly why so many people get stuck trying random button combos that simply don’t apply to their device.
Apple has changed the screenshot method over the years, mainly because newer iPads dropped the physical Home button in favor of Face ID and a slimmer design.
Many people also use these newer iPad Pro models as laptop alternatives for work and creative tasks. That single design change is the reason two different methods exist today.
Before trying anything, it helps to take a quick look at your iPad. If there’s a round button below the screen, you’ll follow one method.
If the front is completely screen with no button at all, you’ll follow a different one. Once that’s clear, the rest becomes simple.
How to Screenshot on an iPad with a Home Button
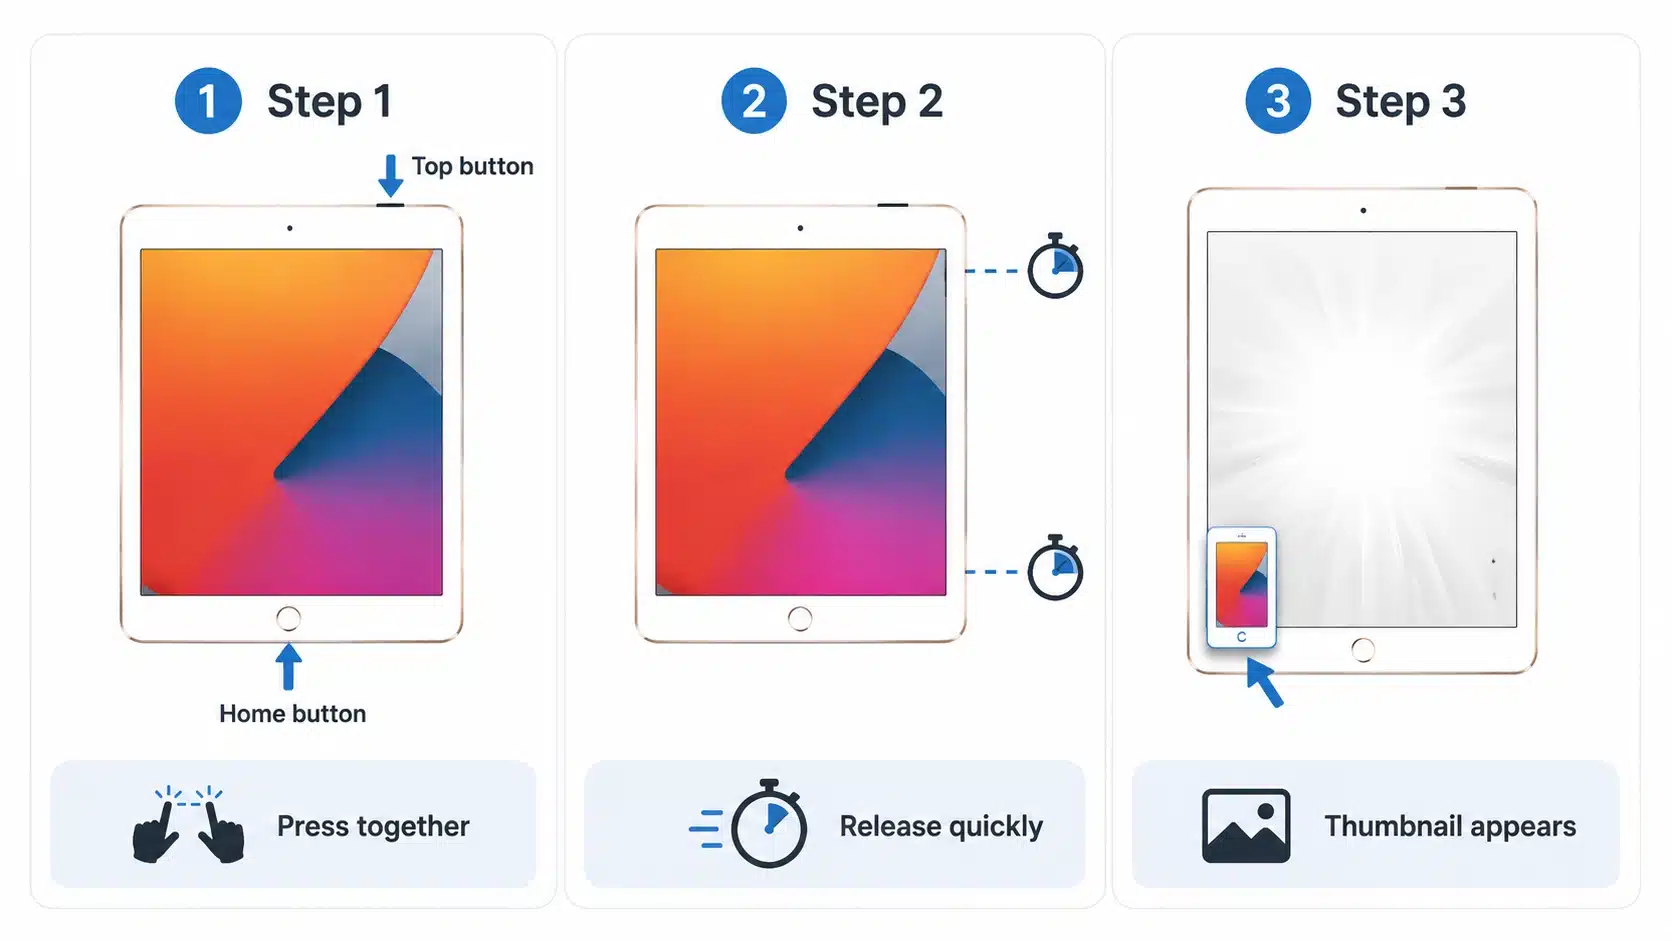
Older iPads that still have a physical Home button use a different screenshot combo than newer models. Instead of relying on Volume buttons, these devices pair the Top button with the Home button for the capture.
1. Press the Top button and the Home button at the same time: Press both together, not one after the other; pressing them in sequence can lock the screen or open Siri instead.
2. Release both quickly: A quick tap works best. Holding too long triggers the power-off slider or Siri instead of a screenshot.
3. The screen flashes, and the thumbnail appears in the corner: A white flash confirms the capture, and a small preview shows up in the bottom-left corner. Tap it to edit or ignore it, and it saves straight to Photos.
That’s all it takes to capture a screenshot on an iPad with a Home button. Once you get the timing down, it becomes second nature and takes barely a second.
Screenshot by iPad Model (Quick Reference)
Not every iPad uses the same button combo, and picking the wrong one can cost you a few tries. Here’s a quick breakdown by model so you can find yours in seconds.
| iPad Model | Home Button? | Button Combo |
| iPad Pro (Face ID models) | No | Top button + Volume Up |
| iPad Air (4th gen and newer) | No | Top button + Volume Up |
| iPad 10 (10th gen) | No | Top button + Volume Up |
| iPad 9 (9th gen) | Yes | Top button + Home button |
| Older iPad / Air / Mini with Home button | Yes | Top button + Home button |
With your model’s exact combo in hand, taking a screenshot becomes a one-step habit. Next up, a few button-free methods for those who prefer not to touch the buttons at all.
Not sure which iPad you have? Open Settings → General → About and look at Model Name. Or just check the front of your device, if there’s a physical Home button, you use the Home button method.
How to Screenshot without Pressing Any Buttons?
Button combos aren’t the only way to grab a screenshot on an iPad. If your hands are full or the buttons feel unreliable, there are a few completely hands-free methods worth trying instead.
1. Using the Apple Pencil
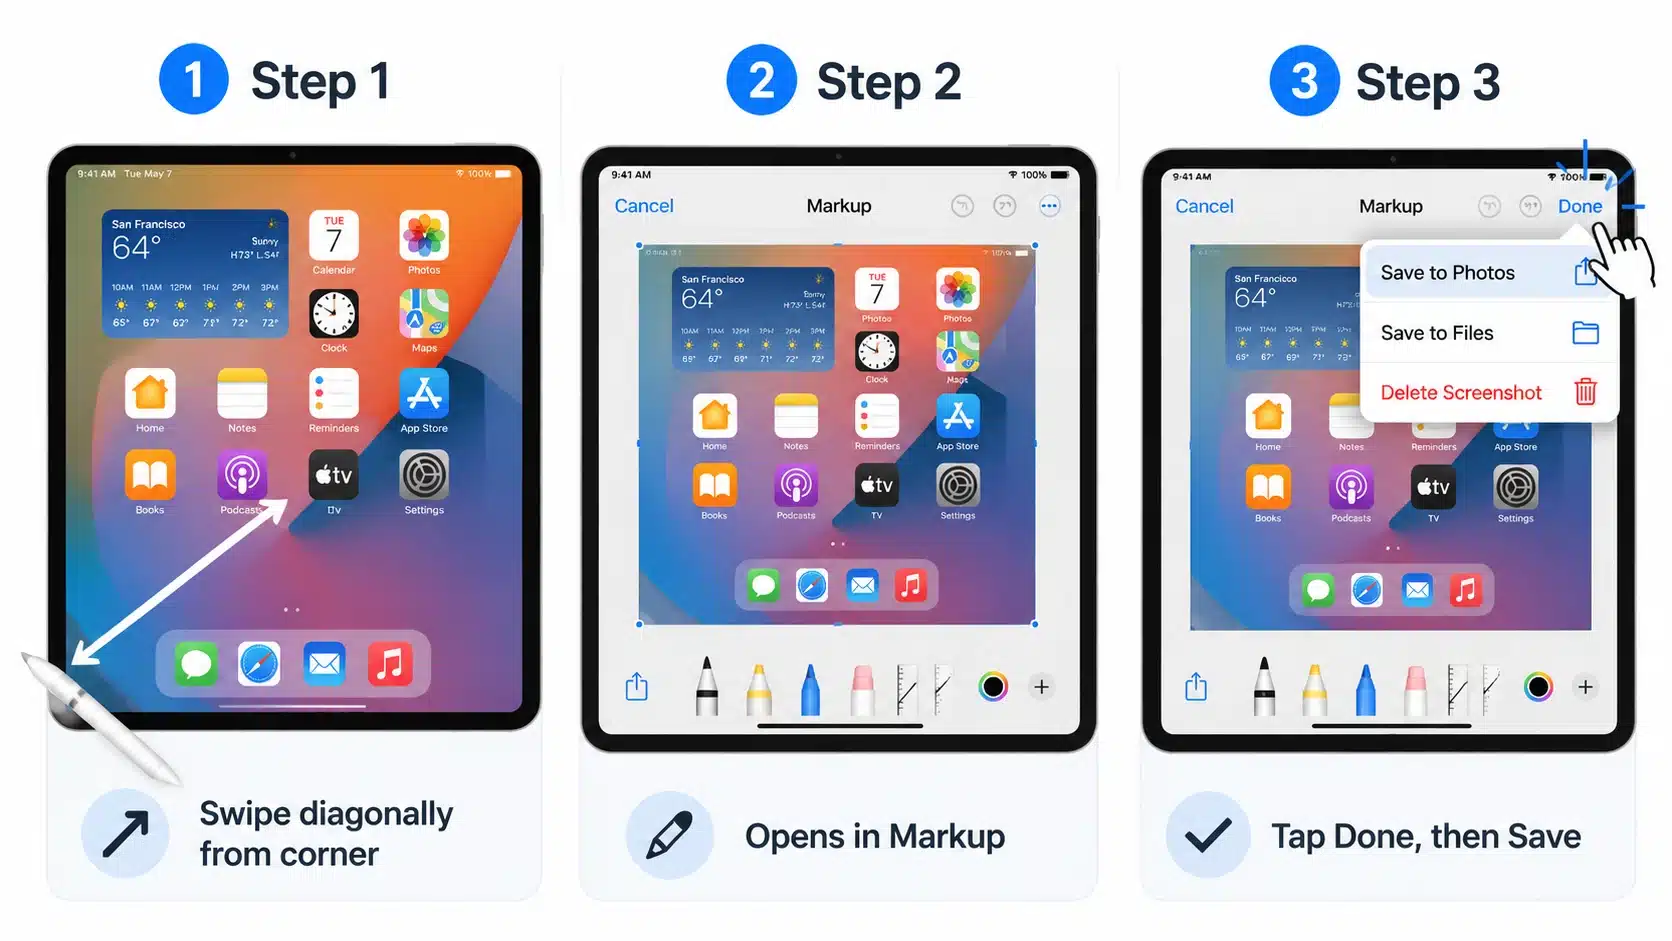
If you own an Apple Pencil, one of the most useful iPad accessories for everyday use, there’s a shortcut that skips the button combo entirely. A simple corner swipe captures the screen and drops you straight into editing mode.
1. Swipe up diagonally from either bottom corner of the screen with the tip of the Pencil: Start the swipe right at the very edge of the bottom-left or bottom-right corner, then drag the Pencil diagonally toward the center.
2. The screenshot opens straight into Markup: As soon as the swipe is complete, the captured image opens automatically in the Markup editor. There’s no extra tap needed to get there, and you can start annotating right away with pen, highlighter, or text tools.
3. Tap Done, then Save to Photos: Once any edits are made, tap Done in the top corner, then choose Save to Photos from the menu that appears. The finished screenshot lands directly in the Photos app, in the Screenshots album.
The Apple Pencil method turns screenshotting into a single fluid motion, no buttons required. Up next, a couple of other button-free options for anyone without a Pencil on hand.
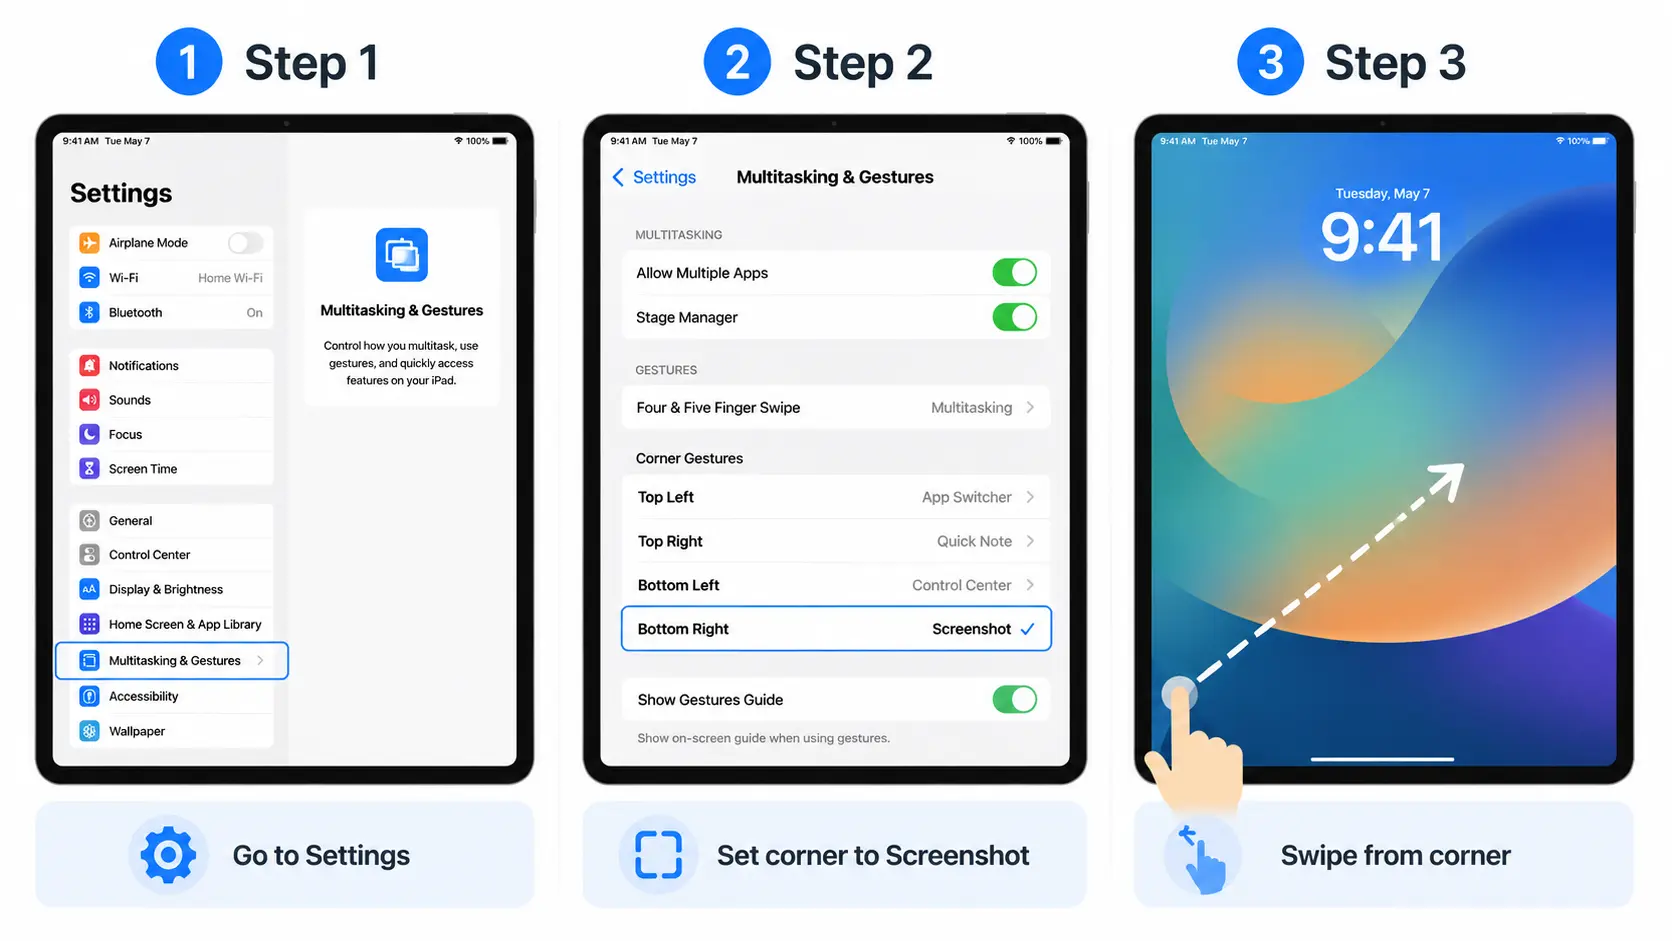
2. Using a Finger Swipe from the Corner
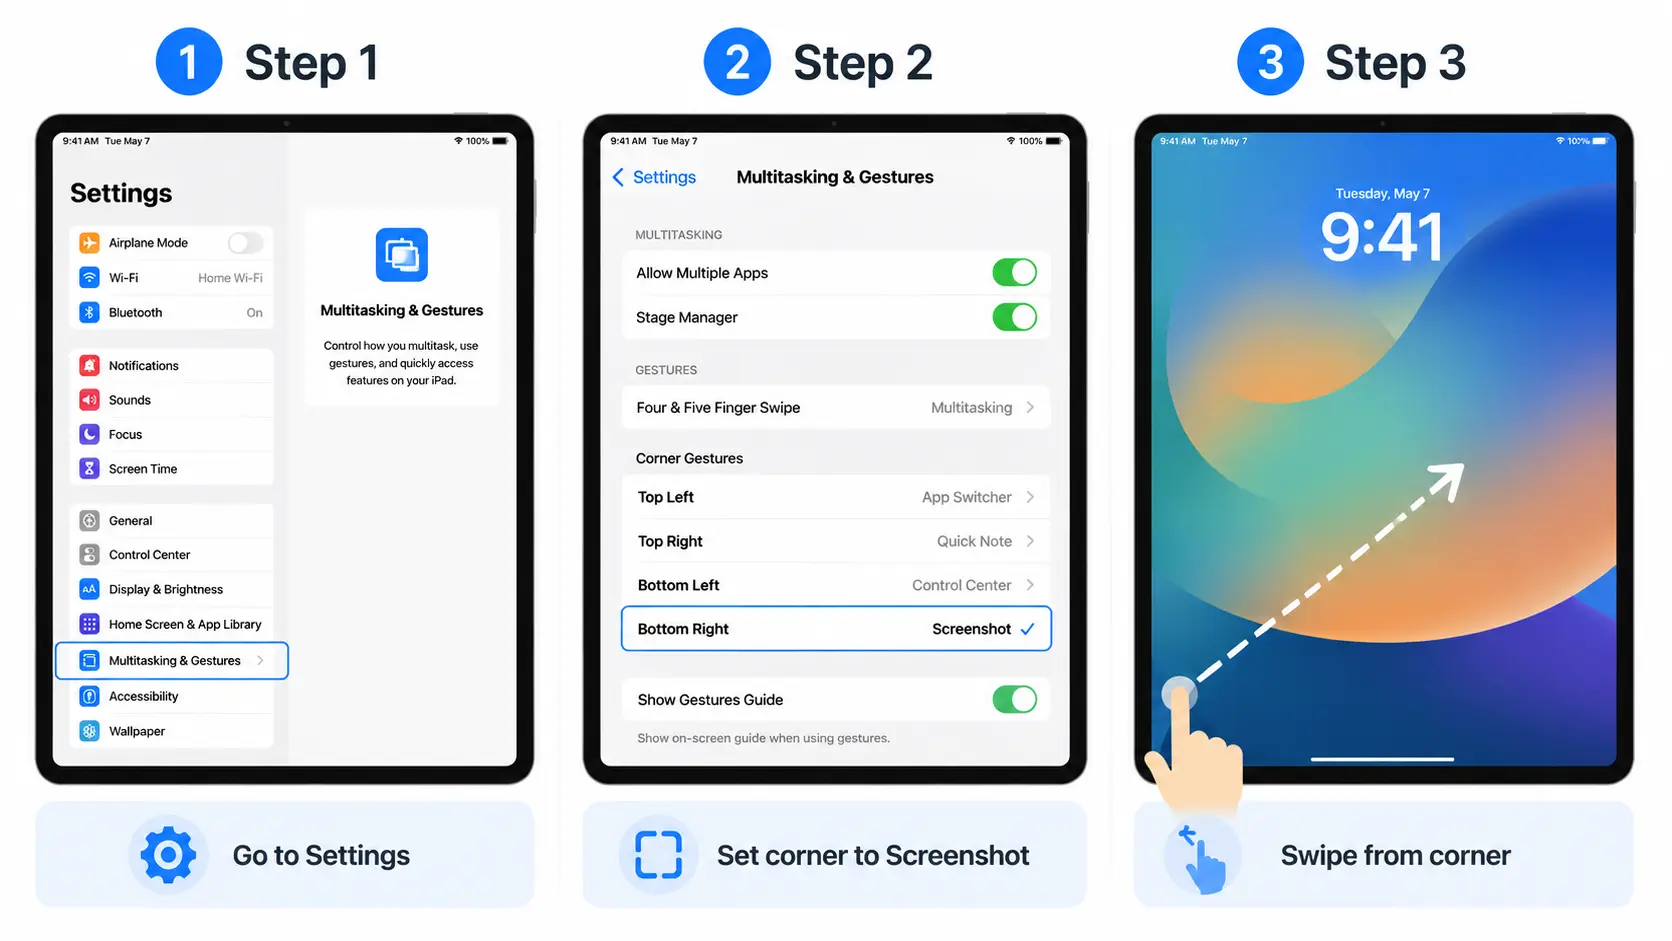
No Apple Pencil? You can set up the same corner-swipe gesture using just a finger once you enable it in settings.
1. Go to Settings → Multitasking & Gestures: Open the Settings app, then navigate to the Multitasking & Gestures menu to find the gesture options.
2. Set a bottom corner to Screenshot: Choose either the bottom-left or bottom-right corner and assign it to the Screenshot action from the list of gesture options.
3. Now swipe up diagonally from that corner with one finger to capture the screen: Once set, a quick diagonal swipe from that corner with a single finger triggers the capture, the same way the Pencil gesture works.
With the gesture enabled, a finger swipe works just as fast as the Pencil method. Next up, one more hands-free trick using Siri or Shortcuts.
3. Using Assistive Touch
When a physical button gets stuck or stops working, Assistive Touch steps in as a reliable on-screen alternative.
1. Go to Settings → Accessibility → Touch → Assistive Touch and turn it on: Head into Accessibility settings, find Assistive Touch under the Touch menu, and toggle it on to bring up a floating button on screen.
2. Tap the floating button that appears on screen: This button stays visible over any app and can be dragged to any edge of the screen for easy access.
3. Tap Device → More → Screenshot: From the menu that pops up, select Device, then More, then Screenshot to capture the screen instantly. This is the go-to workaround when a physical button is stuck or broken.
Between Assistive Touch and Siri, there’s always a button-free way to capture your screen. Next, what to do if none of these methods seem to work at all.
Bonus: voice command: You can also ask Siri to take a screenshot. No buttons, no swipe needed.
How to Capture a Full Webpage (Scrolling Screenshot)?
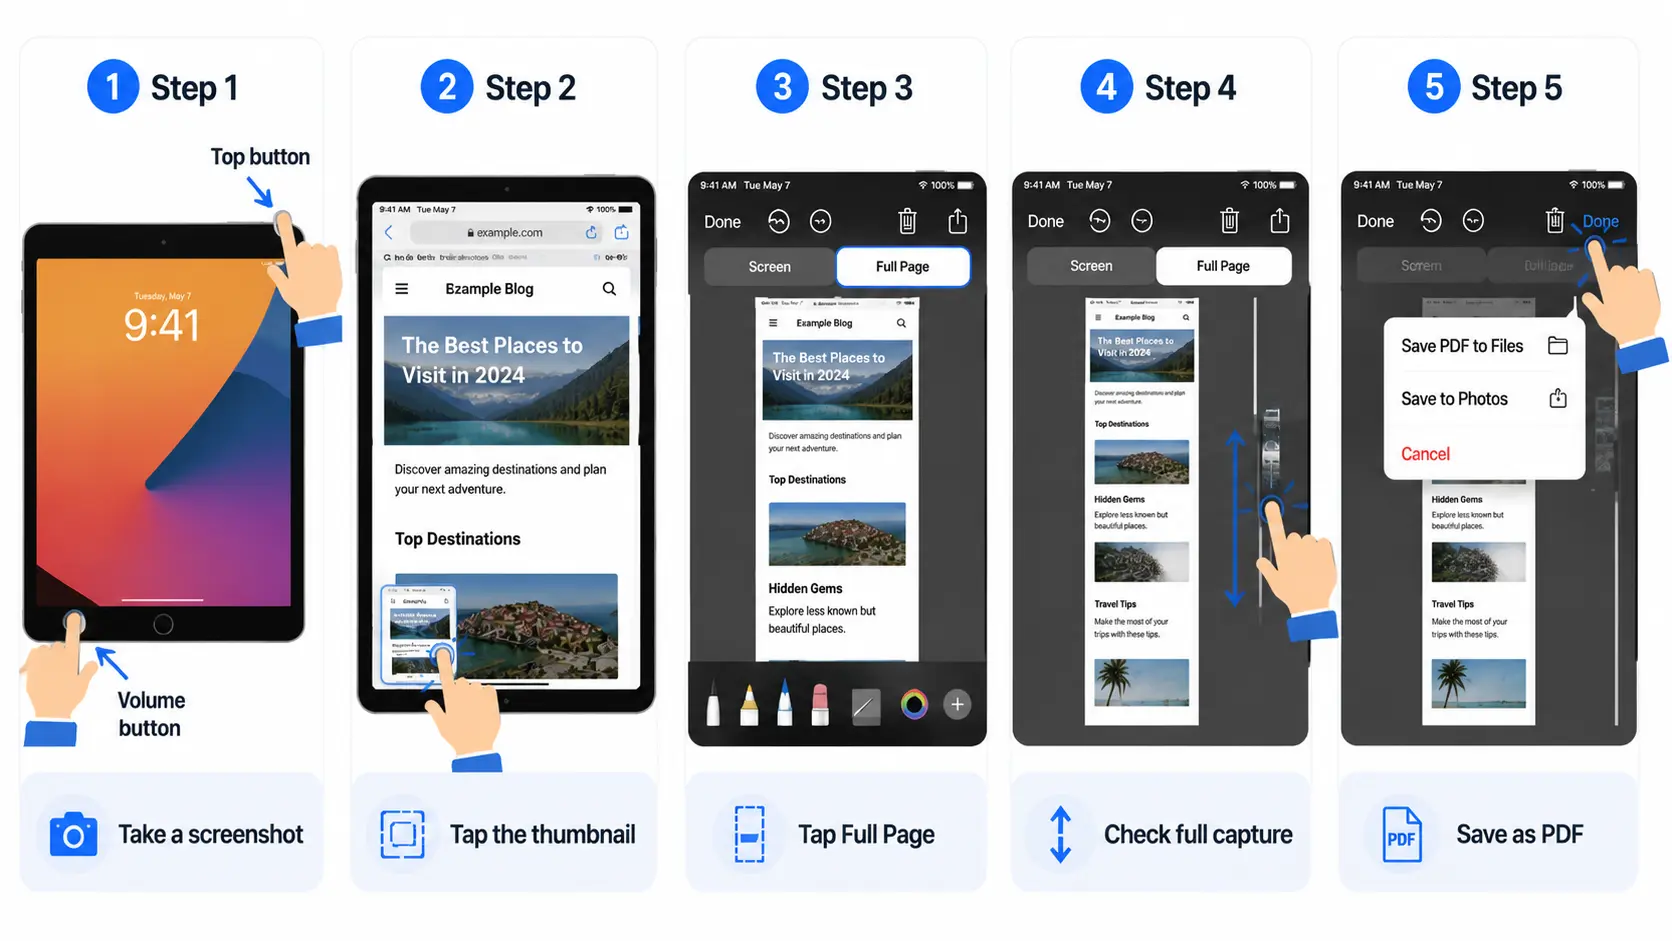
Sometimes a single screen doesn’t cut it, especially with long articles or receipts that stretch beyond view. A full-page scrolling screenshot captures the entire thing in one go.
1. Take a normal screenshot (Top button + Volume button): Start with the standard screenshot combo to capture the visible portion of the page.
2. Tap the thumbnail in the bottom corner: The preview thumbnail appears briefly after capture, tap it to open the editing screen.
3. At the top of the editor, tap Full Page: This option switches from the regular screenshot view to a scrolling capture of the entire page.
4. Drag the scrollbar on the right to check the full capture: Use the scrollbar to preview the whole document and confirm nothing important got cut off.
5. Tap Done → Save PDF to Files, then pick a location: Finish by tapping Done, choosing Save PDF to Files, then selecting a folder to store it in.
Full-page screenshots save as a PDF rather than a photo, which is why they land in the Files app instead of Photos.
That covers every way to capture a screenshot on an iPad, from button combos to full scrolling pages. With these methods on hand, you’re set for whatever needs capturing next.
How to Edit, Crop, and Mark up Your Screenshot?
Capturing the screenshot is just the first step. iPad also gives you built-in tools to crop, annotate, or highlight parts of the image right after taking it.
- Crop: Drag the blue corner handles to keep only the part you want.
- Markup: Use the pen, highlighter, and color tools to draw or write on the image.
- Full Page: Switch to scrolling capture (see above).
With editing and markup covered, your screenshot is ready to share or save exactly how you need it. Next, a look at where all your screenshots actually end up on your device.
Where do iPad Screenshots Go?
After capturing a screenshot, it doesn’t just disappear; it lands in a specific spot on your device depending on the type of capture.
By default, every regular screenshot gets stored directly in the Photos app without needing to save it manually. To find them, simply open Photos, then head to Collections, followed by Media Types, and tap Screenshots to see everyone gathered together in a single dedicated folder.
Full-page screenshots are the exception here, since they save as PDFs rather than images; they don’t appear in Photos at all and show up in the Files app instead.
Knowing exactly where each type lands means you’ll never lose track of a screenshot again, and that wraps up everything needed to capture, edit, and find screenshots on any iPad.
How to Share or Delete a Screenshot?
Once a screenshot has served its purpose, whether that’s sending it to someone or clearing it off your device, iPad makes both actions quick to do from the same place.
Right after capture: Tap the thumbnail, then use the share icon to send it, or the trash icon to delete it on the spot.
Later: Open the Photos app, select the screenshot, and share or delete it from there.
Sharing or deleting a screenshot takes just a couple of taps, keeping your Photos app clutter-free and your screenshots easy to pass along. That brings this whole screenshot walkthrough to a close.
Screenshot Not Working on Your iPad? How to Fix It?
If the button combo does nothing, or the wrong thing happens, here are the common causes and fixes:
- You’re holding the buttons too long: Screenshots need a quick press-and-release. Holding the buttons triggers Siri or the power-off slider instead. Tap and let go fast.
- You’re using the wrong combo for your model: Check the model table above; Home-button iPads use a different combo than newer ones.
- A button is stuck or broken: Use Assistive Touch or the Apple Pencil swipe as a workaround (see the button-free section).
- The iPad is frozen or glitchy: Restart the device, then try again.
- Screenshots seem to save, but you can’t find them: Check Photos → Screenshots and check the Files app for any full-page PDFs.
Still not working? If none of the above helps, a hardware button may need repair. Contact Apple Support or a trusted repair service and use Assistive Touch in the meantime so you can keep capturing your screen.
Final Thoughts
Screenshots feel like a small thing, but once you get comfortable with them, they become one of those tiny skills you use almost every day, saving a receipt, sending proof of a chat, or holding onto something funny before it disappears.
The best part is that iPad gives you more than one way to do it, so you can pick whatever fits how you use your device. Buttons, gestures, or voice- it really comes down to personal preference.
Once you find your go-to method, it sticks with you without much thought, and screenshotting just becomes second nature from here on out.
Frequently asked questions
Can I Use a Magic Keyboard Shortcut for Screenshots?
Yes. If your iPad is connected to a Magic Keyboard or another compatible keyboard, you can press Command + Shift + 3 for a full screenshot or Command + Shift + 4 to capture a selected area, where supported.
Do Screenshots Sync Across Devices Automatically?
Yes, as long as iCloud Photos is enabled and all devices are signed in with the same Apple ID. Screenshots saved to Photos will automatically appear across your synced Apple devices.
Is There a Way to Turn Off the Screenshot Flash Effect?
No. The screenshot flash is part of iPadOS and cannot be turned off through Settings. It briefly confirms that the screenshot was captured successfully and is built into the operating system.