A spreadsheet with cramped headers or repeated labels is hard to read, and it is usually the first thing I clean up when a client hands me a messy budget tracker.
Learning how to merge cells in Google Sheets fixes that layout problem in seconds, but the feature has a catch that trips up more people than you would expect, since it quietly deletes data you did not mean to lose.
Below, you will find every merge method for desktop and mobile, a formula-based way to combine cells in Google Sheets without deleting anything, how to reverse a merge safely, and the permission issues that stop it from working at all.
What Does Merging Cells Mean in Google Sheets?
Merging joins two or more selected cells into a single larger cell. It is a layout change, used for spreadsheet titles, section headers, and labels that need to stretch across several columns or rows.
Combining is different. It uses a formula, such as TEXTJOIN or CONCAT, to display multiple values together in one cell without touching the cell structure underneath.
I run into this mix-up constantly when reviewing sheets other people have built. Someone merges A1 through D1 to create a name column spanning “First Name” and “Last Name,” then wonders why a VLOOKUP or SORT further down the sheet stops working correctly. The merge did not just change how the cell looks; it changed how many cells actually exist in that row.
Knowing this difference before you touch a shared spreadsheet, especially one other people update daily, is what actually prevents the data loss most guides only warn about after the fact. It takes the same kind of discipline that makes software for distributed teams worth adopting in the first place.
How to Merge Cells in Google Sheets
Google Sheets provides merge controls through the Format menu and toolbar on desktop. The mobile app also supports merging, although the controls are arranged differently.
1. Merge Cells Using the Format Menu
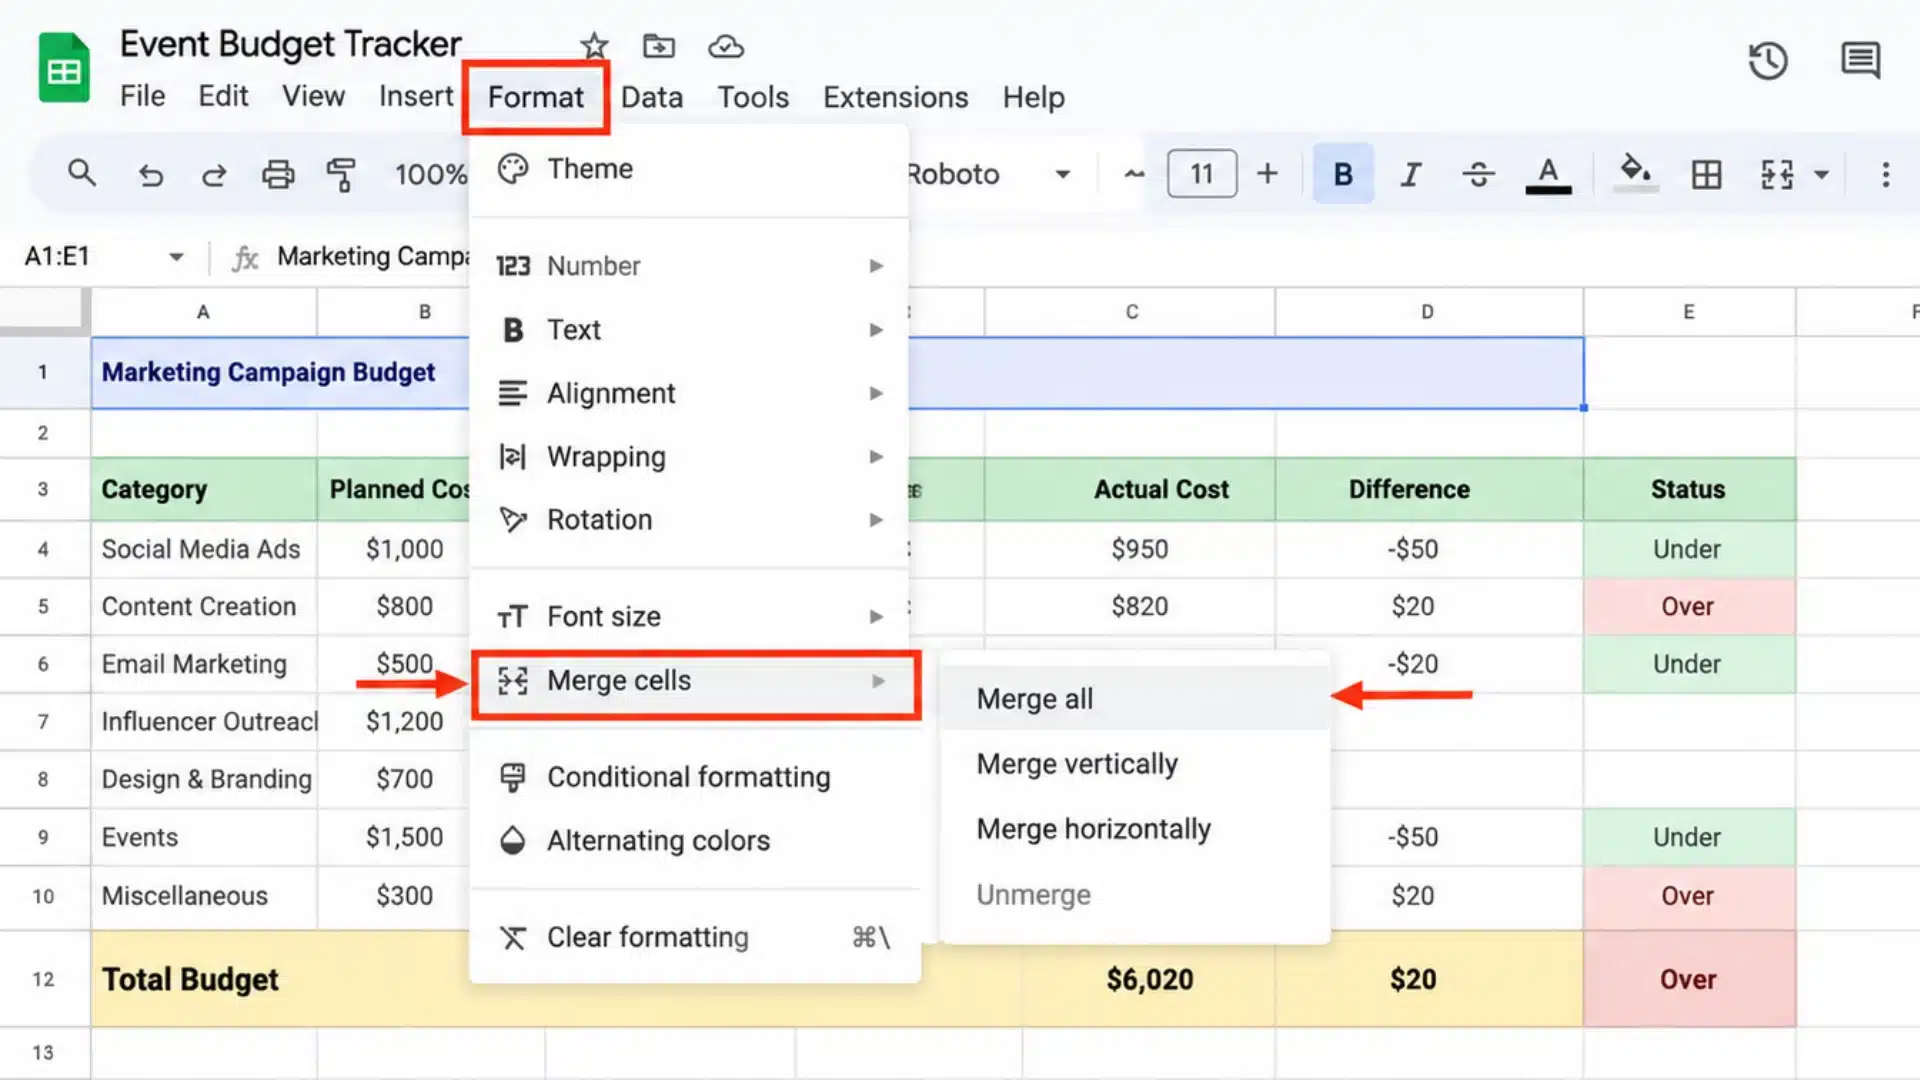
The Format menu is the clearest starting point if you are not sure yet whether you need Merge All, Merge Horizontally, or Merge Vertically. Google’s own instructions for merging rows and columns walk through the same options in more depth.
- Select the cells you want to merge.
- Click Format in the top menu.
- Select Merge Cells.
- Choose Merge All, Merge Horizontally, or Merge Vertically.
If your sheet needs extra rows or columns before the merge will look right, Google’s guide on adding or moving columns & cells covers that prep step.
2. Merge Cells Using the Toolbar
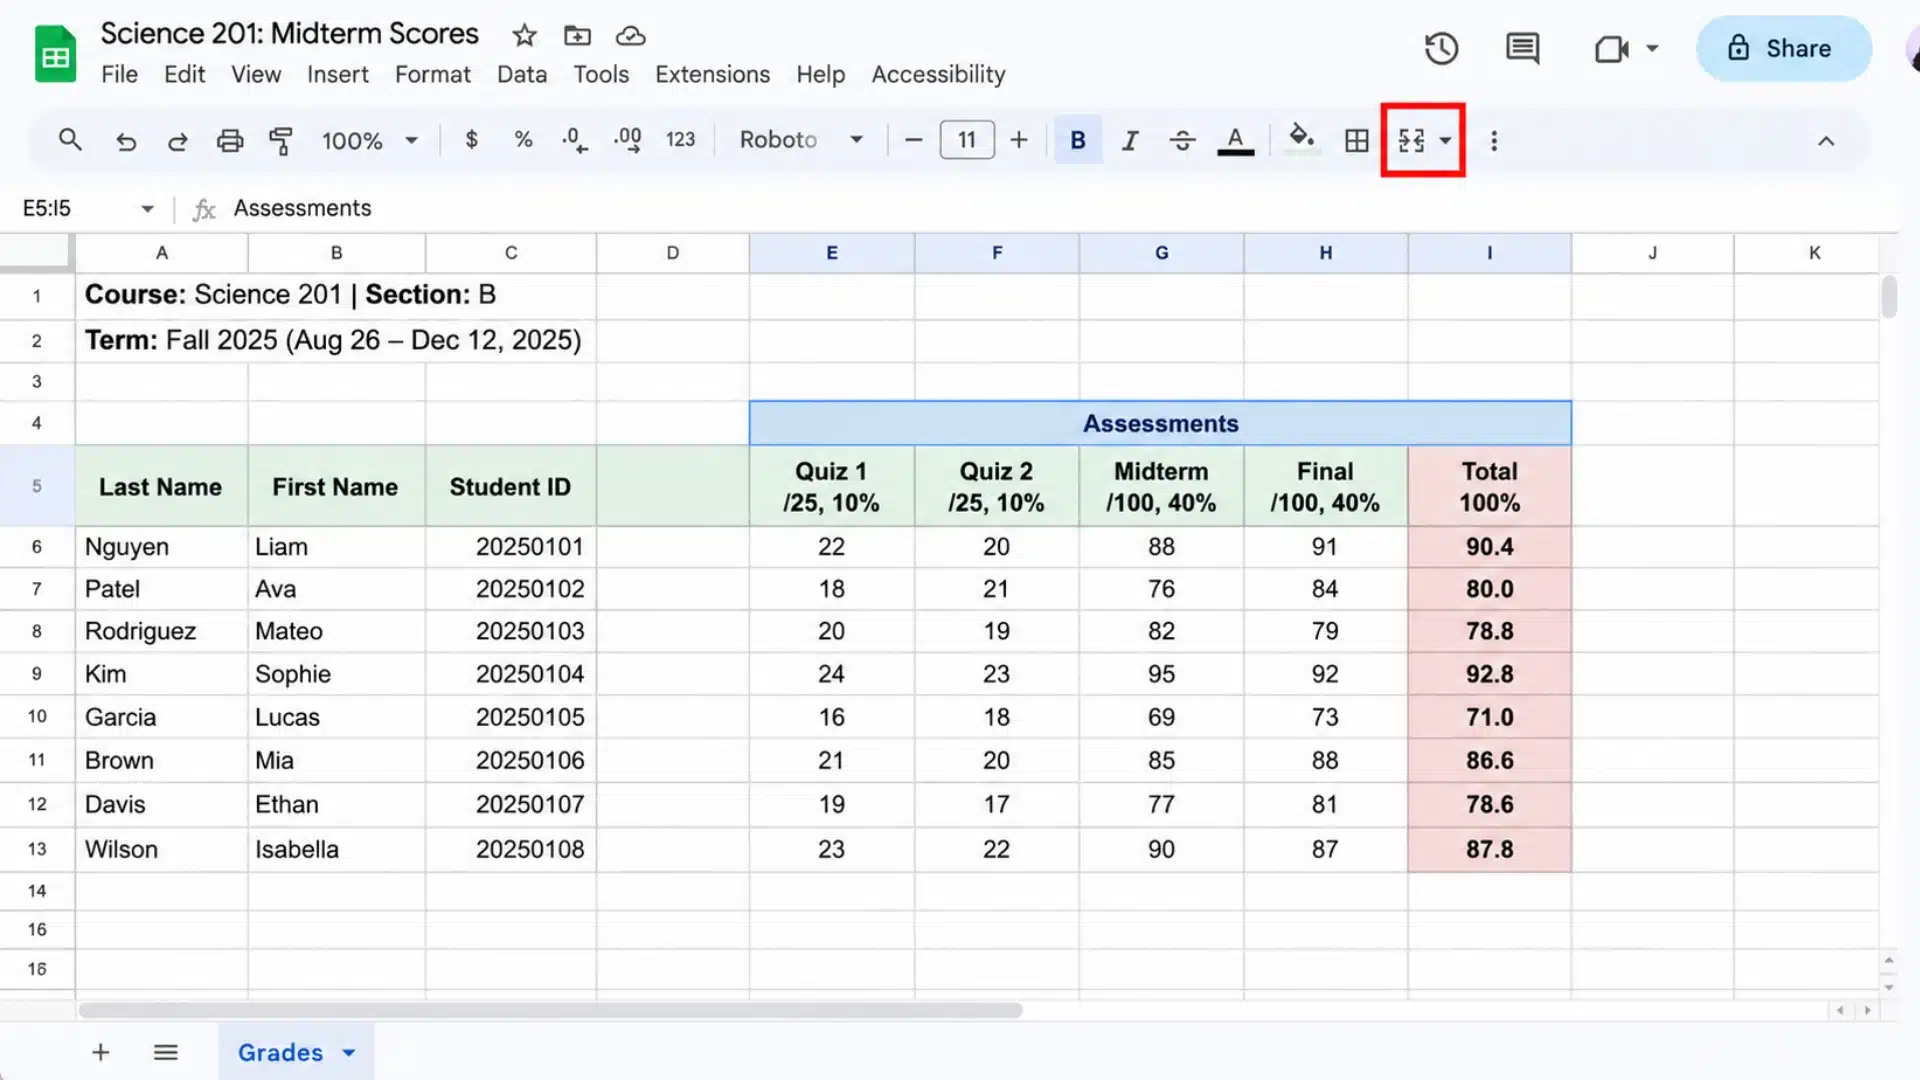
The toolbar provides a faster way to access the same merge controls. Once you know the merge type you use most often, the toolbar shortcut skips a menu click
- Highlight the cells you want to merge.
- Click the Merge Cells icon.
- Choose a merge option if Google Sheets displays the available choices.
I default to the toolbar icon for routine tasks like merging a title row, and I open the Format menu only when I specifically need Merge Vertically, since that option is easy to misclick from the toolbar dropdown on a smaller screen.
Small habits like this matter as much as picking well-chosen productivity apps, since both come down to shaving a few seconds off repetitive tasks.
3. Merge Cells on Android
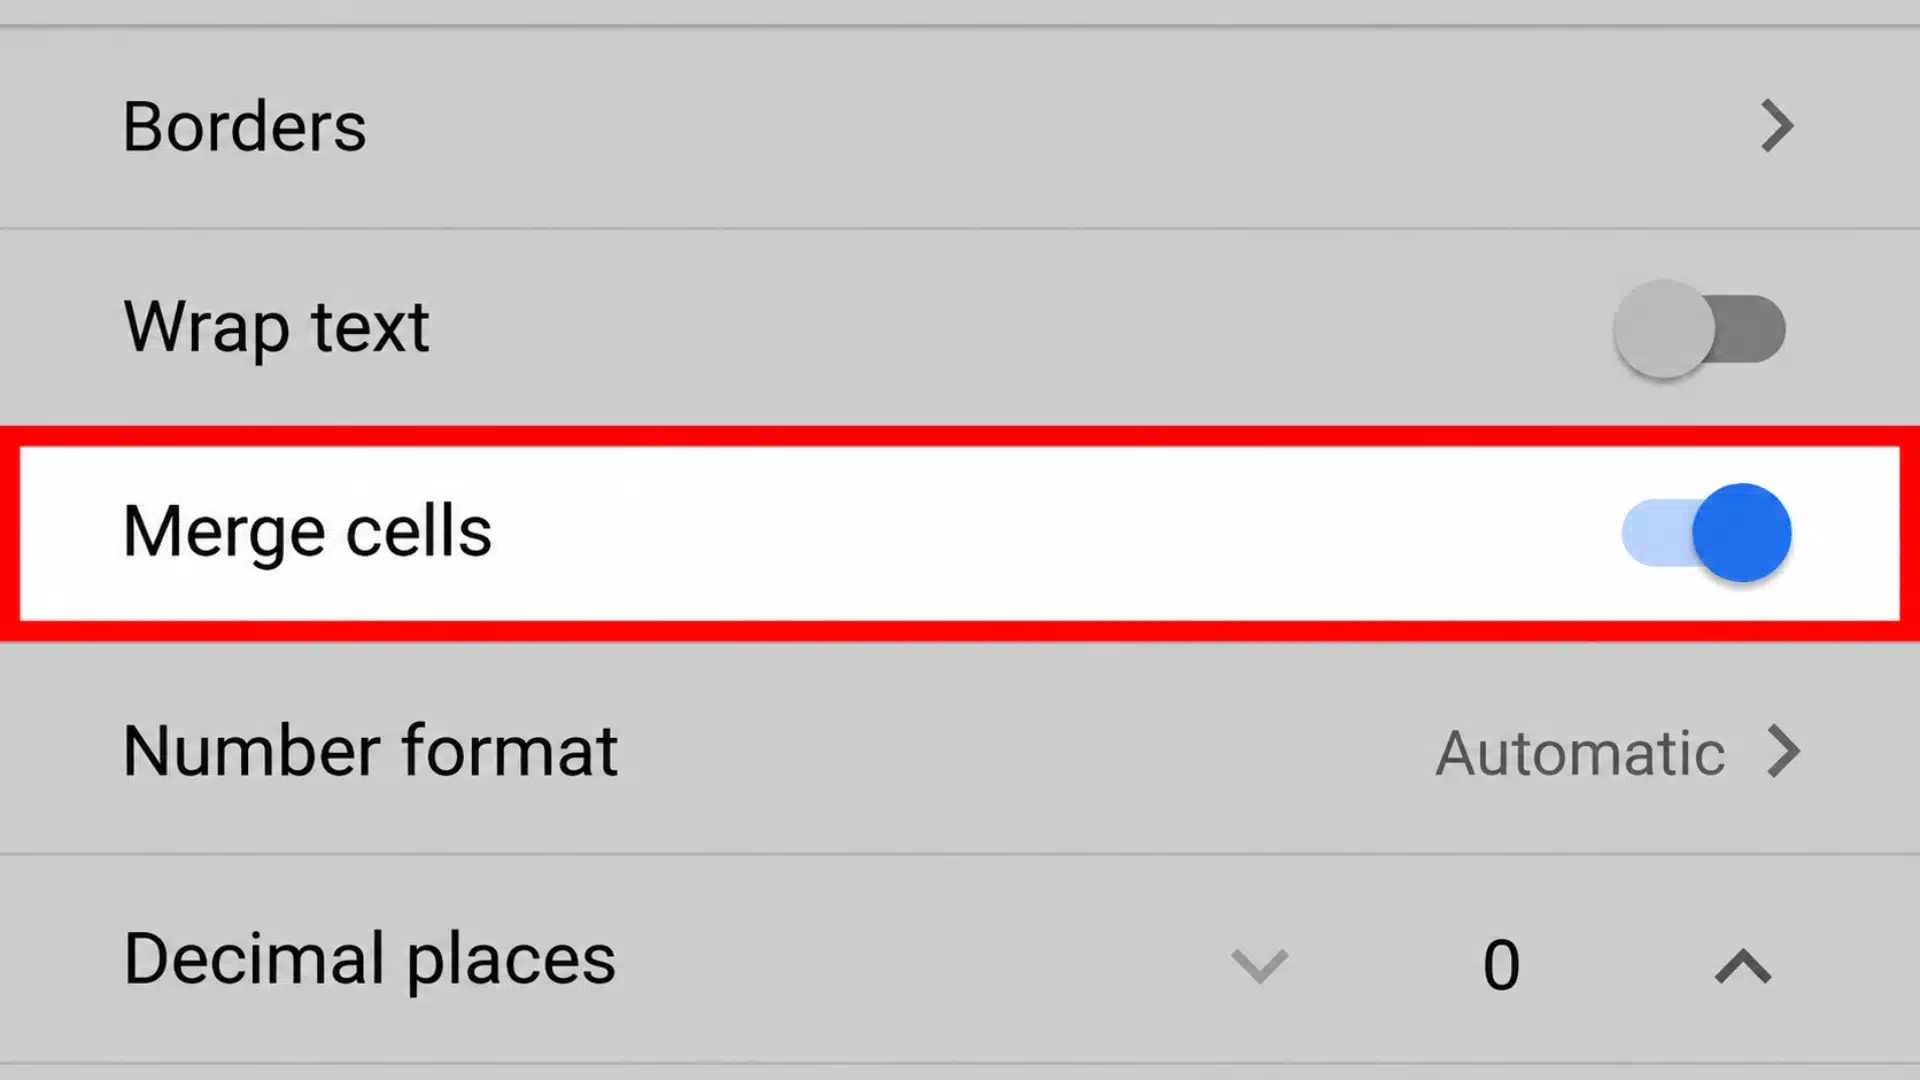
The Google Sheets mobile app places its formatting controls in a different location from the desktop version.
- Open the spreadsheet in the Google Sheets app.
- Select the cells you want to merge.
- Tap the merge option.
- Confirm the selection if prompted.
The same data rule applies on Android: if several selected cells contain values, a standard merge keeps the top-left value and removes the others.
4. Merge Cells on iPhone or iPad
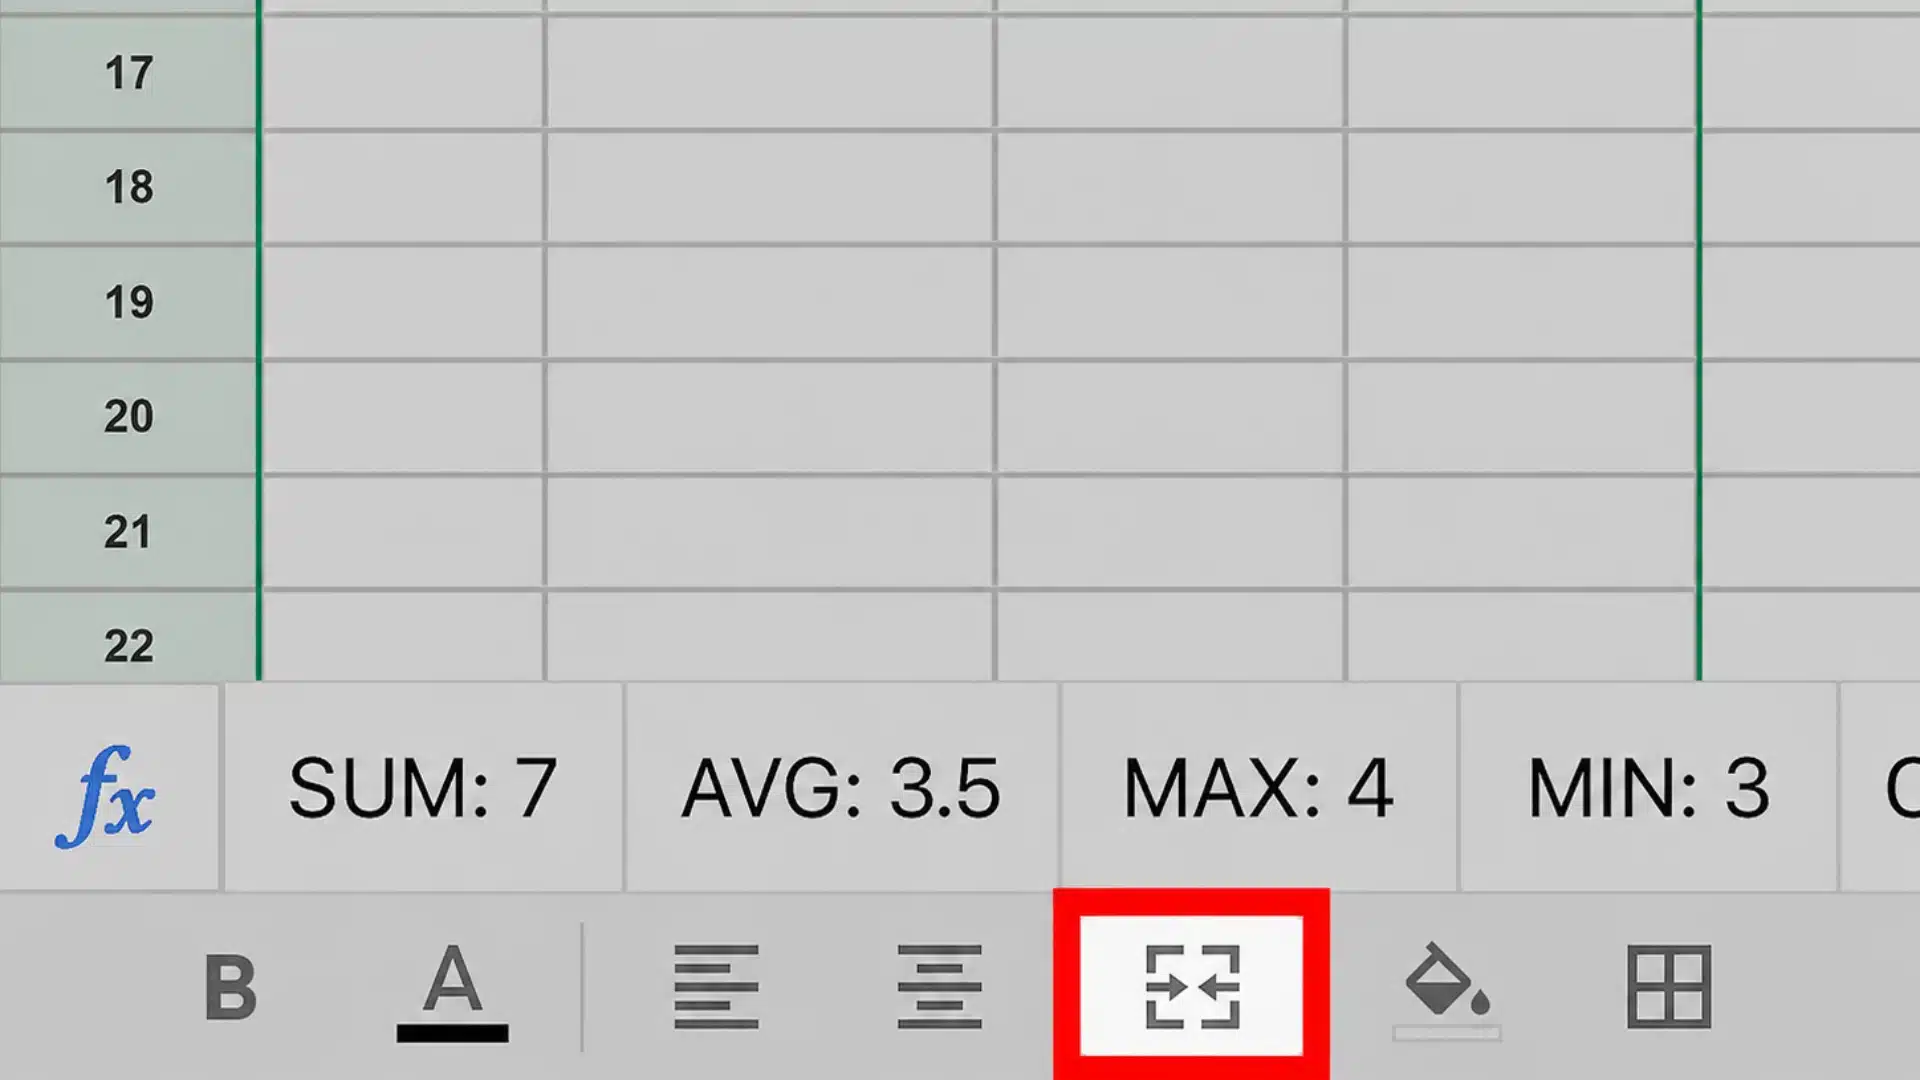
On iPhone or iPad, the merge control is available through the formatting options.
- Select the cells.
- Tap the formatting icon.
- Find the merge option.
- Apply the merge to the selected range.
The mobile merge control is easy to miss the first time, since it sits inside the Cell tab rather than having its own menu the way desktop does. If you do not see it right away, check that tab before assuming the feature is missing from the app.
It is a reminder that most apps for quick edits tuck their advanced options a layer deeper on mobile than on desktop.
And the same data rule applies everywhere: if the selected cells hold more than one value, only the top-left one survives the merge, whether you are on a laptop, a Chromebook, or a phone.
Which Merge Option Should You Use?
The three main merge choices suit different spreadsheet layouts. Picking the right one prevents unnecessary changes to nearby cells.
|
Merge option |
What it does |
Useful for |
|---|---|---|
|
Merge All |
Combines the entire selected range into one cell |
Spreadsheet titles |
|
Merge Horizontally |
Combines cells across each selected row |
Section headings |
|
Merge Vertically |
Combines cells down each selected column |
Grouped labels |
Pick Merge All when a whole rectangular block should collapse into one cell, such as a title banner spanning ten columns. Pick Merge Horizontally or Vertically when you want the merge to repeat automatically across several rows or columns, rather than collapsing the entire selection into a single block.
For simple visual formatting, merging is useful. For data that needs to remain sortable, filterable, or individually editable, keeping cells separate is often more practical.
How to Merge Cells in Google Sheets Without Losing Data
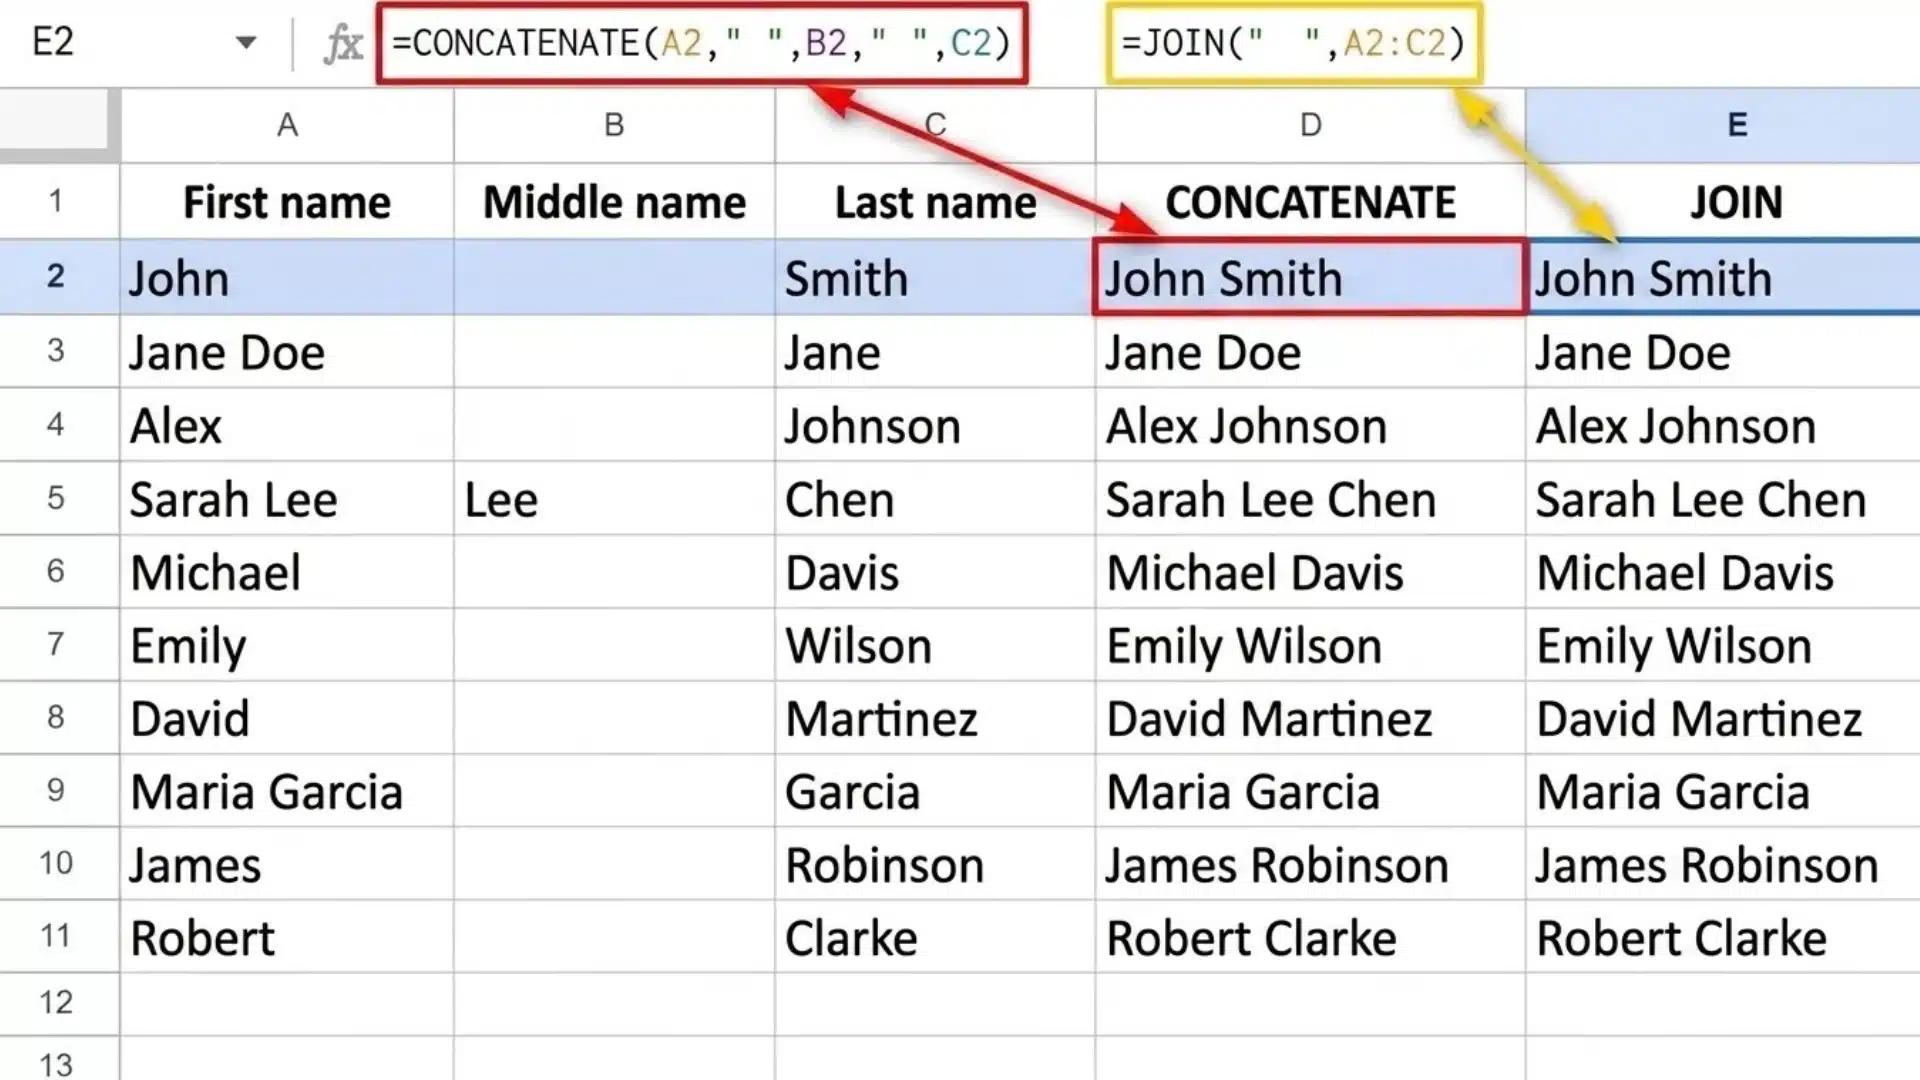
A standard merge is not built to preserve multiple values. Google Sheets keeps whatever is in the top-left cell and clears the rest of the selected range. When you need several values to stay visible and available, a formula is the safer route.
TEXTJOIN
TEXTJOIN Combines values from multiple cells with a separator of your choice, such as a space, comma, or dash, and it can skip blank cells automatically.
=TEXTJOIN(” “, TRUE, A2, B2)
This formula joins the contents of A2 and B2 with a space between them. The TRUE argument tells Sheets to ignore any empty cells in the range.
TEXTJOIN is a strong fit for combining first and last names, building full addresses from separate columns, or turning several columns into one readable line of text. The original source cells stay untouched.
CONCAT and The Ampersand Operator
CONCAT joins text from cells directly, while the ampersand (&) operator gives you more control over spacing and punctuation between values.
=CONCAT(A2, C2). To add a space between the values:
=A2 & ” ” & C2
To add punctuation, such as a comma:
=A2 & “, ” & C2
I reach for the ampersand version more than CONCAT in practice, mainly because it stays readable when a formula bar gets long, and it lets me drop in literal text like ” (US)” without nesting a second function.
Both formulas keep the original data intact and editable, which matters if the sheet feeds a mail merge or another tool downstream.
How Merged Cells Affect Sorting, Filtering, and Formulas
This is the part most tutorials skip, and it is usually the actual reason a sheet breaks after a merge. A merged range behaves like a single cell to Google Sheets’ formulas and tools, not like the multiple cells it used to be.
A few practical effects worth knowing before merging anything inside a working dataset:
- SORT and filters can shift merged rows unpredictably, since Sheets does not always know how to reposition a merged block relative to the single cells around it.
- Formulas such as VLOOKUP, SORT, and SUMIF that reference a merged range only read the value in its top-left cell. Every other cell in that merged block returns blank to the formula.
- Google Apps Script and the Sheets API treat a merged range the same way: only the top-left cell holds a value, and script-based automation can silently skip the rest.
- Keyboard navigation changes too. Arrow keys jump over the entire merged block as one step, which can be disorienting in a sheet you use daily.
I stopped merging cells in any range that feeds a pivot table or a SORT formula after watching a shared team sheet quietly drop three rows during a reorder, simply because a merged label in column A didn’t move the way the rest of the row did. If a table needs to stay sortable or filterable, keep it merge-free and lean on formatting instead, which the next section covers.
Wrap Text: A Merge-Free Alternative for Headers and Labels
Merging is not the only way to make a header or label look clean. Wrap Text, paired with center alignment, does something similar without collapsing multiple cells into one.
- Select the cell or range.
- Open Format, then Text Wrapping.
- Choose Wrap.
- Center the text horizontally and vertically from the toolbar alignment icons.
This keeps every cell independent, so sorting, filtering, and formulas still work exactly as expected. It is a smaller visual effect than a full merge, but for tables that need to stay functional, especially ones other people will sort or filter later, it is often the better default.
For anything I expect a teammate to filter or resort later, I use wrap text and center alignment instead of merging, and save the merge itself for one-off title rows nobody needs to touch again.
Unmerge Cells in Google Sheets
Unmerging restores the selected area to separate cells, but it cannot automatically recover values that were removed during the original merge.
- Select the merged cell.
- Open Format.
- Choose Merge Cells.
- Click Unmerge.
The cell structure returns to normal immediately. If you are unsure whether a merged cell held something important, check File, then Version history before unmerging, not after, since that is the only way to recover data a merge already cleared.
Why Can’t I Merge Cells in Google Sheets?
If the merge option doesn’t work as expected, the issue may be editing restrictions, permissions, or the selected range.
|
Common Issue |
What to Check |
|---|---|
|
Editing restrictions |
Check whether certain ranges are locked |
|
Permission problems |
Confirm that your account can edit the spreadsheet |
|
Incorrect cell selection |
Select the required range before opening the merge menu |
|
Existing merged cells |
Unmerge conflicting cells before applying another merge |
|
View-only mode |
Request editing access or use an account with permission |
Checking the selected range and editing permissions should be the first steps when the merge option is unavailable.
These issues come up often enough that they show up in the Google Docs Editors Help community, where users compare notes on permission settings and locked ranges.
Mistakes to Avoid When Merging Cells
A few simple mistakes can lead to lost information or formatting problems.
- Merging before checking what is already in the selected cells, since there is no warning prompt beforehand.
- Using Merge when a formula like TEXTJOIN would preserve the data instead.
- Merging large ranges inside a table you will later need to sort or filter.
- Nesting merges inside merges, which is a common cause of the “why won’t this merge” error covered above.
- Relying on a merged cell inside a formula range, when the formula will only ever read the top-left value.
The nested merge mistake is the one I see most often in sheets built by multiple people, usually because someone merges a new row without noticing an older merge already sitting inside that same block.
Final Note
Merging is a formatting choice, not a data tool, and treating it that way avoids most of the problems people run into. Use Merge All for titles
Merge Horizontally or Vertically for headers and labels, and reach for TEXTJOIN, CONCAT, or an ampersand formula whenever the original values need to stay intact. If merging won’t work, check for locked ranges, view-only access, or an existing merged block first.
If you are cleaning up a shared budget sheet or formatting a client report, knowing when to merge cells in Google Sheets and when to combine cells with a formula instead will save you from losing data twice. Try it on your sheet, and drop your questions below.
Frequently Asked Questions
Can I Merge Cells in Google Sheets from A Chromebook?
Yes. Chromebooks run the same web version of Sheets as any other browser, so the Format menu and toolbar merge icon work the same way. There is no separate Chromebook-specific merge process.
Does Merging Cells Slow Down a Large Google Sheet?
Not directly. Merged cells do not add processing overhead on their own, but heavy merging combined with SORT, FILTER, or QUERY across thousands of rows can slow recalculation, since Sheets has to work around merged blocks during those operations.
Do Merged Cells Survive when I Export Google Sheets to Excel?
Generally yes. Merge formatting typically carries over when you download a Sheets file as .xlsx, though it is worth reopening the exported file to confirm the merge held, since complex nested merges occasionally need a manual fix in Excel.
Can I Merge Cells Inside a Filtered View without Affecting Hidden Rows?
It is best avoided. Merging while a filter is active can merge rows that aren’t currently visible, which produces confusing results once you clear the filter. Turn off filters before merging, then reapply them afterward.
Is There a Way to Merge Repeating Values Automatically Instead of Doing It Cell by Cell?
Not natively. Google Sheets has no built-in auto-merge for repeated values. Some people script this with Google Apps Script for recurring reports, but for occasional use, manually selecting and merging is simpler and safer.