Every support ticket I’ve closed about a missed client email, after years of managing inboxes for a small team, traces back to the same root cause: a forwarding rule nobody set up correctly the first time.
Knowing how to forward emails in Gmail means matching the method to the problem in front of you: a single message, an entire inbox, or only the emails that fit a rule you define.
Gmail forwarding covers three distinct paths, and each one lives in a different settings screen with its own way of quietly breaking.
What follows sets up automatic forwarding for every incoming message, builds filters that redirect only selected emails, and fixes the settings Gmail resets when you miss a step.
What is Gmail Forwarding?
Gmail forwarding sends copies of your emails to another address, and the setup depends on how much of your inbox is involved. Manual forwarding sends one message and nothing else changes.
Automatic forwarding is the bigger commitment; every new email gets copied to your chosen address from that point on. Filters sit in between: you set conditions like sender, subject, or keyword, and only matching emails get sent along.
I’d rather spend two extra minutes deciding which of the three fits before opening any settings menu than redo the setup later; that habit has saved more than one shared inbox setup from turning into a mess of overlapping rules.This is the only place this piece explains all three methods side by side; each section below covers one method on its own, without repeating this breakdown.
Gmail also has a feature called “Add another account” (delegation), which lets someone else read and send from your inbox directly, that’s a different setting entirely from forwarding, which only sends copies of mail elsewhere and doesn’t hand over access to the account itself.
How to Turn on Automatic Forwarding for All Incoming Emails
This is the setup most people searching for Gmail forwarding want: redirecting an entire inbox, not just one message, and it’s the step the original draft skipped entirely.
- Open Gmail settings; Click the gear icon in the top right, then click See all settings.
- Go to the Forwarding and POP/IMAP tab and click Add a forwarding address.
- Enter the destination address and click Next, then Proceed, then OK. Gmail will warn you that you’re granting another account access to a copy of your mail; this is expected, since this exact setup has shown up in real account compromise cases.
- Verify the address; Gmail sends a confirmation link (and a backup code) to the destination inbox. Open it there and click the link, or paste the code back into the dialog on your original account.
- Choose what happens to your copy; Back in Forwarding and POP/IMAP, select “Forward a copy of incoming mail to [address]” and pick what Gmail should do with the message that stays in your own inbox: keep it, mark it read, archive it, or delete it.
- Click Save Changes at the bottom of the page. Gmail may ask you to re-enter your password to confirm.
This process only works on the desktop version of Gmail (or the mobile browser site), there’s no forwarding menu in the Gmail phone app itself.
Using a work or school account and the forwarding option won’t appear at all, even after following every step above? That’s usually not a bug; Google Workspace admins can disable end-user forwarding org-wide as a data-loss-prevention setting. Check with your admin before assuming something’s broken on your end.
How to Forward Emails in Gmail: Step by Step
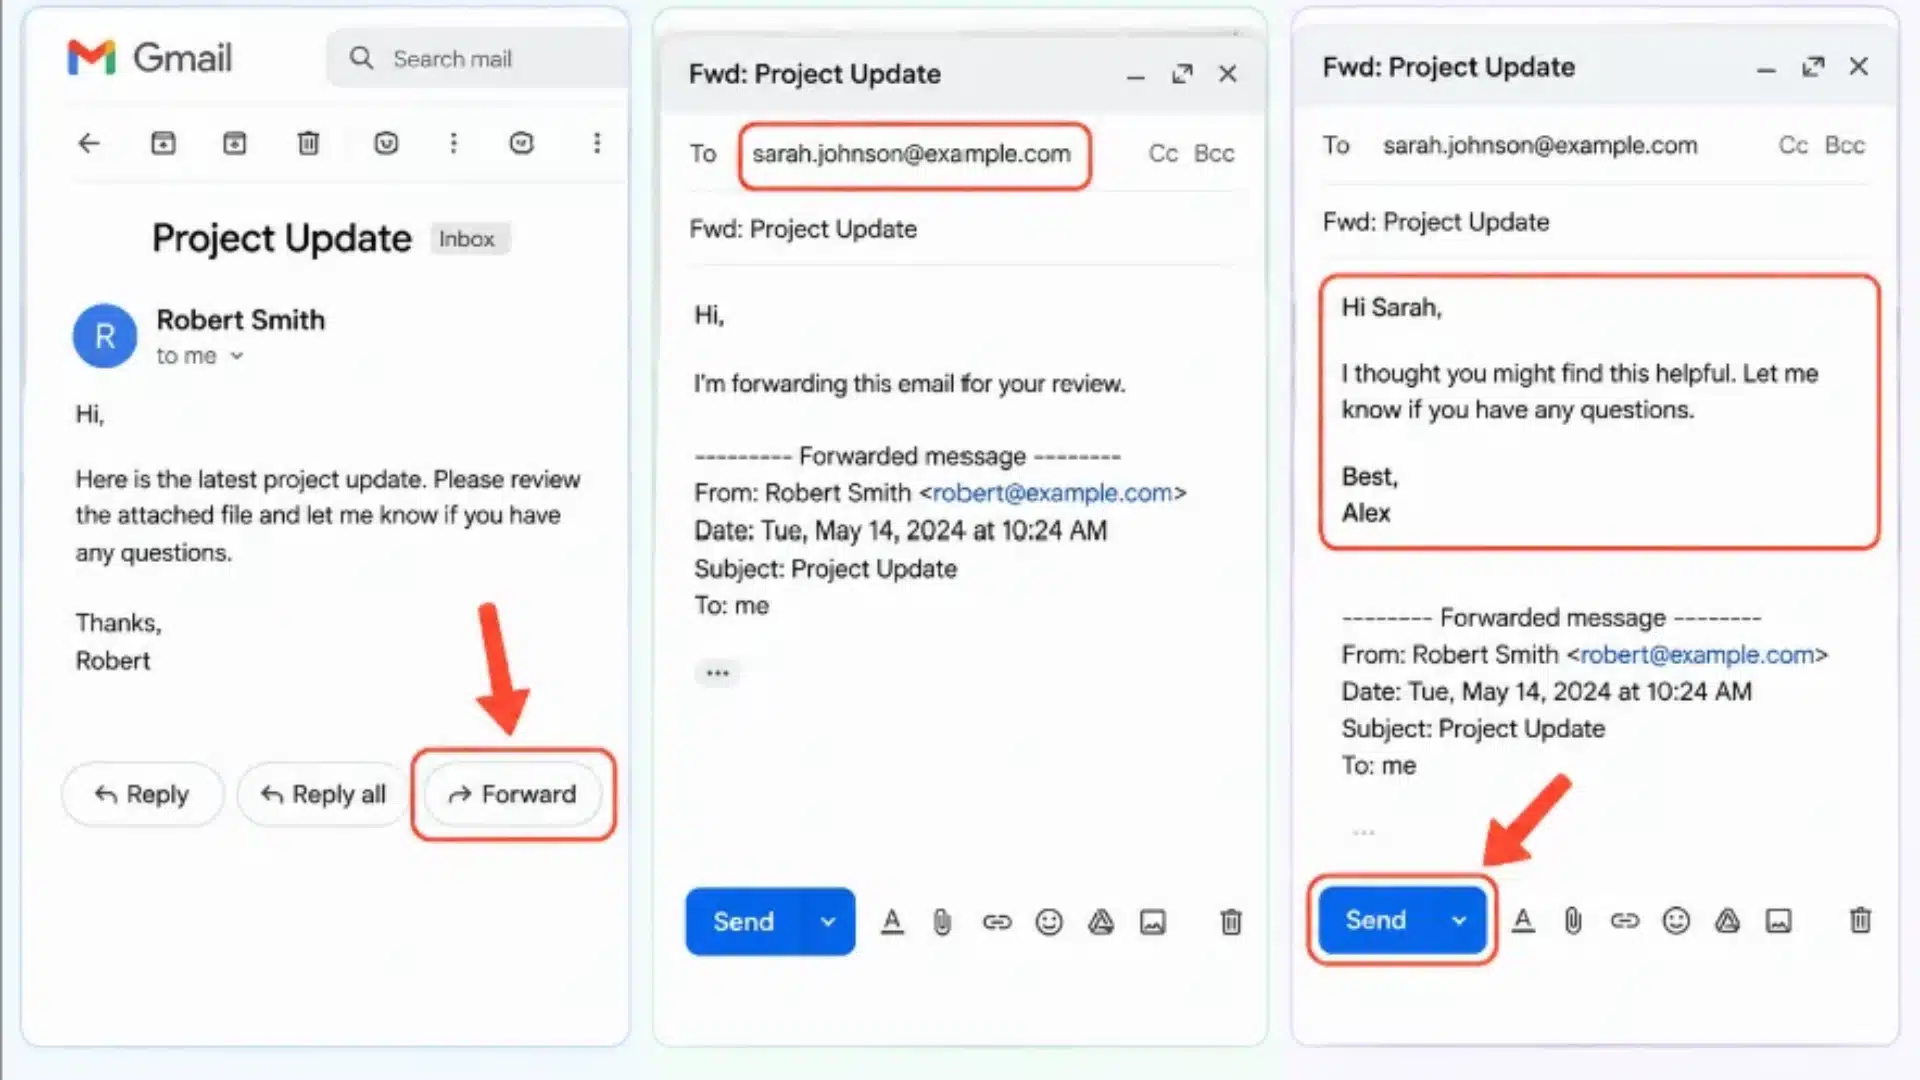
Sometimes you don’t need to change any settings at all; you want to pass along one message before it slips through the cracks.
This is the fastest fix in the whole toolkit, and it’s usually all a one-off situation calls for. Gmail makes it a quick process on both desktop and mobile, though the buttons sit in slightly different spots depending on the device you’re using.
Step 1: Open the Email You Want to Forward
Open the Gmail message you want to send to another person. After opening the email, check the row of icons below the message content.
The Forward button appears beside Reply and Reply All and has a right-facing arrow. Click this option to create a new draft that includes the original email content, allowing you to share the message without copying and pasting the details manually.
Step 2: Enter the Recipient’s Email Address
After clicking Forward, Gmail opens a new draft with a blank To field above the forwarded email content. Enter the recipient’s email address in this field, or start typing their name if they are already saved in your Gmail contacts.
Select the correct contact and confirm the email address before proceeding to ensure the message goes to the intended person- a small check that saves real time when you’re moving through a full inbox.
Step 3: Add a Note and Send the Email
Before sending the forwarded email, add a short note above the original message if you want to explain why you are sharing it or provide additional details- a habit that modern email tools have made second nature.
Review the recipient, message, and forwarded content to ensure everything is correct. When ready, click Send to complete the process. If the Forward button is unavailable, use the three-dot More menu and select Forward instead.
On a phone or tablet, open the email, tap the three dots in the top corner, and choose Forward from the list. The steps after that are the same as on desktop.
Forward Specific Gmail Emails Automatically
Sometimes you don’t want everything sent along, just messages from one client, one newsletter, or one particular topic.
This is where a filter earns its keep, because it sorts for you instead of leaving you to eyeball every message that comes in. Filters check incoming mail against conditions you set and forward only what matches.
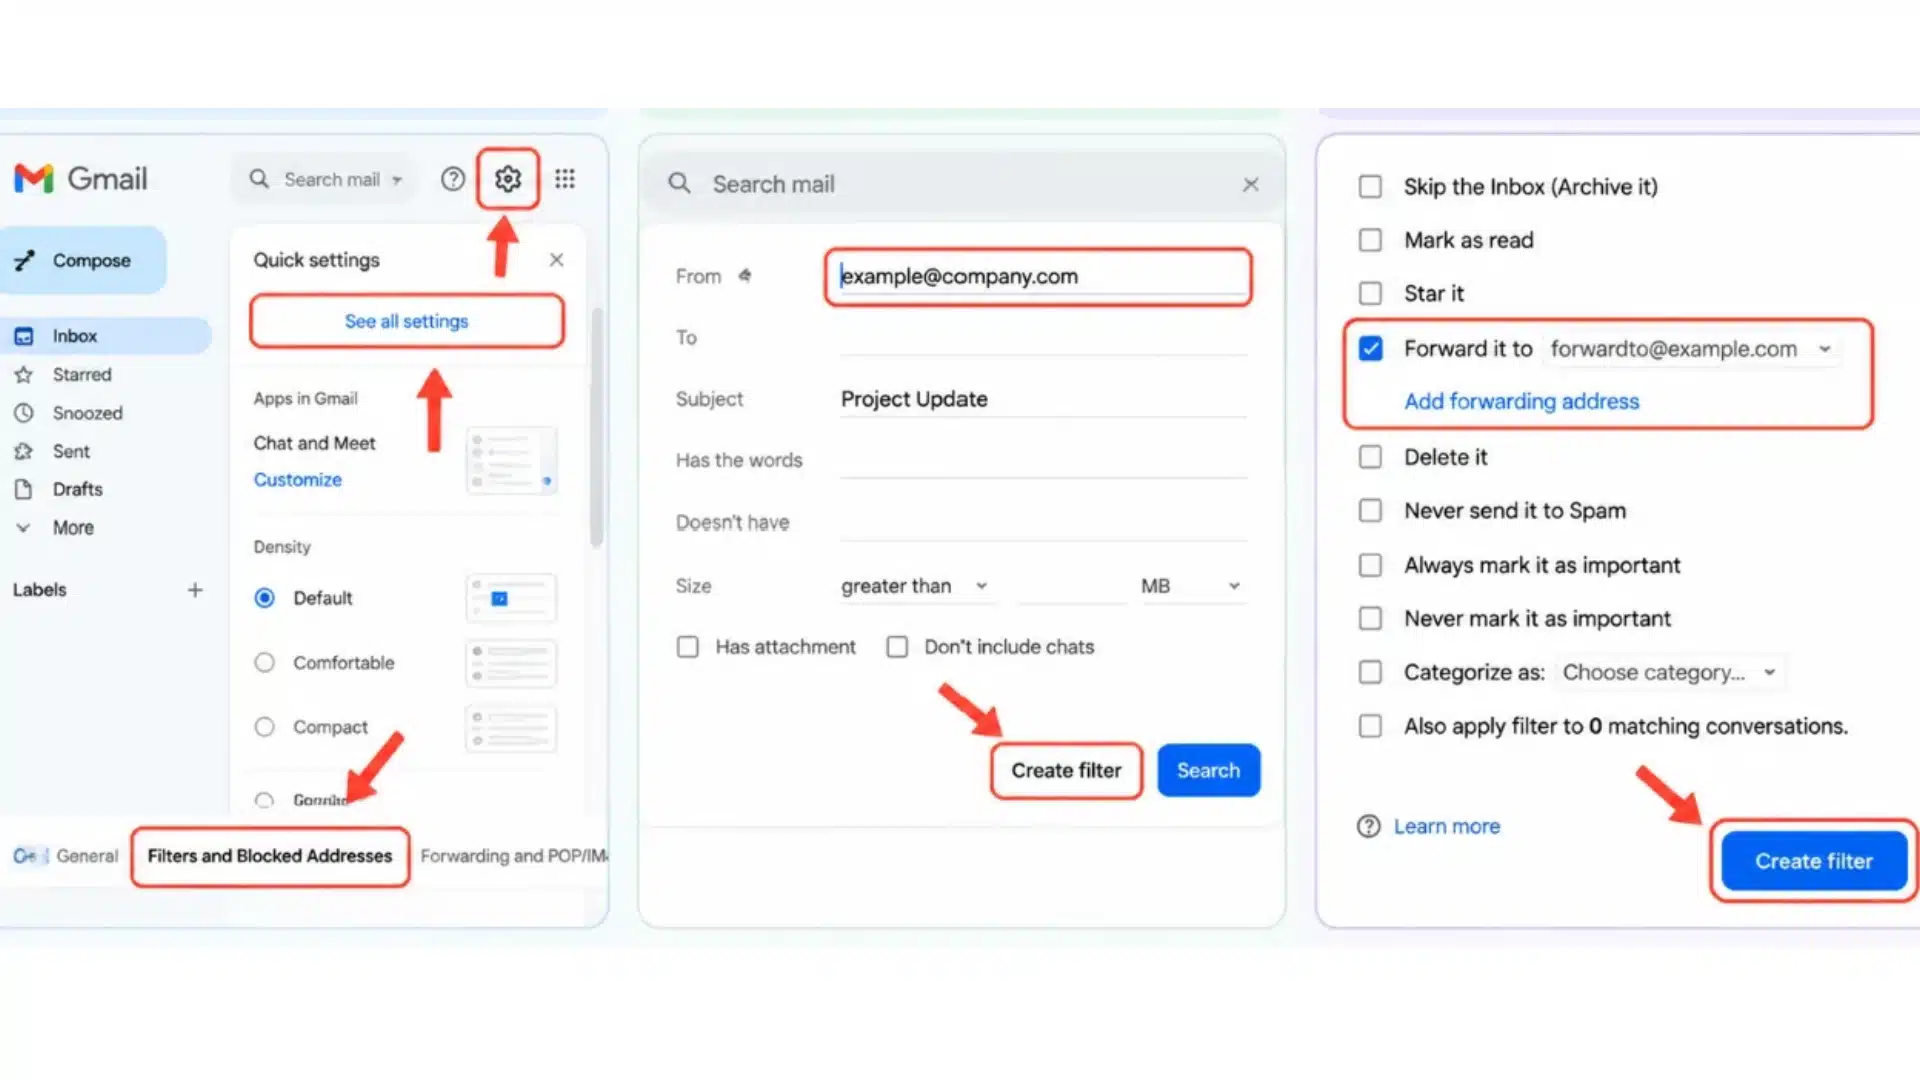
Step 1: Open Filter Settings: Click the gear icon, choose See all settings, and open Filters and Blocked Addresses.
Step 2: Set the Conditions: Create a new filter using details like sender, subject line, or specific words in the message. Only emails matching these conditions will be affected; everything else stays untouched.
Step 3: Apply Forwarding and Save: Choose the forwarding action from the list, select a verified destination address, and save the filter. From that point on, only matching emails move; nothing else in your inbox changes.
Manage Gmail Forwarding Settings
Once forwarding is running, it’s worth checking in on it every so often, the same way you’d walk a venue floor plan a second time even after it’s “done.” Small things get missed, especially if you’ve set up more than one destination address or several filters over time.
|
Task |
Where to Find It |
|---|---|
|
Check active forwarding addresses |
Settings → Forwarding and POP/IMAP |
|
Remove an old address |
Click “Remove” next to the address in question |
|
Turn off automatic forwarding |
Select “Disable forwarding” and save changes |
|
Review filters sending emails elsewhere |
Settings → Filters and Blocked Addresses |
If mail keeps showing up somewhere it shouldn’t, the Filters tab is usually the first place to look, since old rules can quietly stick around long after you’ve forgotten about them.
Why Gmail Requires Verification Before Forwarding Works
Gmail won’t forward a single message automatically until the destination address confirms it, and that extra step isn’t friction for its own sake.
Automatic forwarding is a known method attackers use after gaining access to an account: set up a quiet forwarding rule, and every future email, password resets included, gets copied out without the real owner noticing anything unusual in their own inbox.
That’s exactly why the verification step exists, and why I treat “review active forwarding rules” as a standing item on any account security check, not just a one-time setup task.
For shared or business inboxes especially, an occasional look at the Forwarding and POP/IMAP tab is worth building into a routine.
Gmail Forwarding Limitations You Should Know About
A few edge cases don’t surface until someone actually hits one. Knowing these upfront saves time troubleshooting a setup that isn’t actually broken, just limited by design.
- Workspace admins can disable forwarding entirely: If the option is missing altogether, not just greyed out, an organization admin has likely restricted it; a request to IT fixes this faster than another trip through settings.
- Forwarding isn’t delegation: Forwarding sends copies elsewhere; delegation (“Add another account”) lets someone else log in and manage the inbox directly. They solve different problems.
- Confidential Mode blocks forwarding. If the original message was sent that way, forwarding, downloading, and copying are disabled by the sender; there’s no workaround on the recipient’s end.
- Two accounts auto-forwarding to each other creates a loop, bouncing mail back and forth until Gmail’s spam protections catch it; it’s worth checking before enabling forwarding on a second account.
These limitations rarely mean forwarding is broken; they’re built-in boundaries around security, permissions, and message controls that Gmail enforces on purpose, not gaps in the setup process itself.
Troubleshooting Gmail Forwarding: Why It Stops Working
Most forwarding issues come down to one overlooked step, not something actually broken. These four cover the most common snags and the fastest way to rule each one out.
|
Problem |
Fix |
|---|---|
|
Verification code never arrives |
Check spam first; if it’s genuinely missing, remove and re-add the address to trigger a new code, and check for typos. |
|
Set up, but new mail isn’t forwarding |
Confirm the toggle in Forwarding and POP/IMAP is set to forward, not left on default; Gmail can silently revert it. |
|
Forward button missing on an email |
Open the three-dot More menu; Forward is listed there even when hidden from the main toolbar. |
|
One specific email won’t forward at all |
It was likely sent in Confidential Mode; the sender disabled forwarding, and you can’t re-enable it from your side. |
None of these require starting over; each fix targets one specific setting, so checking the right spot usually resolves it faster than redoing the whole forwarding setup from scratch.
Final Thoughts
Getting how to forward emails in Gmail right comes down to matching the approach to the situation: manual forwarding for a one-off message, automatic forwarding when every incoming email needs a new home, and filters when only certain senders or subjects should move.
Gmail forwarding rules don’t announce when they break; they just stop, which is why it’s worth checking active addresses and filters occasionally.
If a forwarded message seems delayed, missing, or duplicated, verification status and filter conditions are usually the first places to check, not the last.
Every setup I’ve reviewed that seemed broken turned out to be one forgotten setting, not a Gmail failure. Questions about a specific setup? Drop them in the comments below.
Frequently Asked Questions
Can I Forward Gmail Emails to Multiple Addresses?
Yes, Gmail lets you forward to approved addresses, but you must verify each destination first. You can also use filters to manage different forwarding rules for specific messages.
Does Gmail Forwarding Work when My Computer Is Off
Yes, Gmail forwarding happens through Google’s servers, so messages can be forwarded even when your device is turned off or disconnected.
Can I Forward Emails From Gmail to Another Email Provider?
Yes, Gmail can forward messages to many other email services. The receiving account does not need to be another Gmail address.
Can I Forward Old Gmail Emails Automatically?
No, automatic forwarding only applies to new incoming messages after setup. You must forward existing emails manually or handle them separately.