
If you’ve ever wanted to stop typos from creeping into your spreadsheets, knowing how to use the Excel data validation list feature is the fix.
Instead of letting people type anything into a cell, a drop-down list restricts entries to a predefined set of options, so “Yes” never becomes “yess” or “Pending” doesn’t turn into three different spellings across a hundred rows.
Below, you’ll find the exact steps to build a basic Excel data validation list, the most common variations you’ll actually need, and how to customize, edit, or troubleshoot one once it’s set up.
By the end, you’ll be able to build an Excel data validation list confidently, no matter how simple or advanced your spreadsheet needs to be.
What is Data Validation in Excel?
Data validation is a built-in Excel feature that controls what can actually be typed into a cell. Instead of accepting anything a user enters, it lets you set rules, like restricting a cell to a specific list of values, a number range, or a date range.
A drop-down list is simply the most common use of data validation, and building an Excel data validation list is exactly the focus here: rather than typing a value manually, users click a small arrow and pick from options you’ve already defined.
This keeps data consistent, cuts down on typing errors, and makes spreadsheets far easier for other people to fill out correctly.
How to Add a Drop-Down List in Excel
Building your first drop-down list takes less than a minute once you know where to look, and understanding why each step matters makes the process easier to repeat later on your own.
Step 1: Select Your Cell or Range
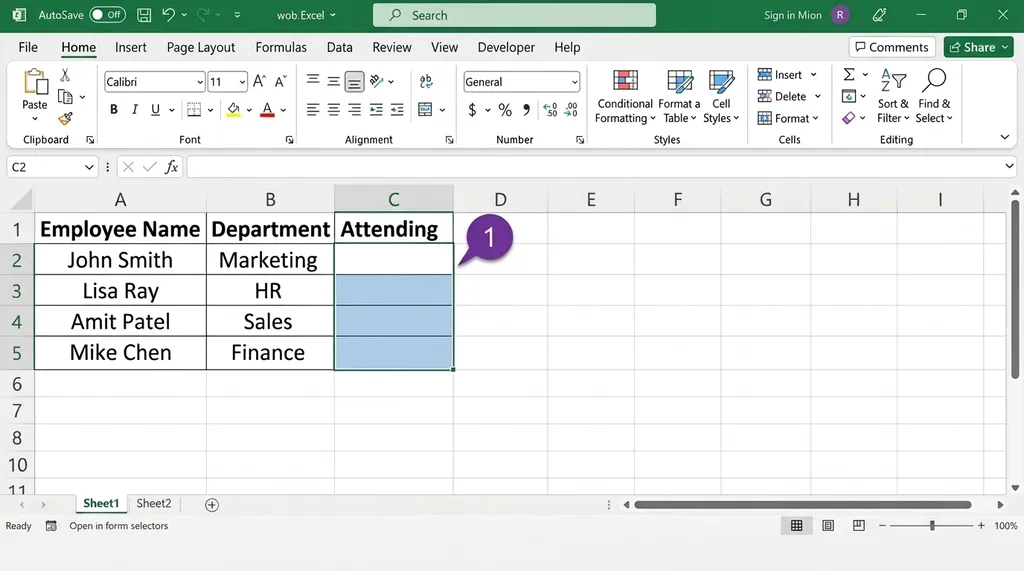
Click on the single cell where you want the drop-down to appear, or click and drag to select a range if you want the same list applied across multiple cells, like an entire column.
Selecting the full range upfront saves you from repeating the setup cell by cell later, which matters most when working with a long list of entries, like a status column running down fifty or more rows.
Status columns like these are common in project trackers, so choosing the right project management tool depends on whether a simple Excel sheet or dedicated software better fits your workflow.
Step 2: Open Data Validation
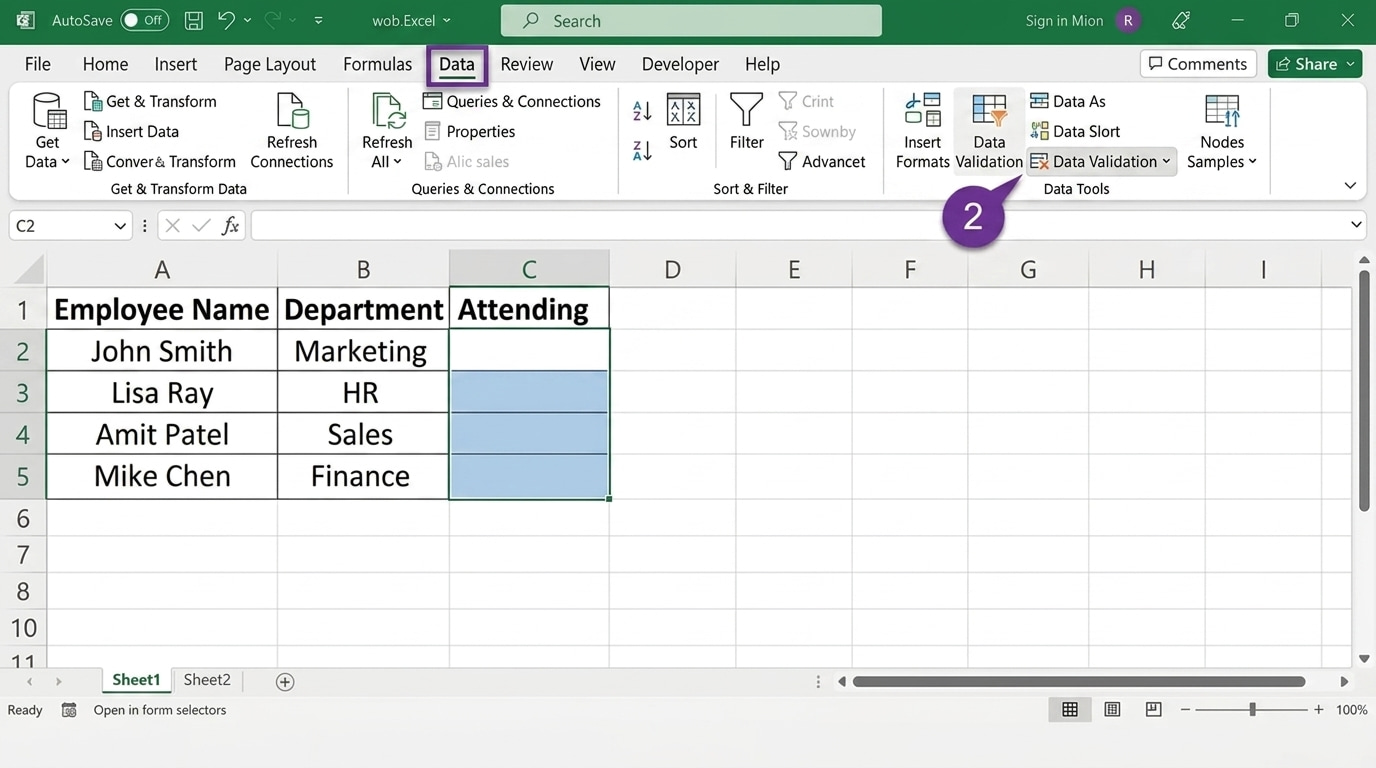
Go to the Data tab on the Excel ribbon, then look for Data Validation inside the Data Tools group and click it.
This opens a dialog box with several tabs, though for a basic drop-down list you’ll only need the Settings tab. Microsoft’s own support page covers a few additional settings worth knowing once you’re comfortable with this basic version.
Step 3: Choose List Under Allow
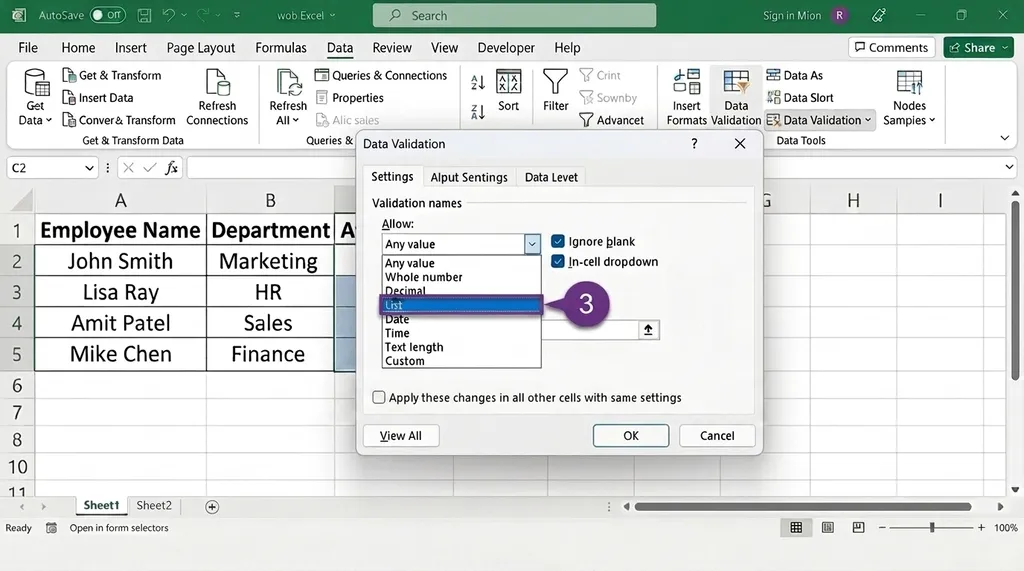
Inside the Settings tab, click the “Allow” dropdown menu and select List from the options shown.
This tells Excel that the cell should only accept values from a predefined set rather than any free-typed entry. Once List is selected, a new “Source” field appears just below it, where you’ll define the allowed values in the next step.
Step 4: Enter Your Options in the Source Box
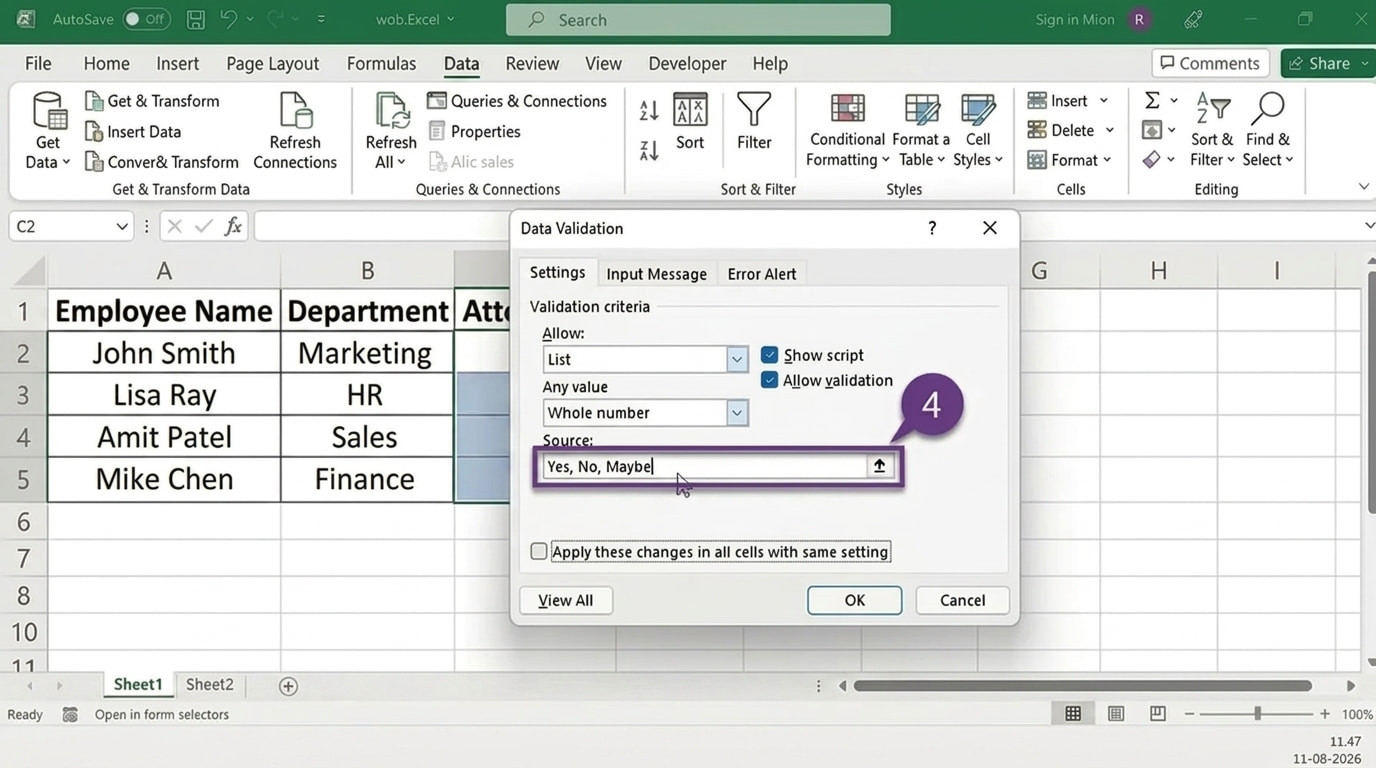
In the Source box, type the values you want to appear in the drop-down, separated by commas, for example: Yes, No, Maybe.
Excel reads each comma as a separator between individual list items, so avoid adding extra commas within a single option. This method works best for short, simple lists that won’t need frequent updates, since editing means reopening this same dialog box each time.
Step 5: Click OK and Test Your Drop-Down
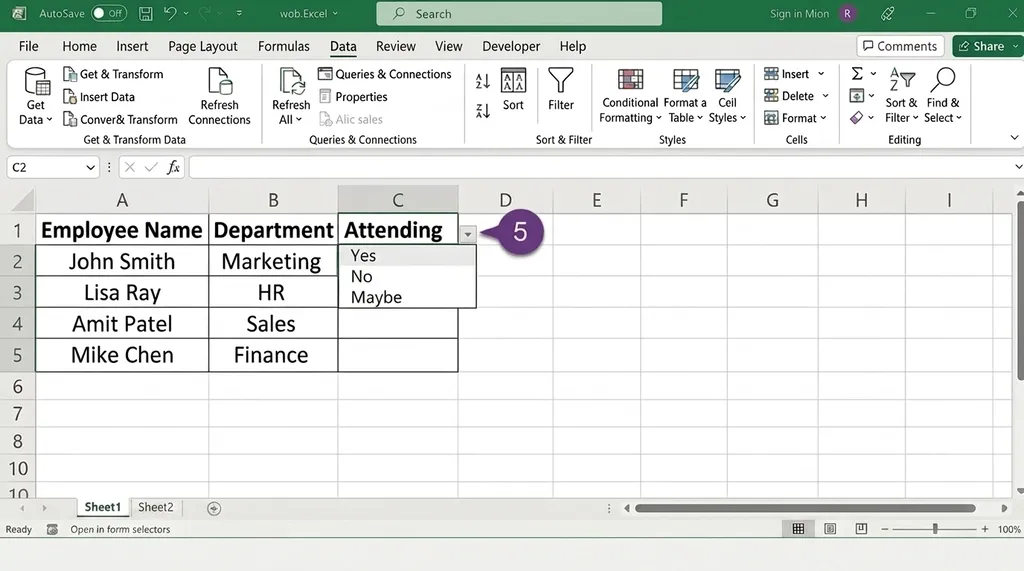
Click OK to close the dialog and apply your new drop-down list to the selected cell or range.
Click directly on the cell afterward, and you should see a small arrow appear on its right edge. Clicking that arrow reveals your list of options, confirming the setup worked correctly. It’s worth testing this on a couple of different cells before entering real data across the whole sheet.
Common Variations of Excel Drop-Down Lists
The basic comma-separated method works great for short, fixed lists, but most real spreadsheets eventually need something a little more flexible.
- Drop-down list from a cell range: instead of typing options directly, reference a range of cells that already contains your list, like =A$2: A$6, which is useful once your list grows longer than a few items
- Drop-down list from a named range or table: select your list, name the range through the Name Box, then reference that name in the Source box, and HowToGeek’s guide explains how putting the list in an actual Excel Table lets new items appear automatically
- Dependent (cascading) drop-down lists: these change their available options based on a different cell’s selection, typically built using named ranges paired with the INDIRECT function, and Exceljet’s walkthrough is worth reading once you’re ready to set one up
Starting with the simplest variation that fits your actual need tends to save time over building something more complex than the spreadsheet requires.
Customizing Your Drop-Down List
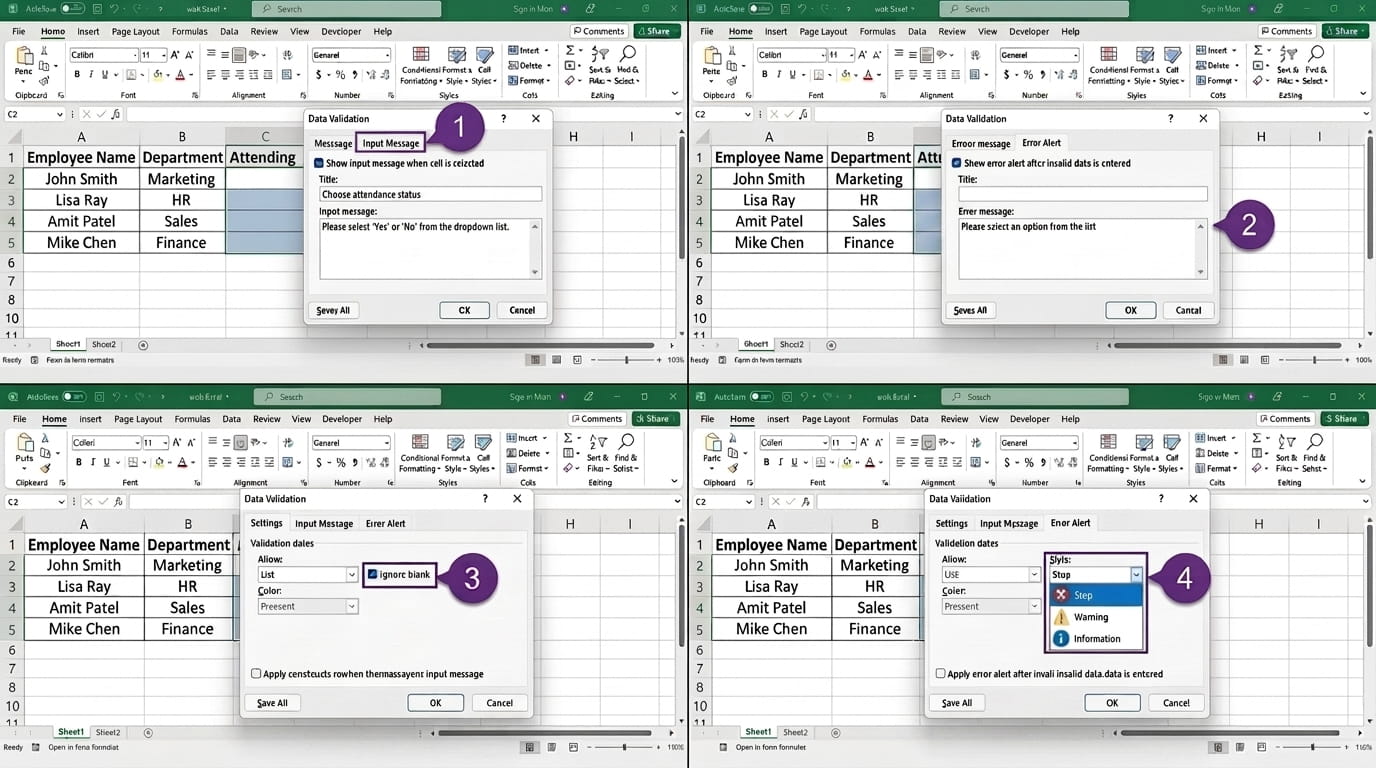
A few extra settings inside the same Data Validation dialog box make your drop-down list noticeably more user-friendly.
Below are the steps to follow if you want to customize your drop-down list:
- Open the Input Message tab and add a short tooltip that appears when someone clicks the cell, explaining what they should choose before opening the list
- Switch to the Error Alert tab to write your own custom message instead of Excel’s generic warning, which helps for shared spreadsheets used by less technical coworkers
- Check Ignore Blank on the Settings tab if the cell should be allowed to stay empty without triggering a validation error
- Choose between a Stop, Warning, or Information alert style under the Error Alert tab, depending on how strictly you want the rule enforced
These settings take an extra minute to configure but make a real difference for anyone else filling in the spreadsheet after you.
Comparing Drop Down List Methods
Seeing all four approaches side by side makes it easier to pick the right one for your specific spreadsheet.
| Method | Best For | Updates Automatically | Difficulty |
|---|---|---|---|
| Comma-separated list | Short, fixed lists that rarely change | No | Very Easy |
| Cell range reference | Longer or occasionally updated lists | Only if range is large enough | Easy |
| Named range or table | Lists reused across multiple sheets | Yes, with a Table | Moderate |
| Dependent drop-down | Lists that depend on another selection | Yes | Advanced |
Starting with the simplest method that fits your needs usually beats building something more complex than the spreadsheet actually requires.
How to Edit or Remove a Drop-Down List
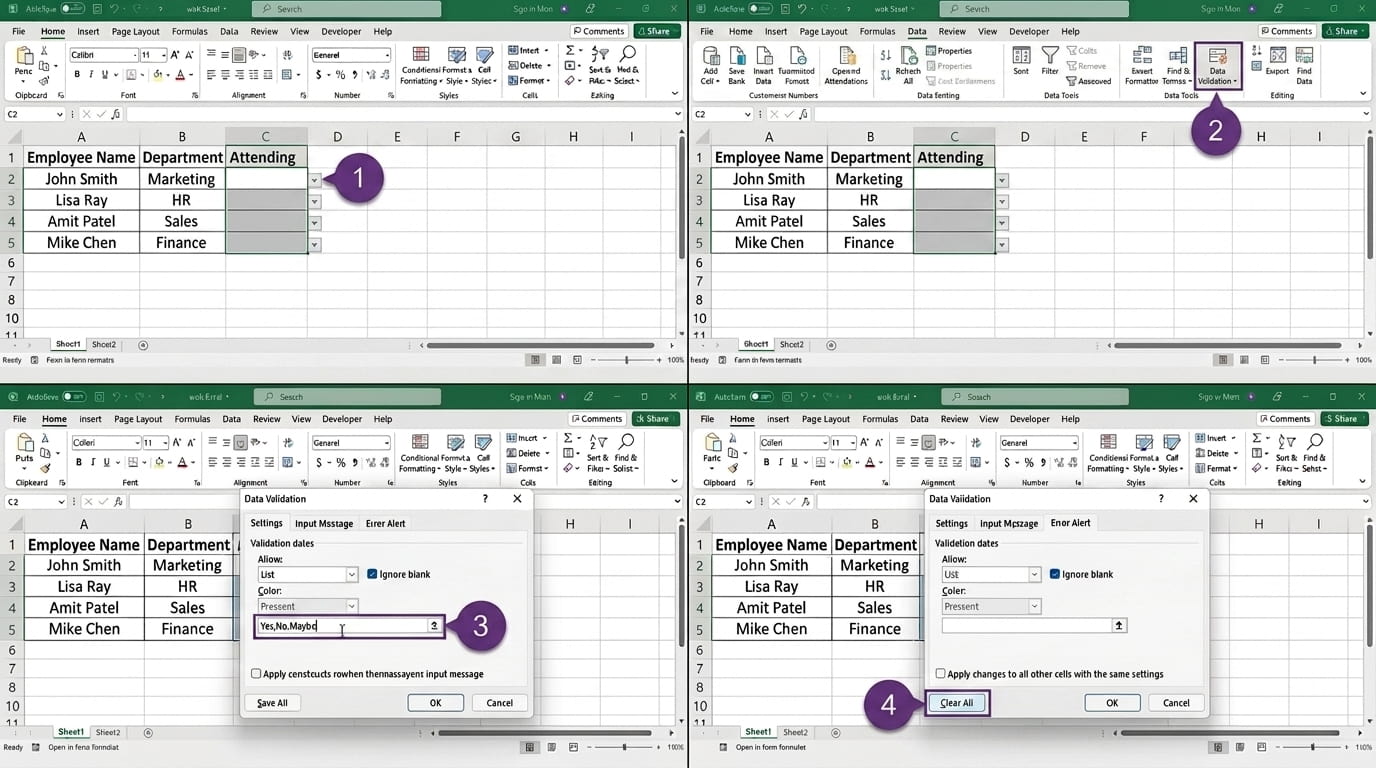
Changing or deleting an existing drop-down list uses the same dialog box you used to create it in the first place.
Below are the steps to follow if you want to remove or edit a drop-down list:
- Click the cell that already has the drop-down list applied
- Go to the Data tab and click Data Validation to reopen the same settings
- Edit the Source box directly to add, remove, or change list items, then click OK to save
- To remove the drop-down entirely, click Clear All inside the Data Validation dialog box, then click OK
If the drop-down was applied to a range of cells, repeat these steps with the full range selected rather than just one cell, so the change applies everywhere it should.
Common Drop-Down List Problems and Fixes
A handful of predictable issues account for most drop-down list frustrations, and each one has a quick fix.
| Problem | Likely Cause | Fix |
|---|---|---|
| Drop-down arrow doesn’t appear | “In-cell dropdown” option is unchecked | Reopen Data Validation and check the In-cell dropdown box |
| List doesn’t update with new items | Source references a fixed range instead of a table | Convert your source list into an Excel Table |
| Error when typing a value not in the list | Validation is working correctly | Choose from the list, or add the missing value to your source range |
| Dependent list shows no options | Named range doesn’t exactly match the category name | Check for typos or extra spaces in your named ranges, as GeeksforGeeks notes this is the most common cause |
If a fix here doesn’t resolve the issue, double-checking your named ranges and source references usually turns up the actual problem.
Practical Uses of Drop-Down Lists in Excel
Seeing where drop-down lists actually get used day to day makes it easier to spot opportunities for them in your own spreadsheets.
- Budget and expense tracking: restrict a category column to fixed options like Travel, Supplies, or Utilities, so expense reports stay consistent across an entire team
- Task and project status: limit a status column to values like Not Started, In Progress, or Complete, making it easy to filter and track progress at a glance
- Inventory management: use a simple Yes/No or In Stock/Out of Stock list to flag items needing reorder, without anyone typing inconsistent variations
- Employee timesheets and approvals: restrict an approval column to Approved, Pending, or Rejected, keeping HR or payroll spreadsheets clean and easy to filter
- Customer feedback forms: limit a rating column to a fixed scale, like 1 through 5, so responses stay structured enough to summarize or chart later
Once you start using drop-down lists in one spreadsheet, it’s easy to spot several other places where the same approach would save time and prevent messy data.
In many workplaces, these spreadsheets are also used to track approvals while team members are away, making Out of Office automatic replies in Outlook another useful part of keeping work organized.
Final Thoughts
Learning how to build an Excel data validation list really comes down to picking the right method for your specific list: a quick comma-separated list for something simple, or a named range and table setup for anything you’ll reuse and update over time.
The basic steps take under a minute, and once you’re comfortable with those, variations like dependent drop-downs open up a lot more flexibility for real-world spreadsheets.
Clean, consistent data entry starts with restricting what people can actually type, and a drop-down list is the easiest way to do that.
Open a spreadsheet right now and try building your first drop-down list using the steps above before moving on to anything more advanced.
Frequently Asked Questions
Can a Drop-Down List Pull Values From a Different Workbook?
Not directly. Data validation lists only work with ranges or named ranges within the same workbook, so values from another file need to be copied in first.
Does a Drop-Down List Work in Excel Online or Only Desktop?
Yes, drop-down lists created with Data Validation work in Excel Online as well as desktop versions, though some advanced customization options may display slightly differently.
Can You Allow Both a Drop-Down Selection and Free Typing in the Same Cell?
Not with standard Data Validation set to Stop alerts, but switching the alert style to Warning or Information lets users type a custom value while still seeing a caution message first.
Do Drop-Down Lists Copy Over When You Paste a Cell Elsewhere?
Yes, copying a cell with data validation and pasting it elsewhere carries the same drop-down rules with it, as long as you use a regular paste rather than Paste Values only.