If you’re trying to change a ceiling light fixture on your own and want a guide that actually walks you through each step, you’re in the right place.
I know this job can feel confusing when you haven’t done it before, so I wrote this to make the entire process simple and safe for you.
You’ll learn exactly what tools you need, how to turn off the power correctly, and how to remove the old fixture without damaging anything.
I’ll also show you how to connect the wires, secure the new fixture, and test it once everything is in place. My goal is to help you feel confident enough to handle this project from start to finish.
By the time you’re done reading, you should feel ready to replace your ceiling light fixture on your own.
What to Know Before You Start?
Before you get into the actual work, it helps to understand a few simple things about changing a ceiling light fixture.
Knowing what to expect makes the whole project feel easier and less stressful, especially if this is your first time doing it.
In this section, you’ll find the tools you’ll need, the type of wiring you’ll see, and the safety habits that keep the job running smoothly.
By knowing these basics ahead of time, you’ll feel more prepared and confident when you move into the step-by-step part of the project.
It sets the foundation so the instructions feel natural instead of overwhelming, and it helps you avoid common mistakes people run into when they rush into the work too fast.
How to Change a Light Fixture Step by Step?
Replacing a ceiling light fixture becomes much easier when each part of the process is clear. This is a breakdown of every step so you can follow along safely.
Step 1: Turn Off the Power Safely

Before touching any part of the fixture, leave the light switched on and go to your circuit breaker to turn off the correct circuit.
This helps you confirm you shut off the right power source because the light will go out immediately. Once that’s done, use a voltage tester on the wires to make sure no current remains.
This extra check adds a layer of safety before you begin removing anything.
Step 2: Remove the Decorative Caps
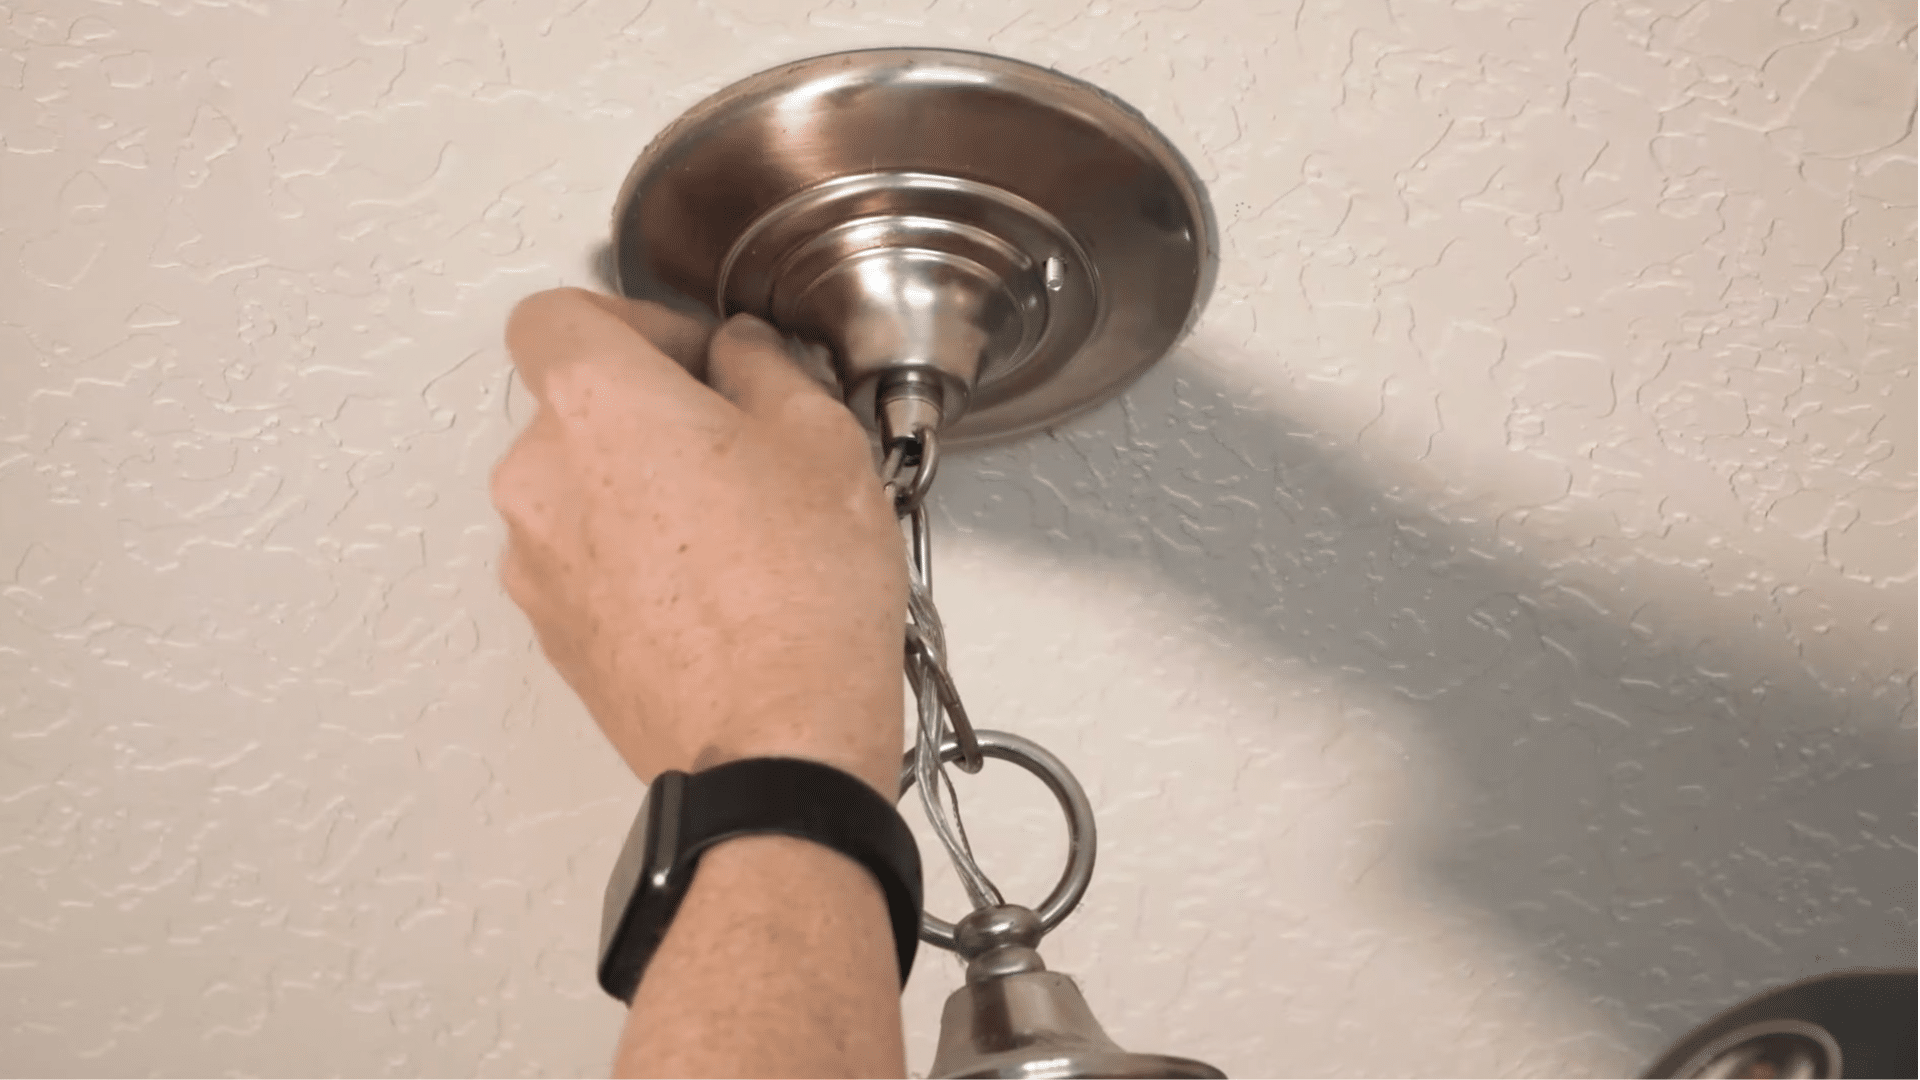
Most ceiling fixtures include decorative caps that hold the fixture in place, and these are the first pieces to remove. Loosen them slowly so you don’t strain the weight-bearing wire often found inside the assembly.
Once the caps are off, the fixture will start to release from the ceiling.
Take your time here, because the goal is to expose the internal wiring without pulling or forcing the fixture, keeping everything steady and controlled.
Step 3: Disconnect the Old Fixture Wiring
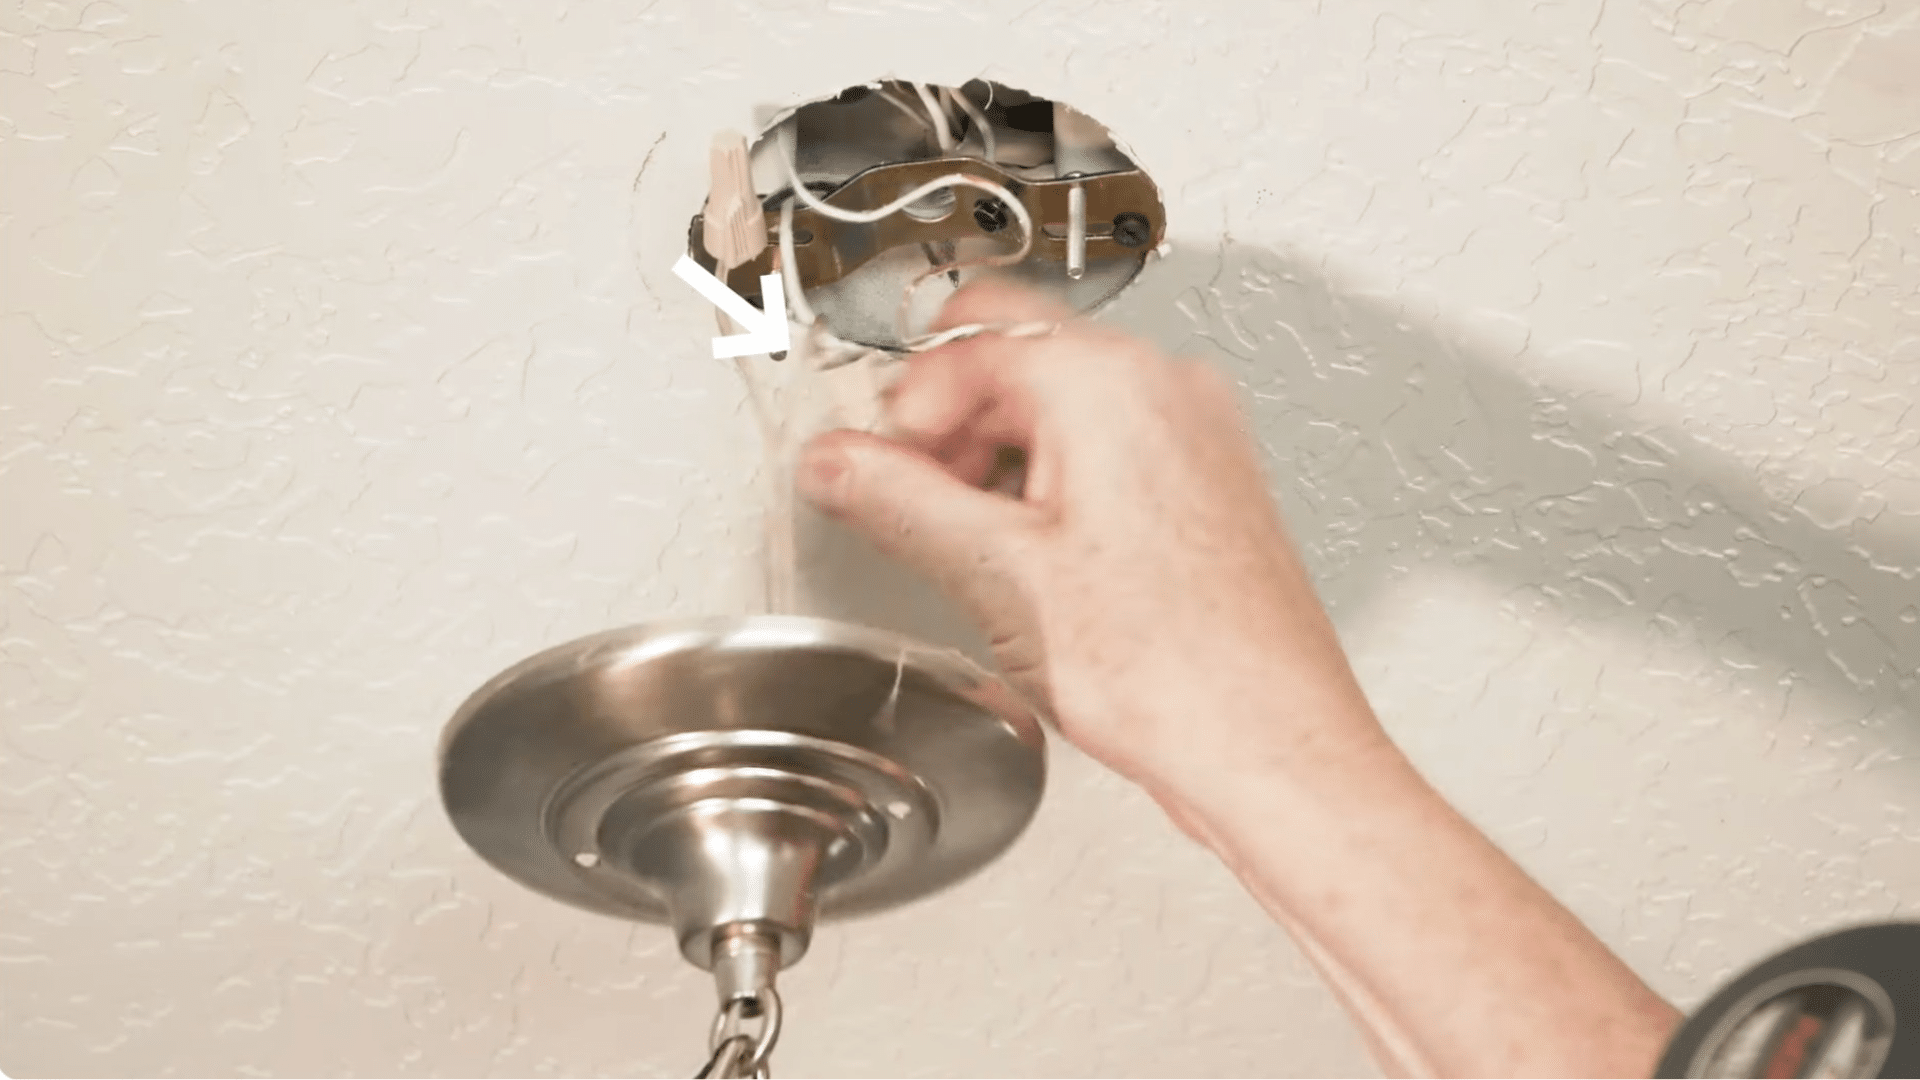
Inside the fixture, you’ll see wire caps connecting the house wires to the old light. Remove each wire cap and untwist the wires gently to avoid stressing the support wire.
When the wires separate, the fixture should come free with little effort. This step is where the old fixture fully detaches, so make sure everything is loose before pulling it away.
Once the wires are free, set the old fixture aside and keep the work area clear.
Step 4: Test for Remaining Power
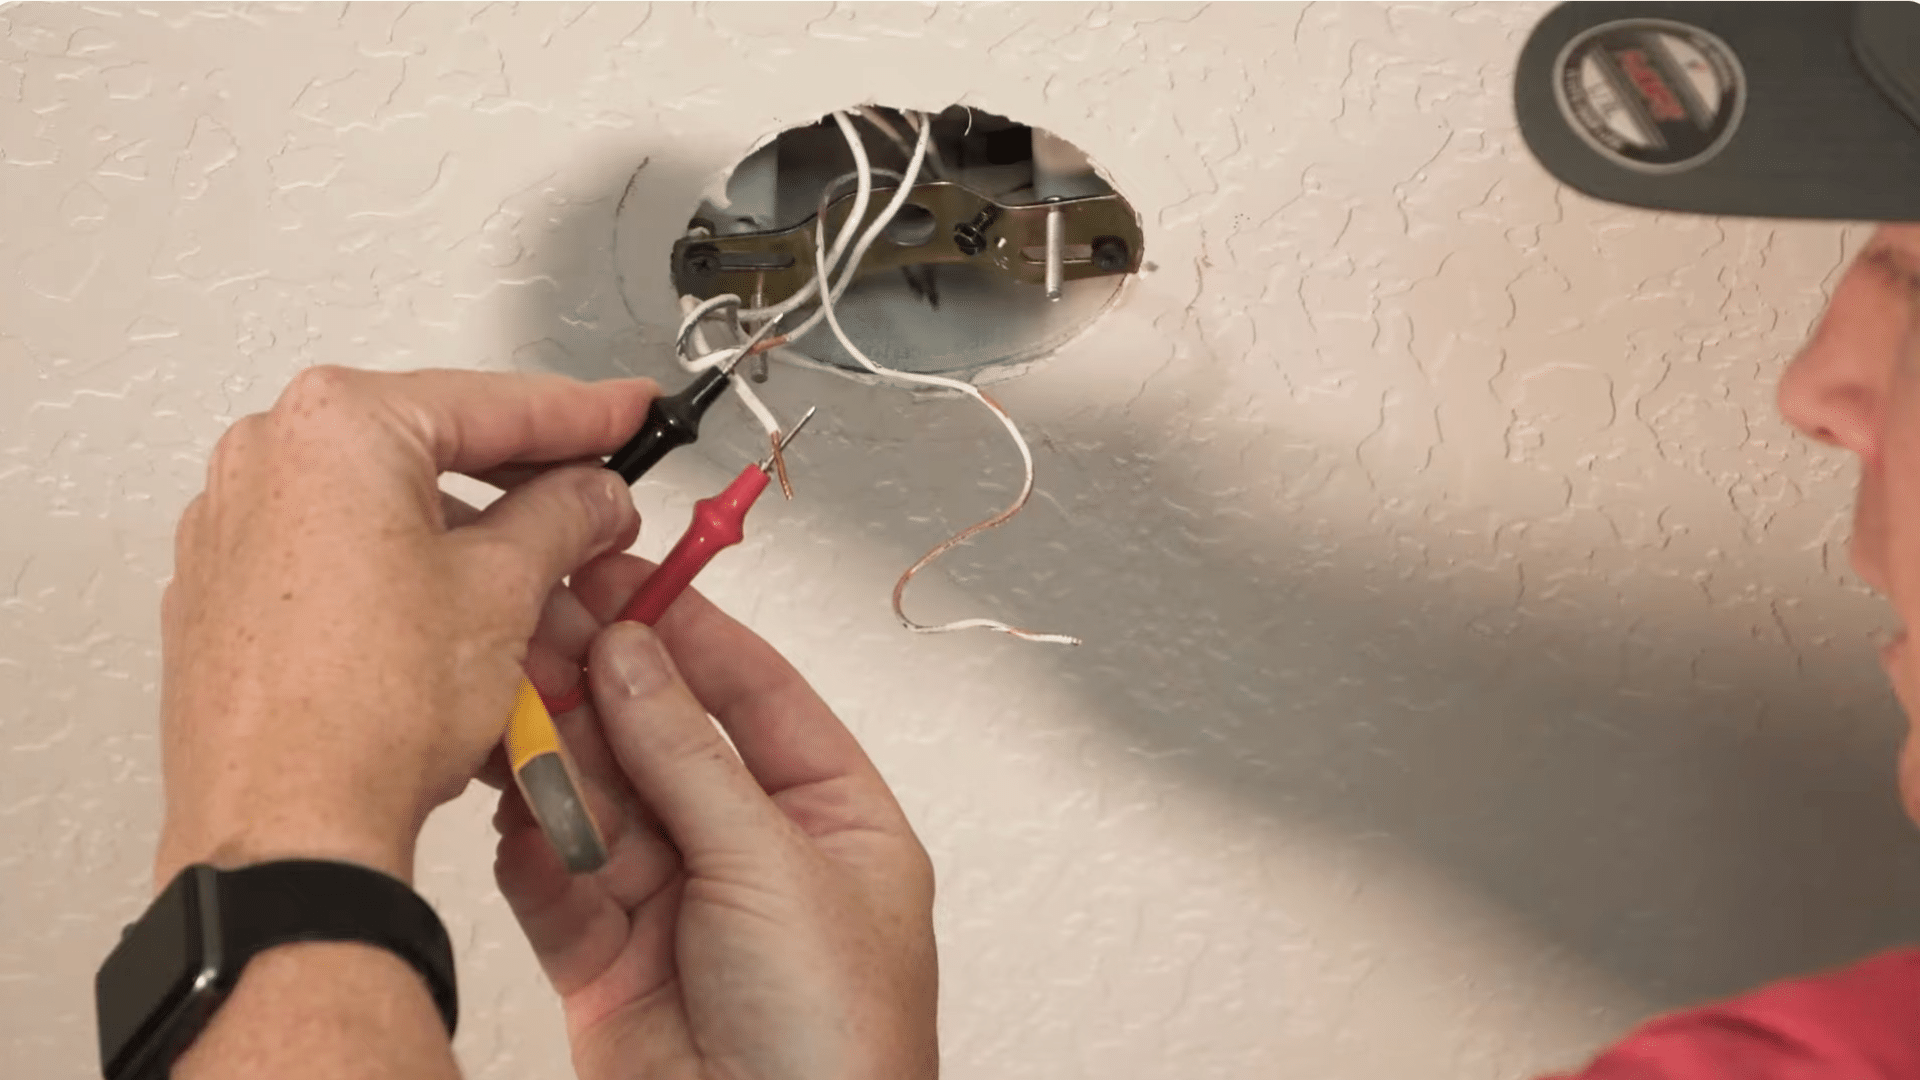
Even after turning off the breaker, it’s important to check the wires again. Use a voltage tester and touch it to each wire from both sides.
If there’s still power, it will light up, but if everything stays dark, you’re completely safe to continue. This quick check prevents surprises and ensures the next steps are done without any risk.
Voltage testers are inexpensive and provide peace of mind when you’re working with wiring at home.
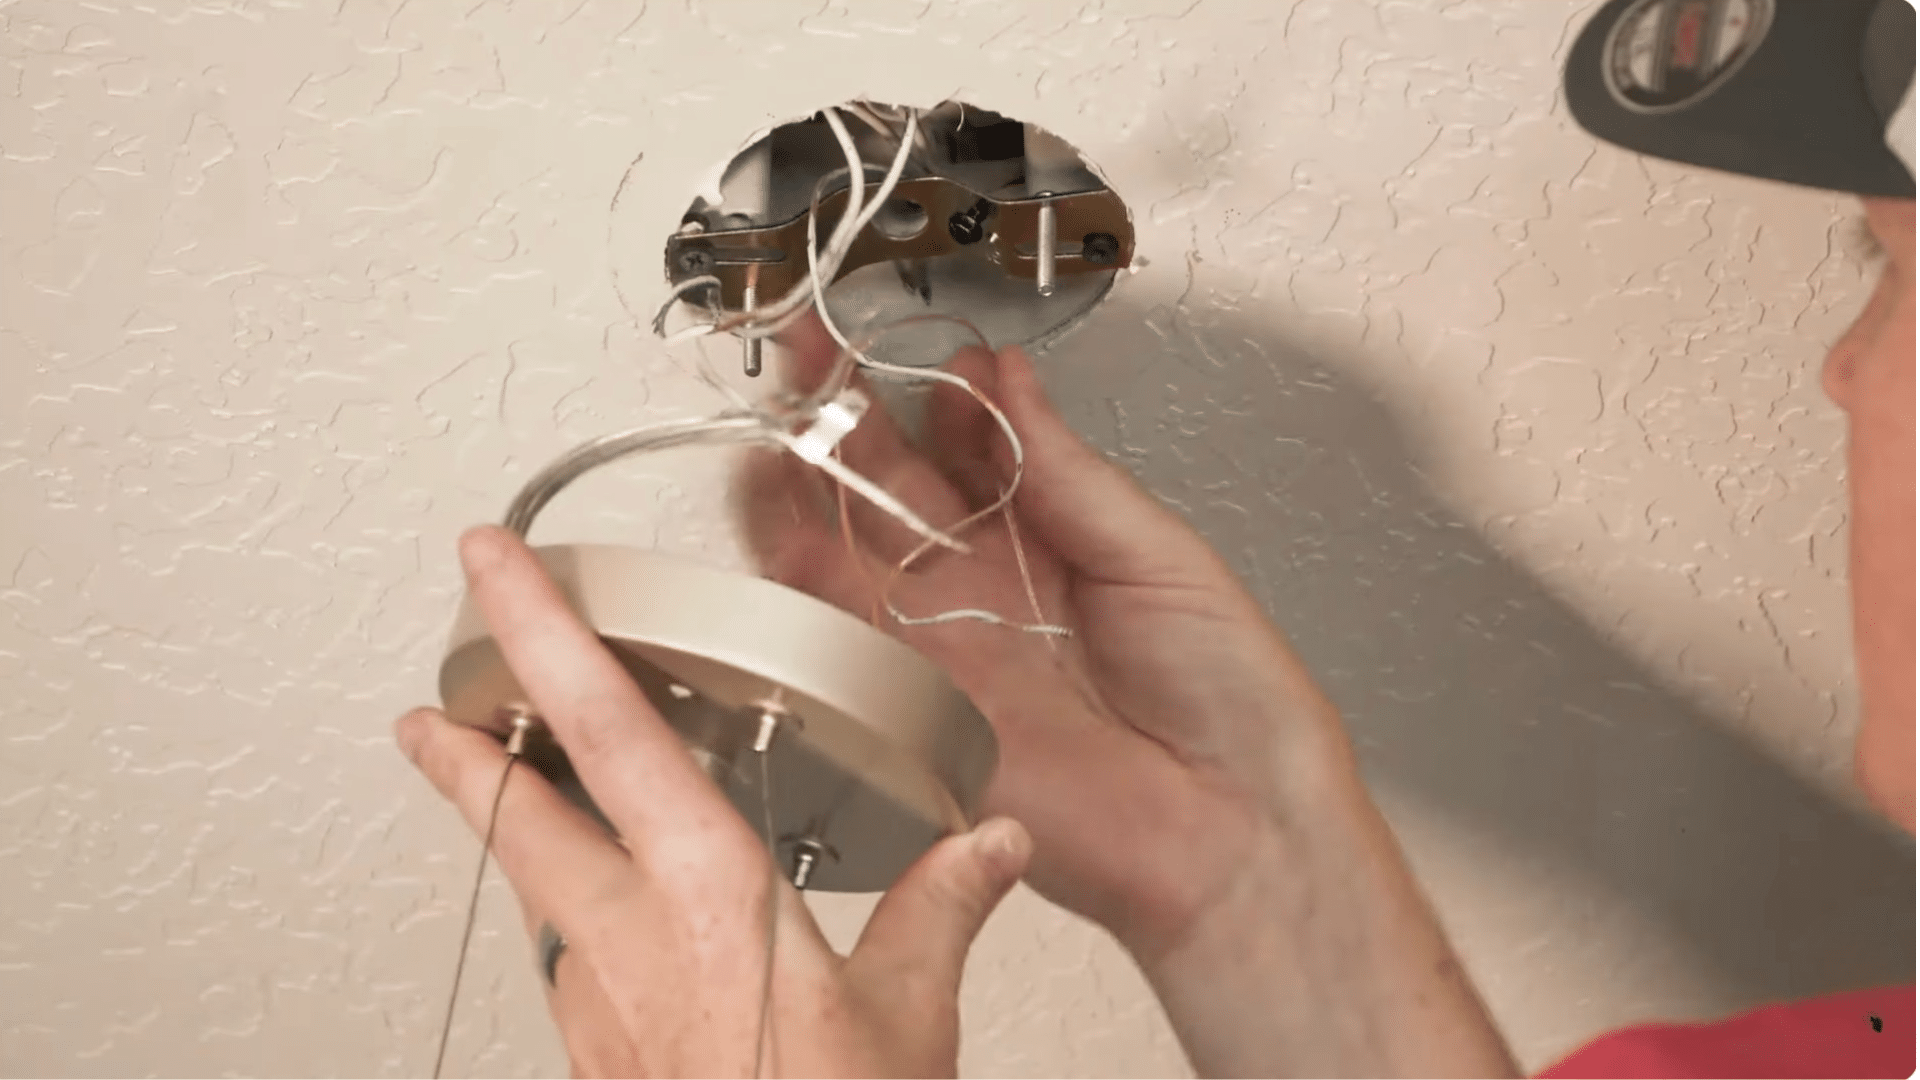
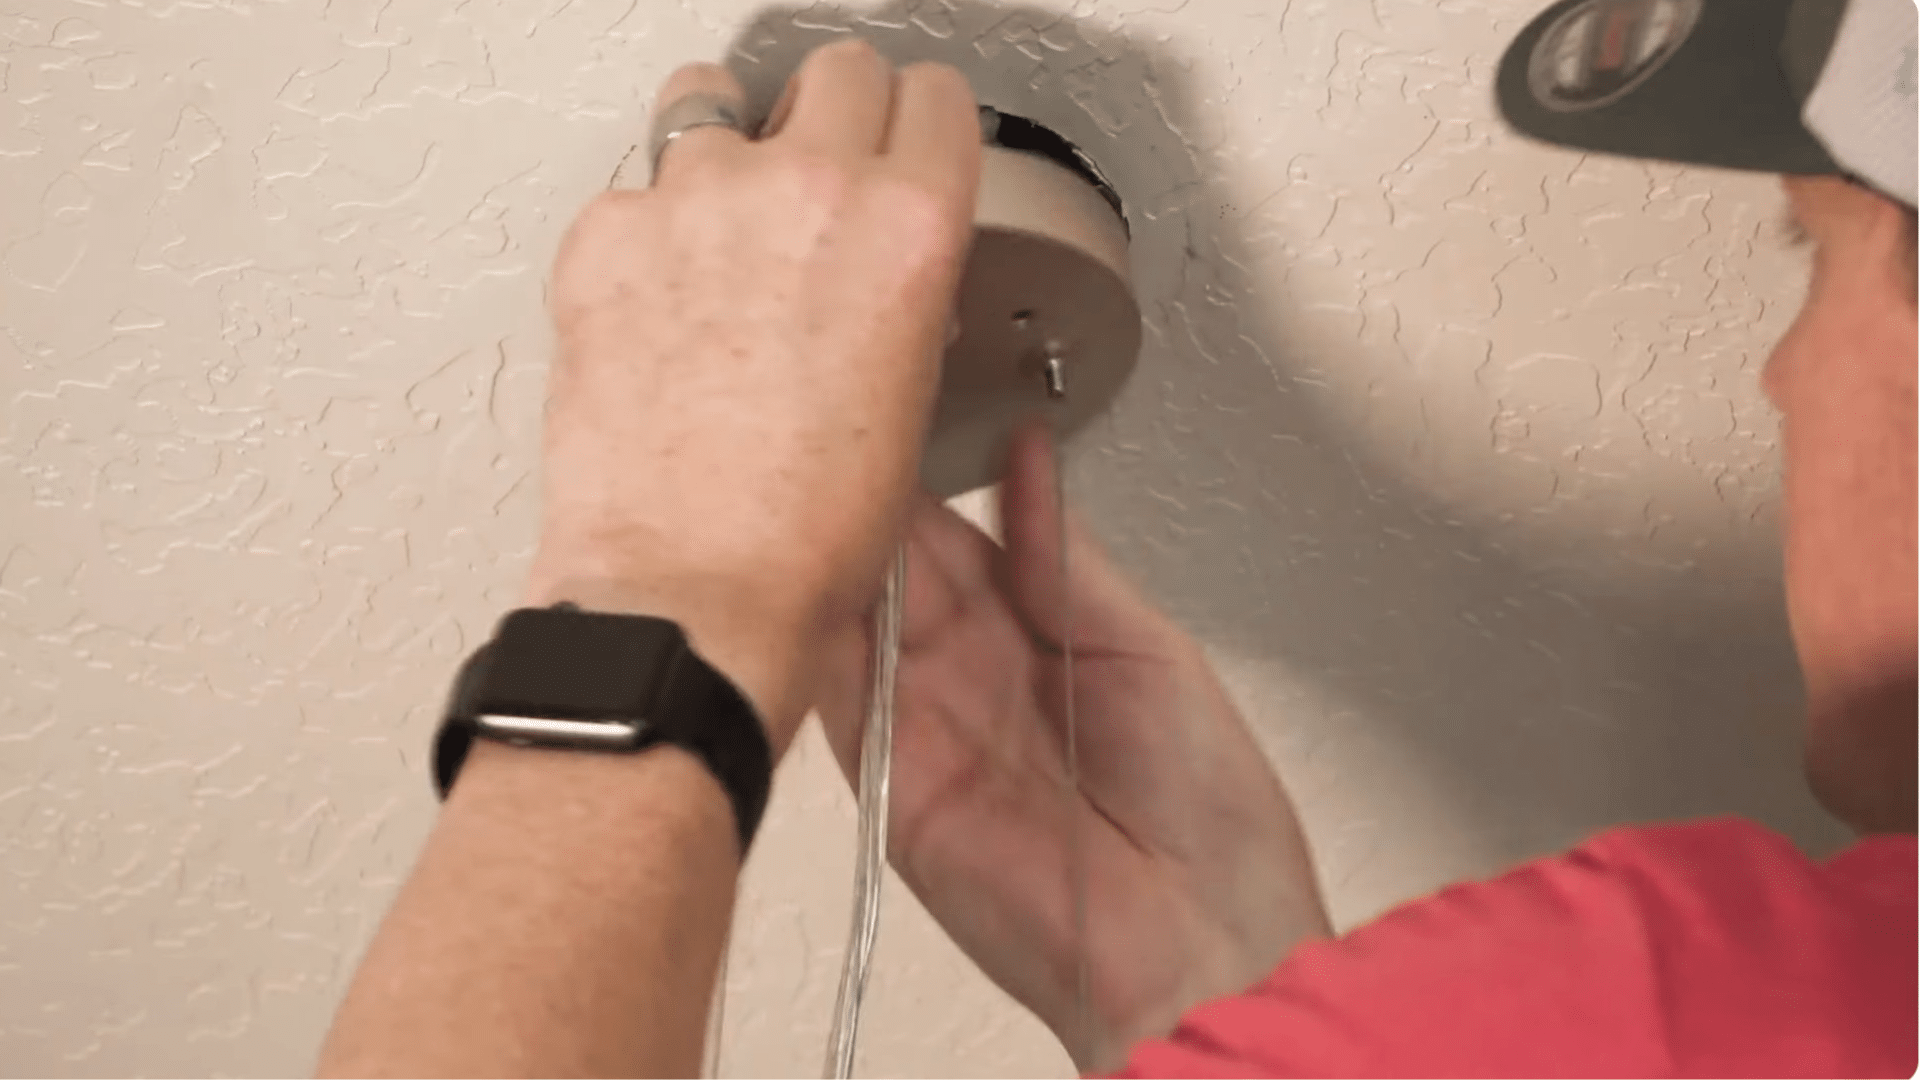
Step 5: Check the Mounting Plate Fit

Before replacing anything, compare the new fixture’s mounting plate to the one already installed on your ceiling. If the spacing of the screws matches, you can keep the existing plate where it is.
Test the new decorative caps on the posts to make sure they thread correctly.
If they fit, no replacement is needed. If they don’t, simply remove the old plate and attach the new one. Checking this early prevents trouble once the fixture is ready to mount.
Step 6: Install Bulbs Before Mounting
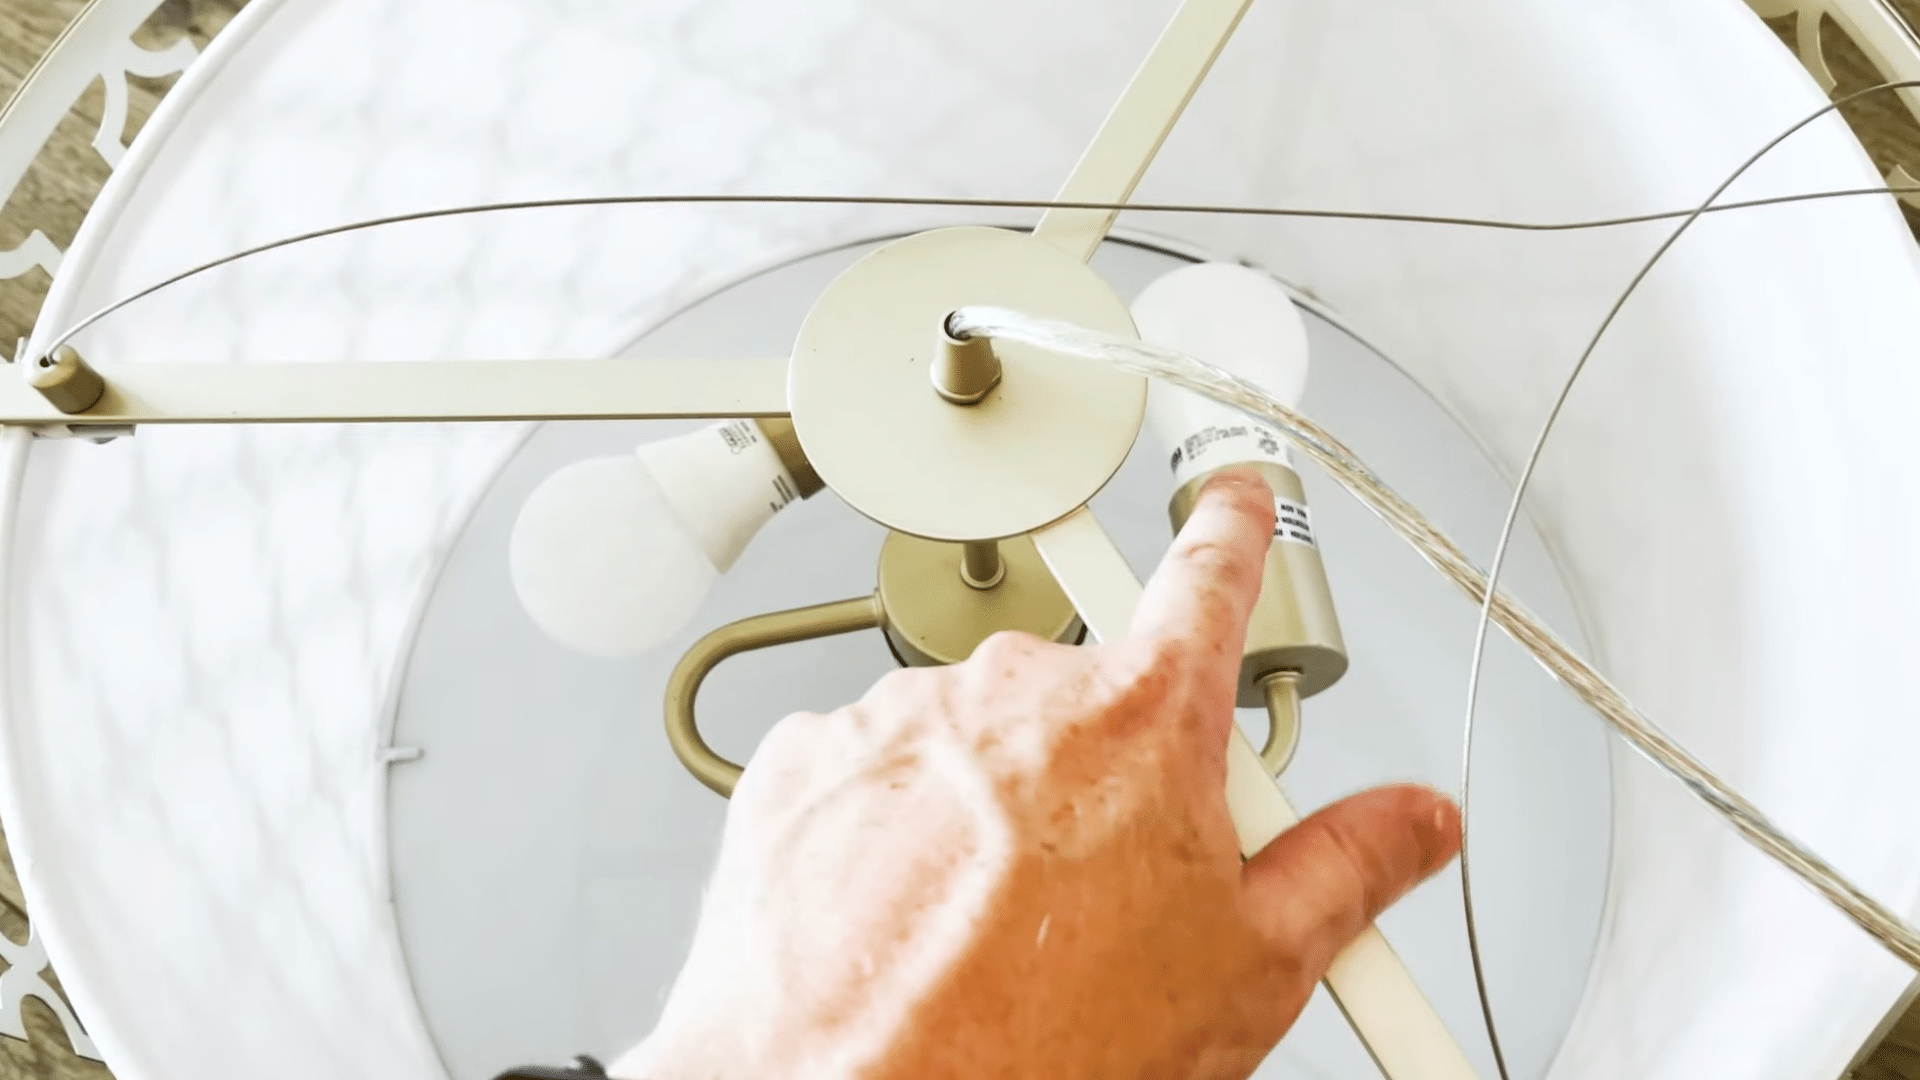
Putting the bulbs into your new fixture while it’s still on the ground saves you a lot of frustration later. It’s much easier to twist bulbs into place when the fixture is steady and close to you.
This small step also helps you spot any issues with bulb type or fit before everything goes up on the ceiling.
Preparing the fixture this way makes the final installation smoother and keeps the entire process more manageable.
Step 7: Fasten the Strain-Relief Cable
Your new fixture includes a strain-relief cable that acts as a backup support. Attach it to the mounting plate using the grounding screw position or another secure point.
This cable keeps the fixture from falling if the wiring ever loosens, adding an important safety layer. Securing it only takes a moment but gives you peace of mind.
Once it’s attached, the fixture has a reliable safety hold even before the wiring and caps are fastened.
Step 8: Connect the New Fixture Wires
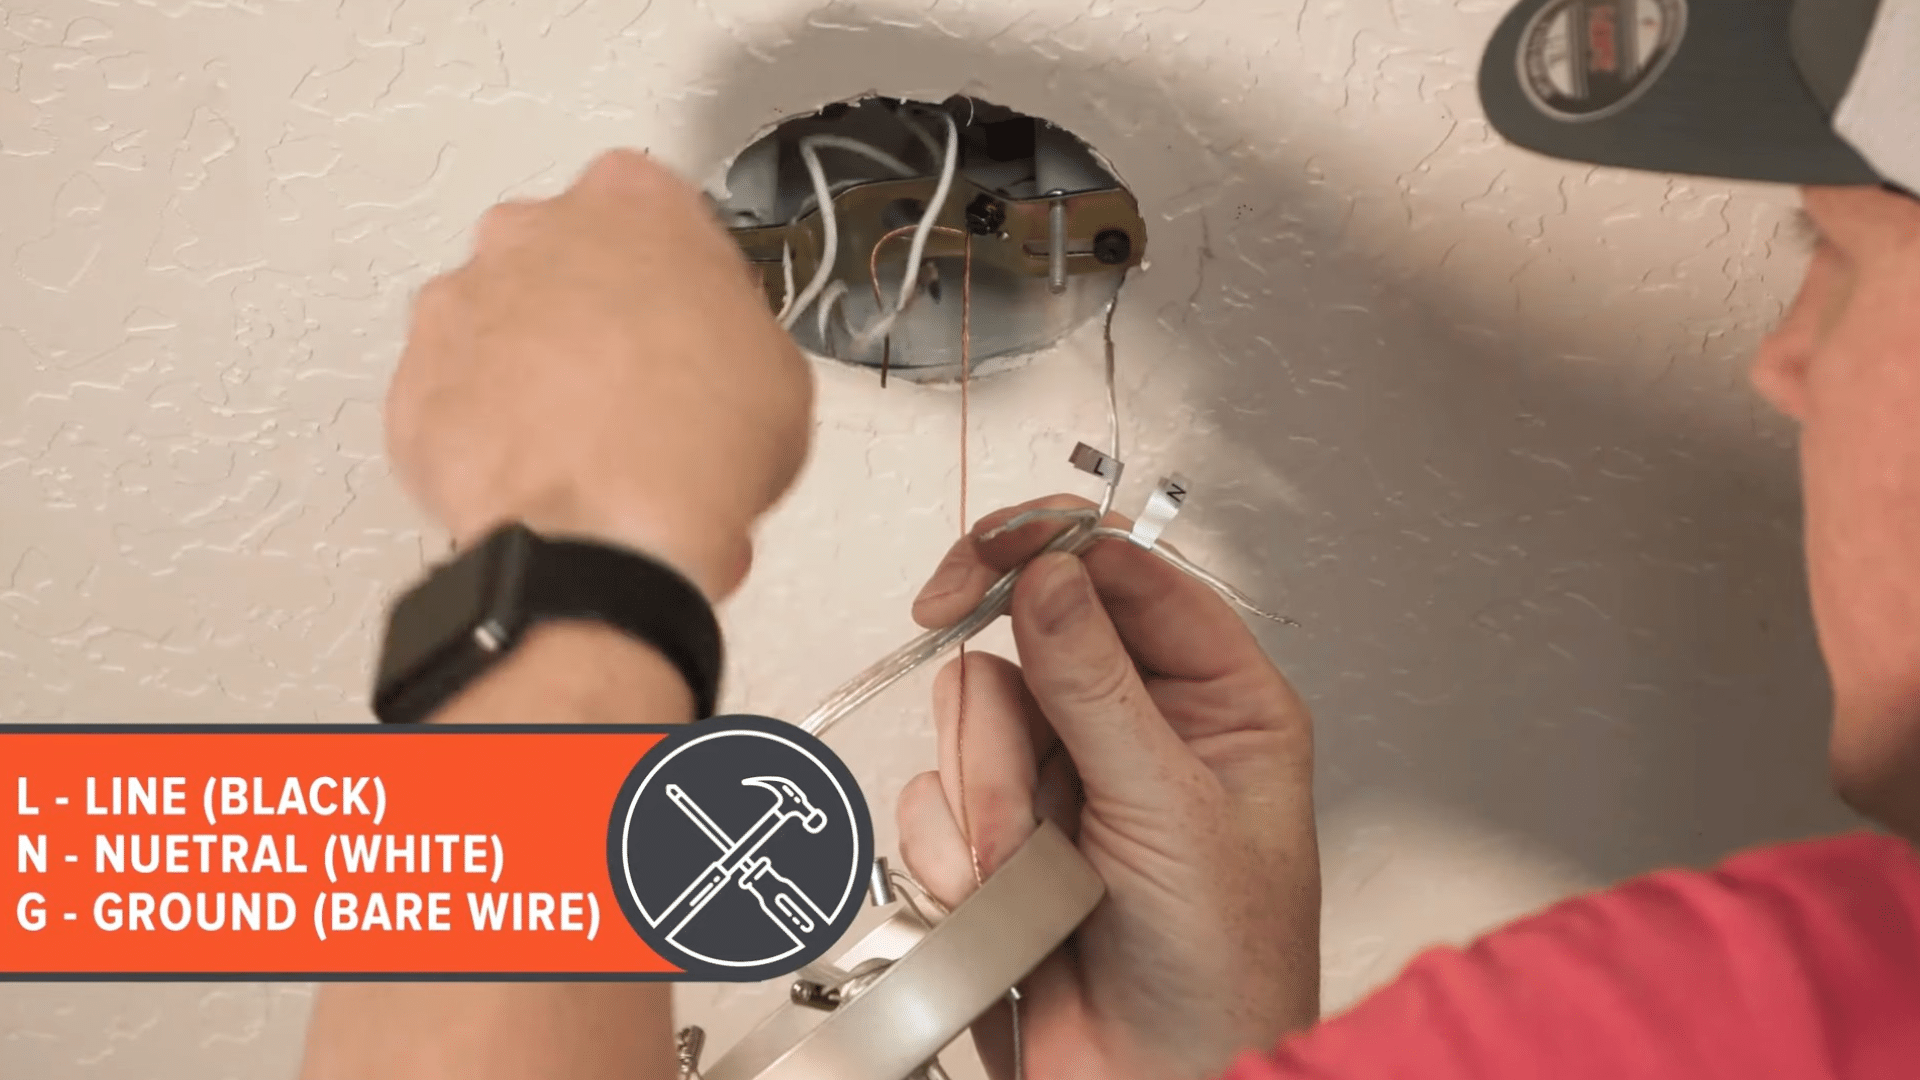
Match each house wire with the correct fixture wire: black to line, white to neutral, and green or bare to ground.
Twist them together using wire nuts, making sure each connection is snug and properly enclosed.
After securing the caps, pull lightly on each wire to confirm it won’t slip free once tucked inside the ceiling box.
This check keeps everything stable and prevents loose connections later. Once each wire holds firm, you’re ready to move on.
Step 9: Tuck Wires Into the Junction Box
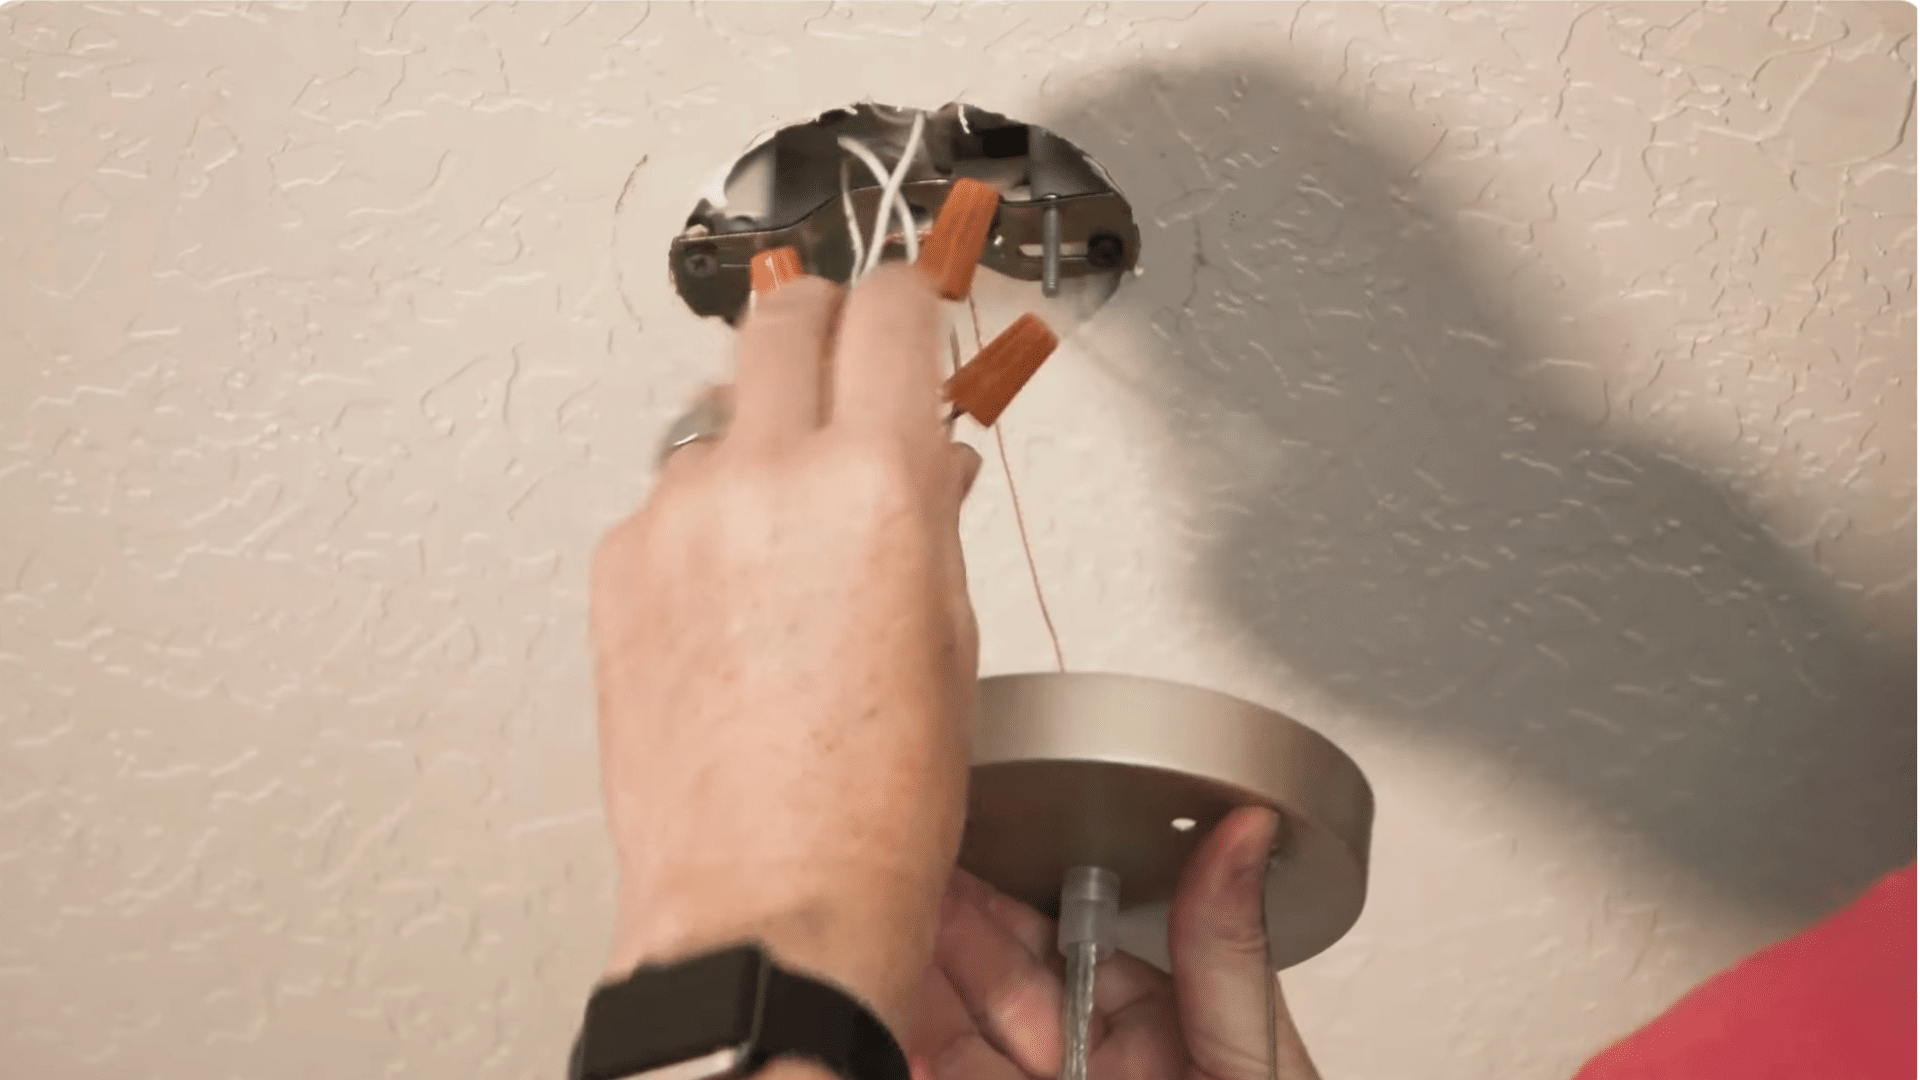
Carefully fold the wires back into the junction box, keeping the exposed ends separated so nothing touches by accident.
Line up the holes on the mounting plate with the ceiling screws so the fixture can slide into place.
This step sets the foundation for securing the fixture, so take your time arranging the wires neatly.
A clean layout helps the fixture sit level and makes tightening the decorative caps much easier.
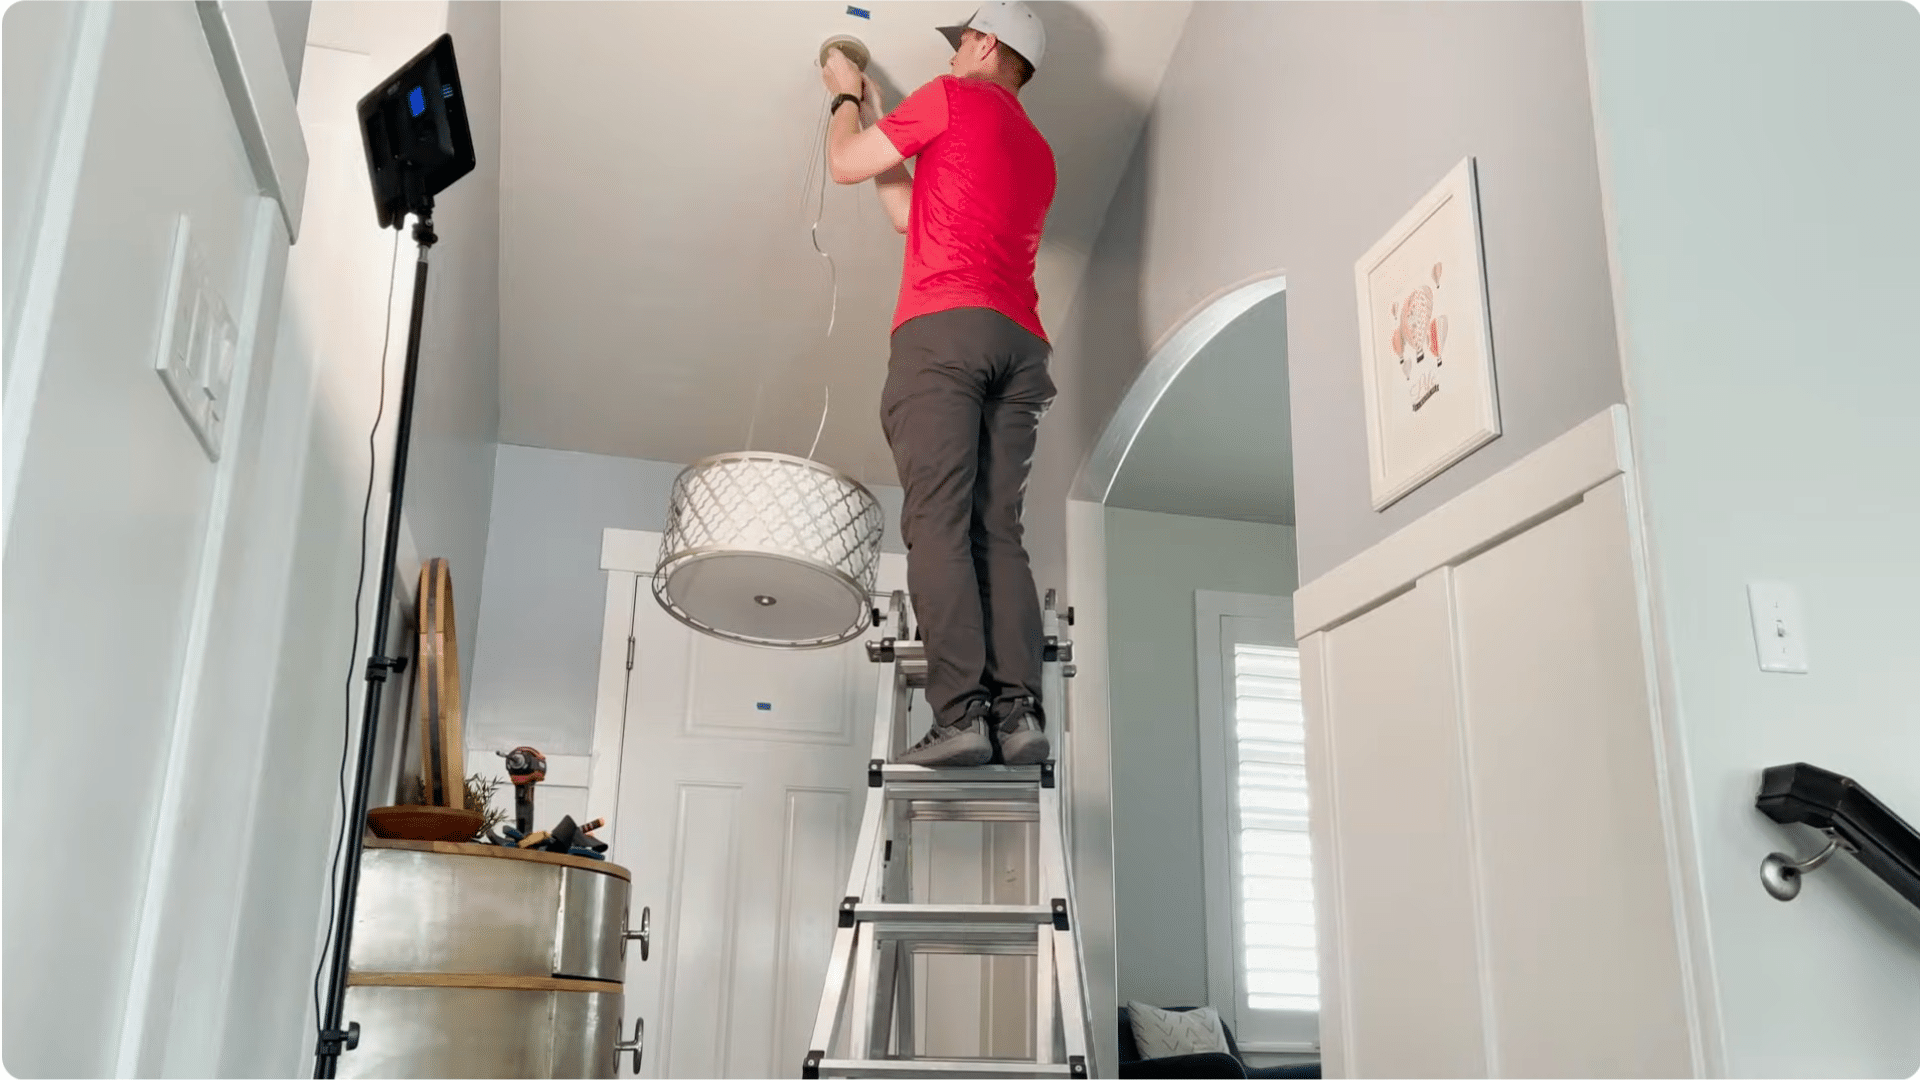
Step 10: Secure the Fixture to the Ceiling
Lift the fixture and guide the ceiling screws through the matching holes. Use the decorative caps to secure it, tightening them until the fixture sits firmly against the ceiling.
This model uses a one-way push system, so the cables lock into place as you lift the fixture upward. Adjust the height, check that everything feels stable, and finish tightening.
Once set, the fixture should sit even and secure without shifting.
Step 11: Restore Power and Test the New Light
Head back to your circuit breaker and switch the power on. Return to the room and test the light to make sure everything works as expected.
If the fixture turns on smoothly and looks stable, then the installation is complete. This final check confirms your wiring, mounting, and safety steps all came together correctly.
With the new light in place, you’ve successfully replaced your fixture from start to finish.
This tutorial is based on a helpful video by LRN2DIY. A big thanks to the creator for providing such a clear and detailed walkthrough.
You can check out the original video on their YouTube channel here or watch it below.
When to Call an Electrician?
There are times when changing a ceiling light fixture is no longer a simple DIY project, and I always want readers to know when it’s safer to stop and call a professional.
If you notice damaged wiring, burnt marks, or brittle insulation, it’s best not to handle it on your own.
The same goes for overloaded junction boxes or wires that feel loose even after tightening.
Flickering lights after proper installation can also signal a deeper electrical issue. When anything feels off or beyond what you expected, bringing in an electrician is the safest choice.
They can diagnose the problem quickly and make sure your home’s wiring stays secure in the long run.
Common Mistakes to Avoid When You Change Light Fixtures
There are a few common mistakes that can slow you down or create safety issues when changing a ceiling light fixture. The most important ones here so you can feel more prepared before you begin.
- Turning off the wrong circuit breaker and accidentally leaving power running to the fixture.
- Mixing up the wires or leaving the wire nuts loose often leads to flickering later.
- Pushing the wires back into the junction box without checking that the exposed ends are separated.
- Forgetting to secure the strain-relief cable, which protects the fixture if anything loosens.
- Mounting the fixture unevenly because the screws weren’t aligned or appropriately tightened.
- Rushing the final check and missing minor issues that are easy to fix before restoring power.
Conclusion
Changing a ceiling light fixture is a useful home skill that can save time and help you understand your space better.
Once the wiring, mounting, and safety steps are clear, the process feels much more manageable.
Taking things slowly, double-checking connections, and testing the light at the end all play a big role in a successful result.
It’s also important to recognize when a situation goes beyond basic installation and requires professional help.
Paying attention to warning signs keeps both you and your home safe. With the right tools and preparation, most fixture replacements can be completed without stress.
If this guide helped you or you still have questions, leave a comment below and share your experience or ask for tips.
Frequently Asked Questions
How Do I Know IfMy Ceiling Box Can Support My New Fixture?
Check the box label for its weight rating and compare it to your new fixture. If the rating is missing or unclear, upgrading to a listed support box is safer.
Should I Remove Old Paint or Debris Around the Ceiling Opening?
Yes, cleaning the area helps the new fixture sit flush against the ceiling. Removing loose paint or debris also prevents gaps and improves the overall fit and finish.
Can I Shorten Long Fixture Wires without Causing Issues?
Yes, you can trim them as long as enough wire remains to make secure connections. Cut cleanly, strip properly, and ensure the wire nuts fully cover the exposed copper.
What if My Ceiling Has No Ground Screw Available?
If the box lacks a ground screw, use an approved grounding clip or replace the box with one that supports proper grounding. A secure ground connection is important for safety.
Can I Adjust the Fixture Height After Mounting?
Many fixtures allow height adjustments before tightening the final caps. Once everything is secured, adjustments become harder, so set the preferred height while the fixture is still loosely positioned.