
MacBooks usually run smoothly for years, but over time, the system can start to feel slow or cluttered. Apps may stop responding, storage fills up with old files, or settings become messy after multiple updates.
In other situations, people simply want to clear everything before selling the device or passing it on to someone else.
In cases like these, understanding how to factory reset macbook can make the process much easier. A factory reset removes personal files, clears system settings, and restores the laptop to a clean state.
Many users rely on this step to fix persistent issues or prepare the device for a new owner. This guide explains the reset process step by step.
It also covers important steps to take before resetting, the differences between Intel and Apple Silicon Macs, common issues users face, and helpful tips often shared in community forums.
What Does a Factory Reset on a MacBook Actually Do?
A factory reset removes all personal data from the MacBook and restores the system to its original state. This process erases files, apps, user accounts, saved settings, and login details stored on the device.
After the reset, the MacBook looks and behaves like a fresh system that has just been set up. Important files remain safe only if they are backed up before the reset begins.
Many users store their data in the cloud, so it can be restored later on another Mac or after reinstalling macOS.
People often choose a factory reset when they plan to sell, trade in, or give away their MacBook.
Clearing personal data protects privacy and ensures the next user receives a clean device without leftover files or accounts.
Things to Do Before You Factory Reset Your MacBook
Before starting the reset process, a few preparation steps help prevent data loss and account issues. The first step is backing up important files.
Many users rely on Time Machine with an external drive, while others prefer cloud storage services to keep documents, photos, and other data safe.
It is also important to sign out of Apple ID and iCloud. This removes the MacBook from the account and prevents activation problems later.
Signing out ensures that personal services such as iMessage, FaceTime, and iCloud syncing are no longer linked to the device.
Another recommended step is deauthorizing the Mac from Apple services like Apple Music or Apple TV.
How to Factory Reset MacBook Using Erase Assistant?
MacBooks with Apple Silicon or a T2 security chip include a built-in erase assistant that removes personal data and restores the system to its original factory state.
1. Back Up Your Mac and Prepare Your Apple ID
![]()
Before starting the reset process, it is important to back up important files using Time Machine, cloud storage, or an external drive.
The erase process permanently deletes documents, photos, apps, accounts, and saved settings from the MacBook. Creating a backup ensures that files can be restored later if needed.
It is also necessary to keep the Apple ID and password ready, since the system may ask for them while signing out of Apple services and Find My during the reset steps.
2. Open System Settings and Go to Transfer or Reset
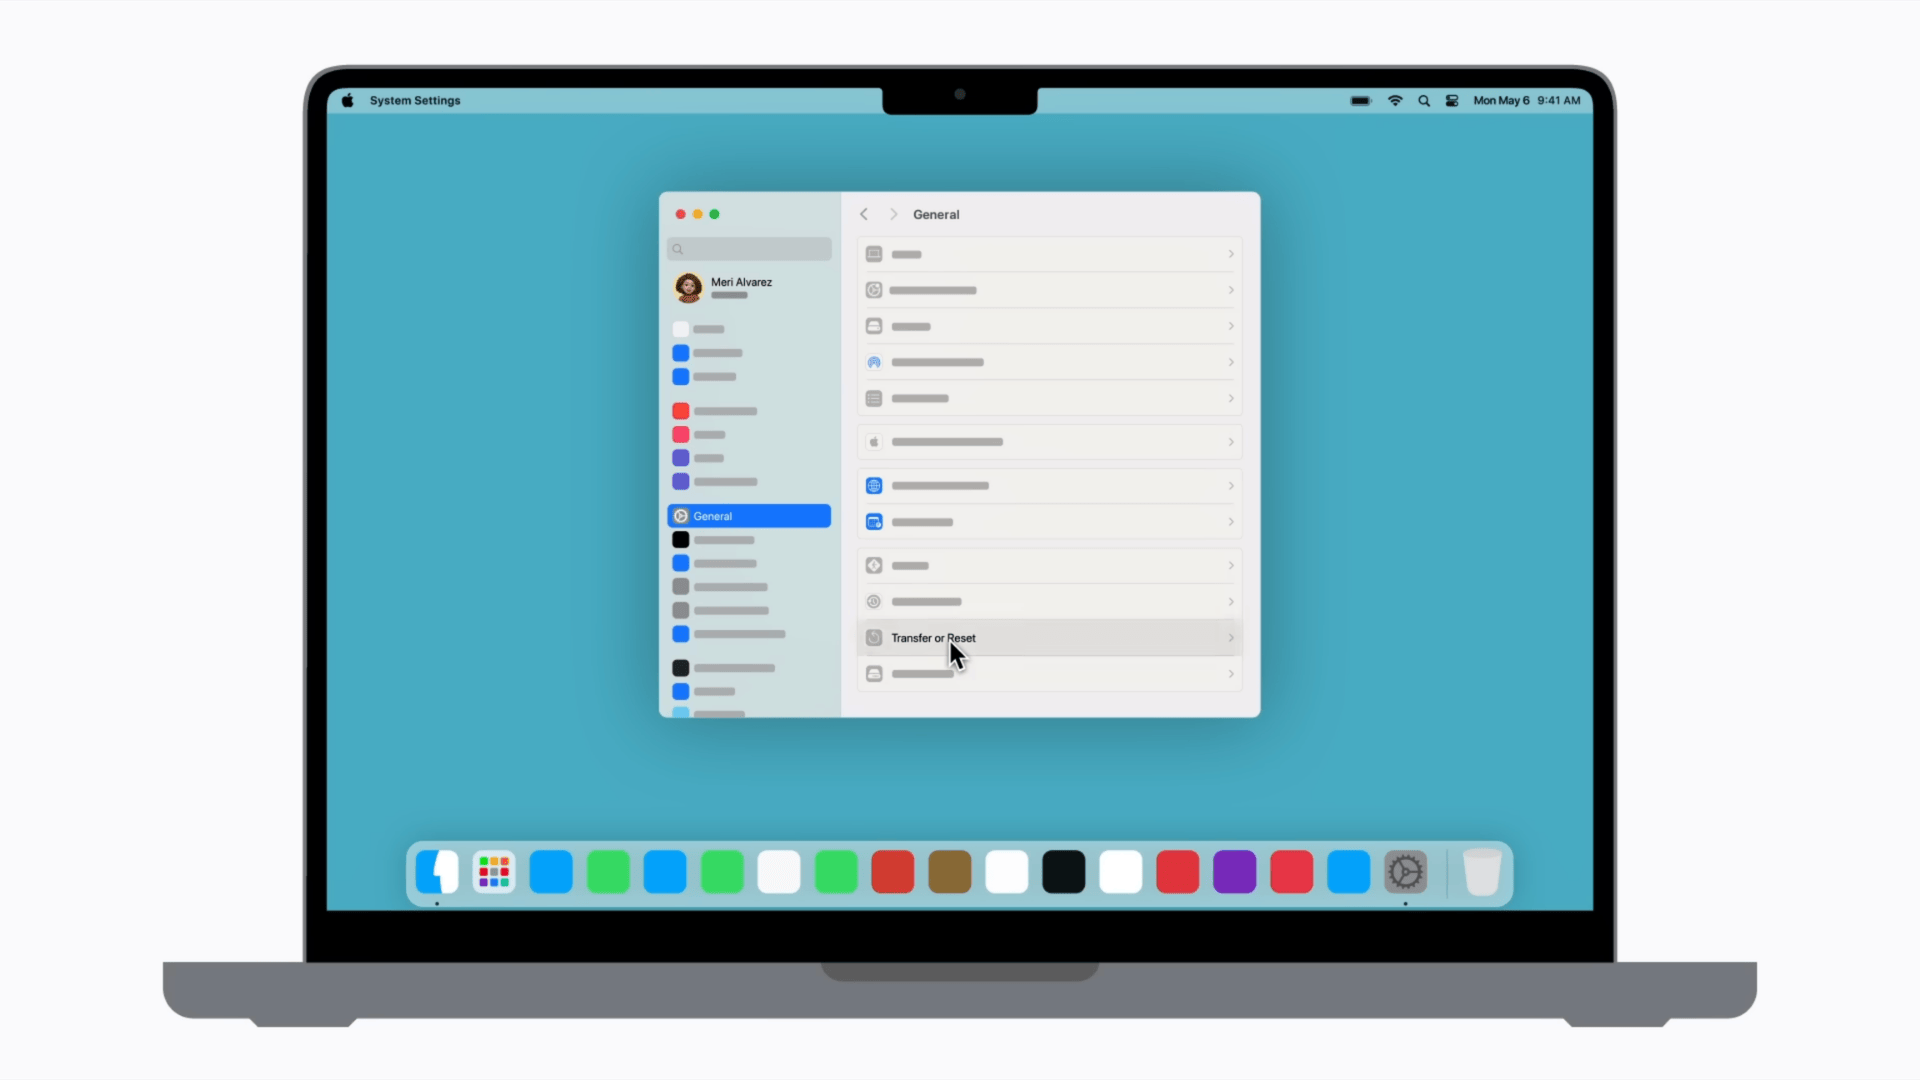
Click the Apple menu located in the upper left corner of the screen and open System Settings from the dropdown.
Inside the settings window, select General from the sidebar and scroll until the Transfer or Reset option appears. This section contains tools designed for resetting the device or preparing it for a new owner.
The option is available on Macs running macOS Monterey 12 or later and works on devices equipped with Apple Silicon or a T2 security chip.
3. Select “Erase All Content and Settings.”
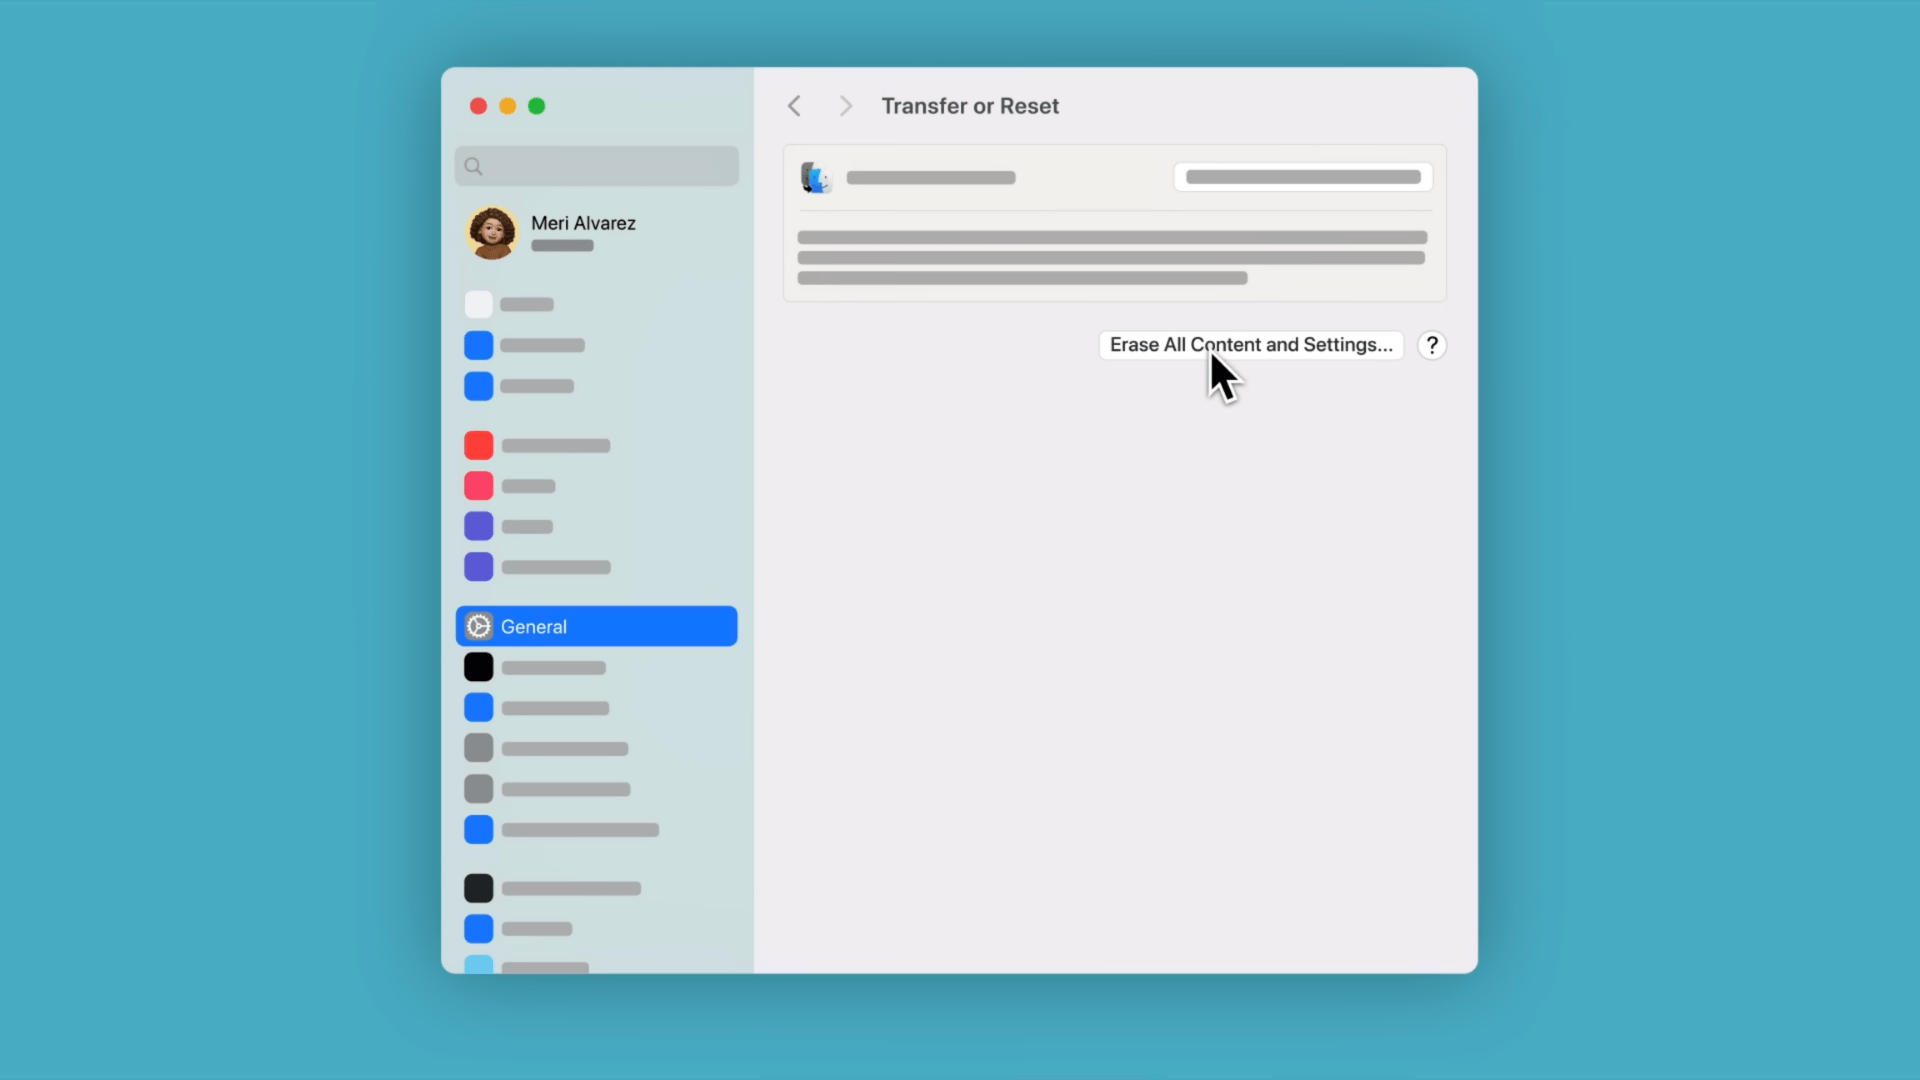
Inside the Transfer or Reset section, select the option called Erase All Content and Settings. This action opens the erase assistant, which automatically manages the reset process.
The assistant securely removes user accounts, personal files, installed apps, system preferences, and other stored data from the Mac.
Using this built-in tool is the simplest way to restore the device to a clean state without manually formatting the drive or deleting files through different utilities.
4. Unlock the Erase Assistant With the Administrator Password
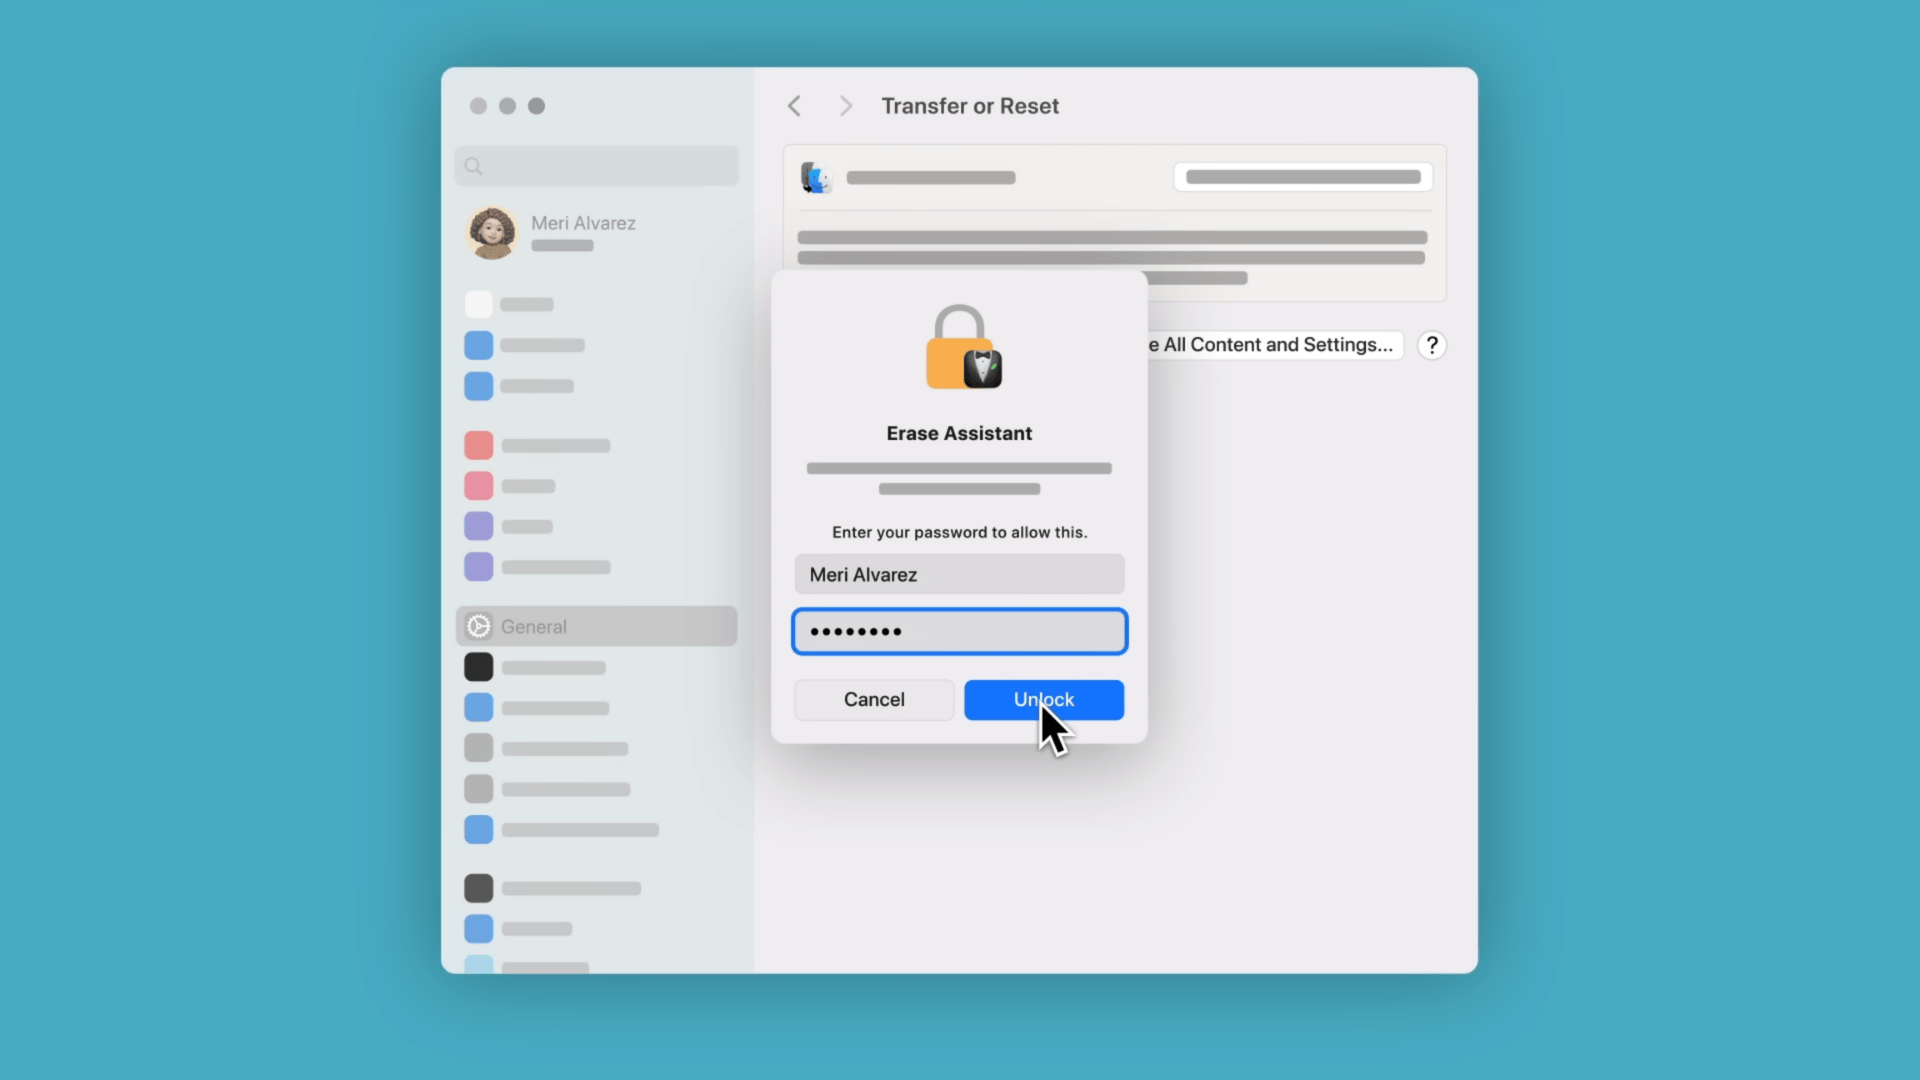
After selecting the erase option, the Mac asks for the administrator password used to log in to the system. Entering this password unlocks the erase assistant and allows the process to continue.
Once the assistant opens, it displays a detailed summary of items to be removed from the device.
This list usually includes user accounts, media files, downloaded apps, system settings, and Apple services currently connected to the MacBook.
5. Follow the Prompts to Sign Out and Start the Erase Process
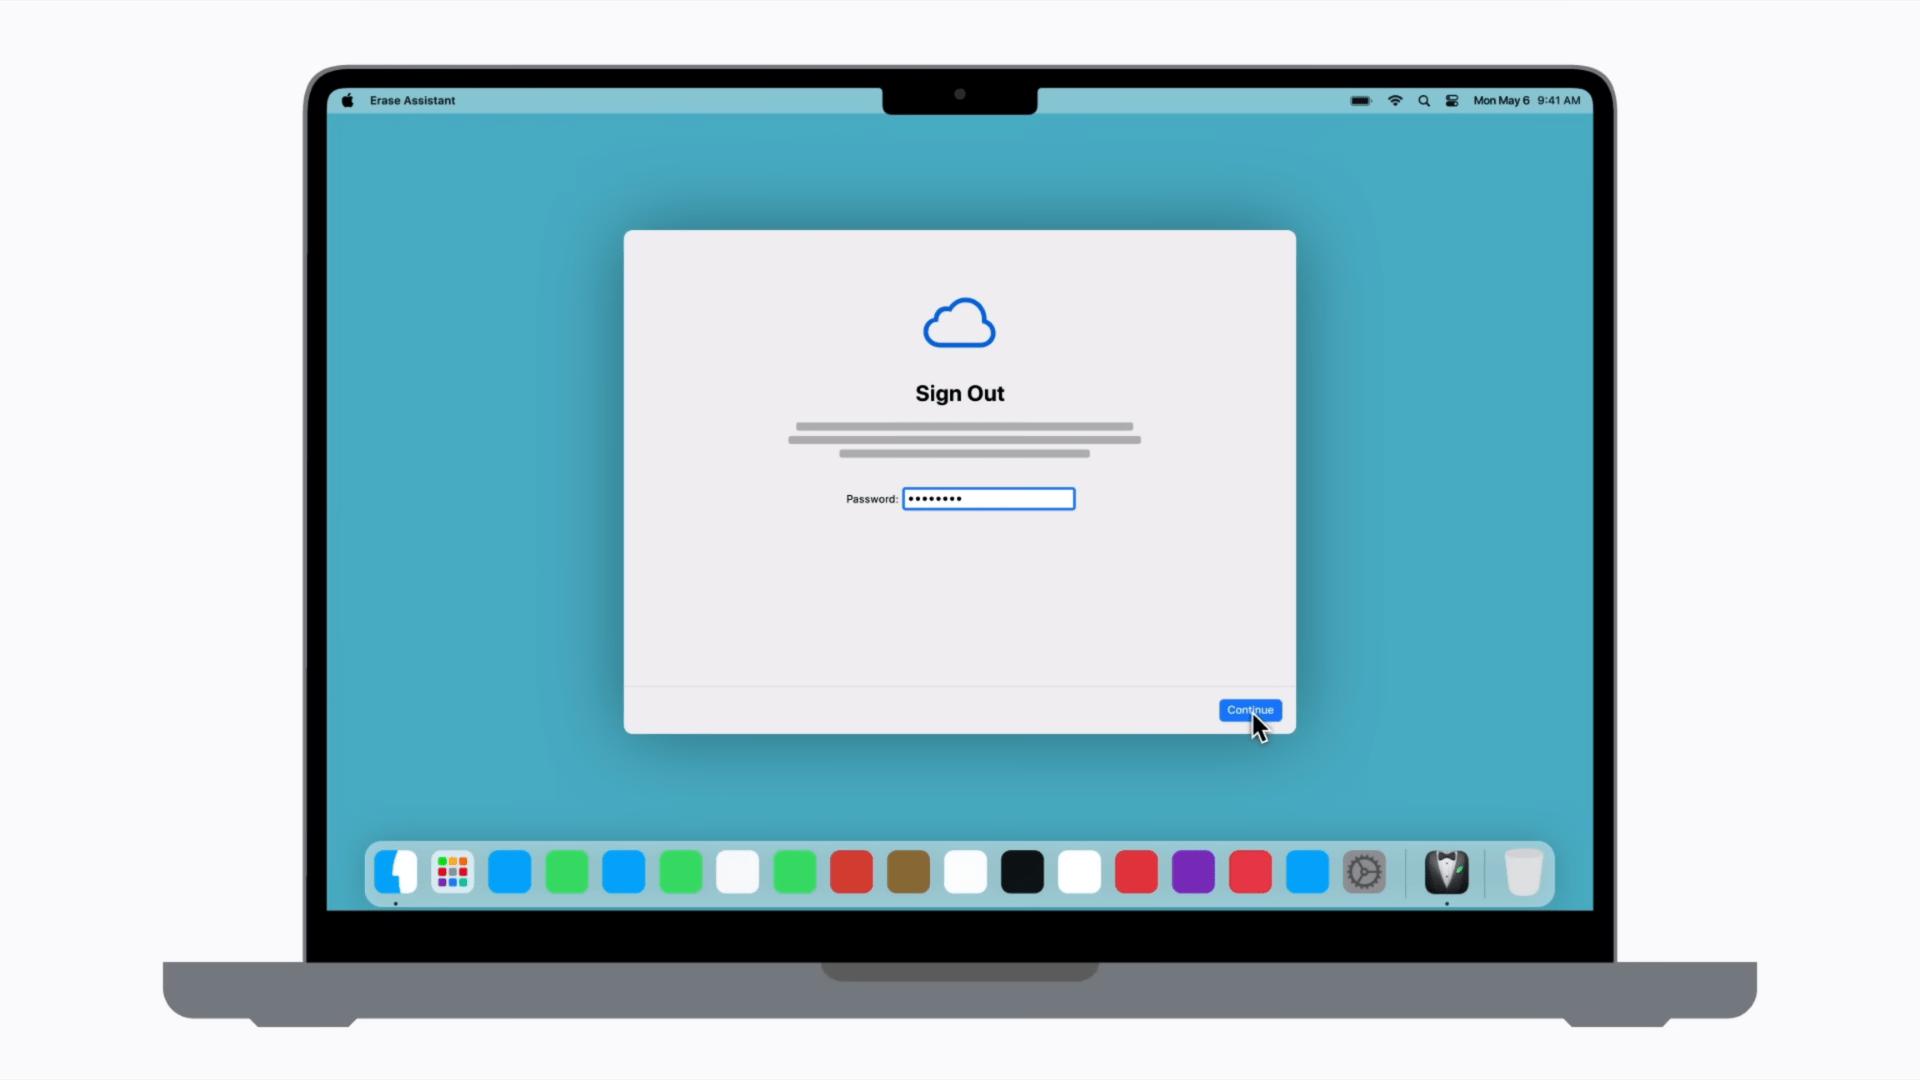
The erase assistant continues by guiding the remaining steps needed to reset the Mac. During this stage, the system asks to sign out of Apple services and disable Find My using the Apple ID and password.
This step removes the activation lock and disconnects the MacBook from the Apple account linked to the device.
After confirming these prompts, the assistant begins the erase process, removing files, settings, user accounts, and other stored data from the system.
6. Complete the Restart and Set Up the Mac Again
![]()
Once the erase process begins, the Mac restarts and displays a progress bar while the system removes stored data and resets internal settings.
This stage may take several minutes, depending on the amount of information stored on the device. The MacBook may restart more than once during the process.
After completion, the system loads the setup screen that appears on a new Mac. From this point, the device can be set up again or prepared for a new owner.
This tutorial references guidance from an official Apple Support video that explains how the reset a MacBook using the built-in erase assistant.
What Happens After a MacBook Factory Reset?
After a factory reset finishes, the MacBook restarts and displays the setup screen that appears on a new device. The first steps usually involve selecting a language, connecting to a WiFi network, and choosing the region.
Once the connection is complete, the system may ask to sign in with an Apple ID to activate services such as iCloud, the App Store, and other Apple features.
Users who created a backup earlier can restore files and settings using Time Machine or another backup source during this setup process.
This helps bring back apps, documents, and personal preferences. If the MacBook is being sold, traded, or given away, the setup process should be stopped at the welcome screen.
Leaving the device at this stage allows the next owner to complete the setup with their own Apple ID and preferences.
Common Problems People Face While Resetting a MacBook
Some users experience account or system-related issues before the reset begins. These problems usually involve iCloud, access to recovery mode, or system freezes.
- Reset stuck or frozen: The reset process may appear frozen when large amounts of data are being erased, or the system is processing background tasks.
- Cannot sign out of iCloud: Signing out may fail if the device cannot connect to Apple servers or if Apple ID credentials are entered incorrectly.
- Recovery Mode not opening: Recovery Mode may fail to load if the startup keys are not pressed at the correct time during reboot.
- Activation Lock appearing after reset: The Mac may request the previous Apple ID login if Find My was not disabled before the reset process began.
- WiFi connection failing in recovery: A weak or unstable network can prevent macOS recovery tools from loading or downloading the required system files.
Reddit User Tips on How to Factory Reset MacBook
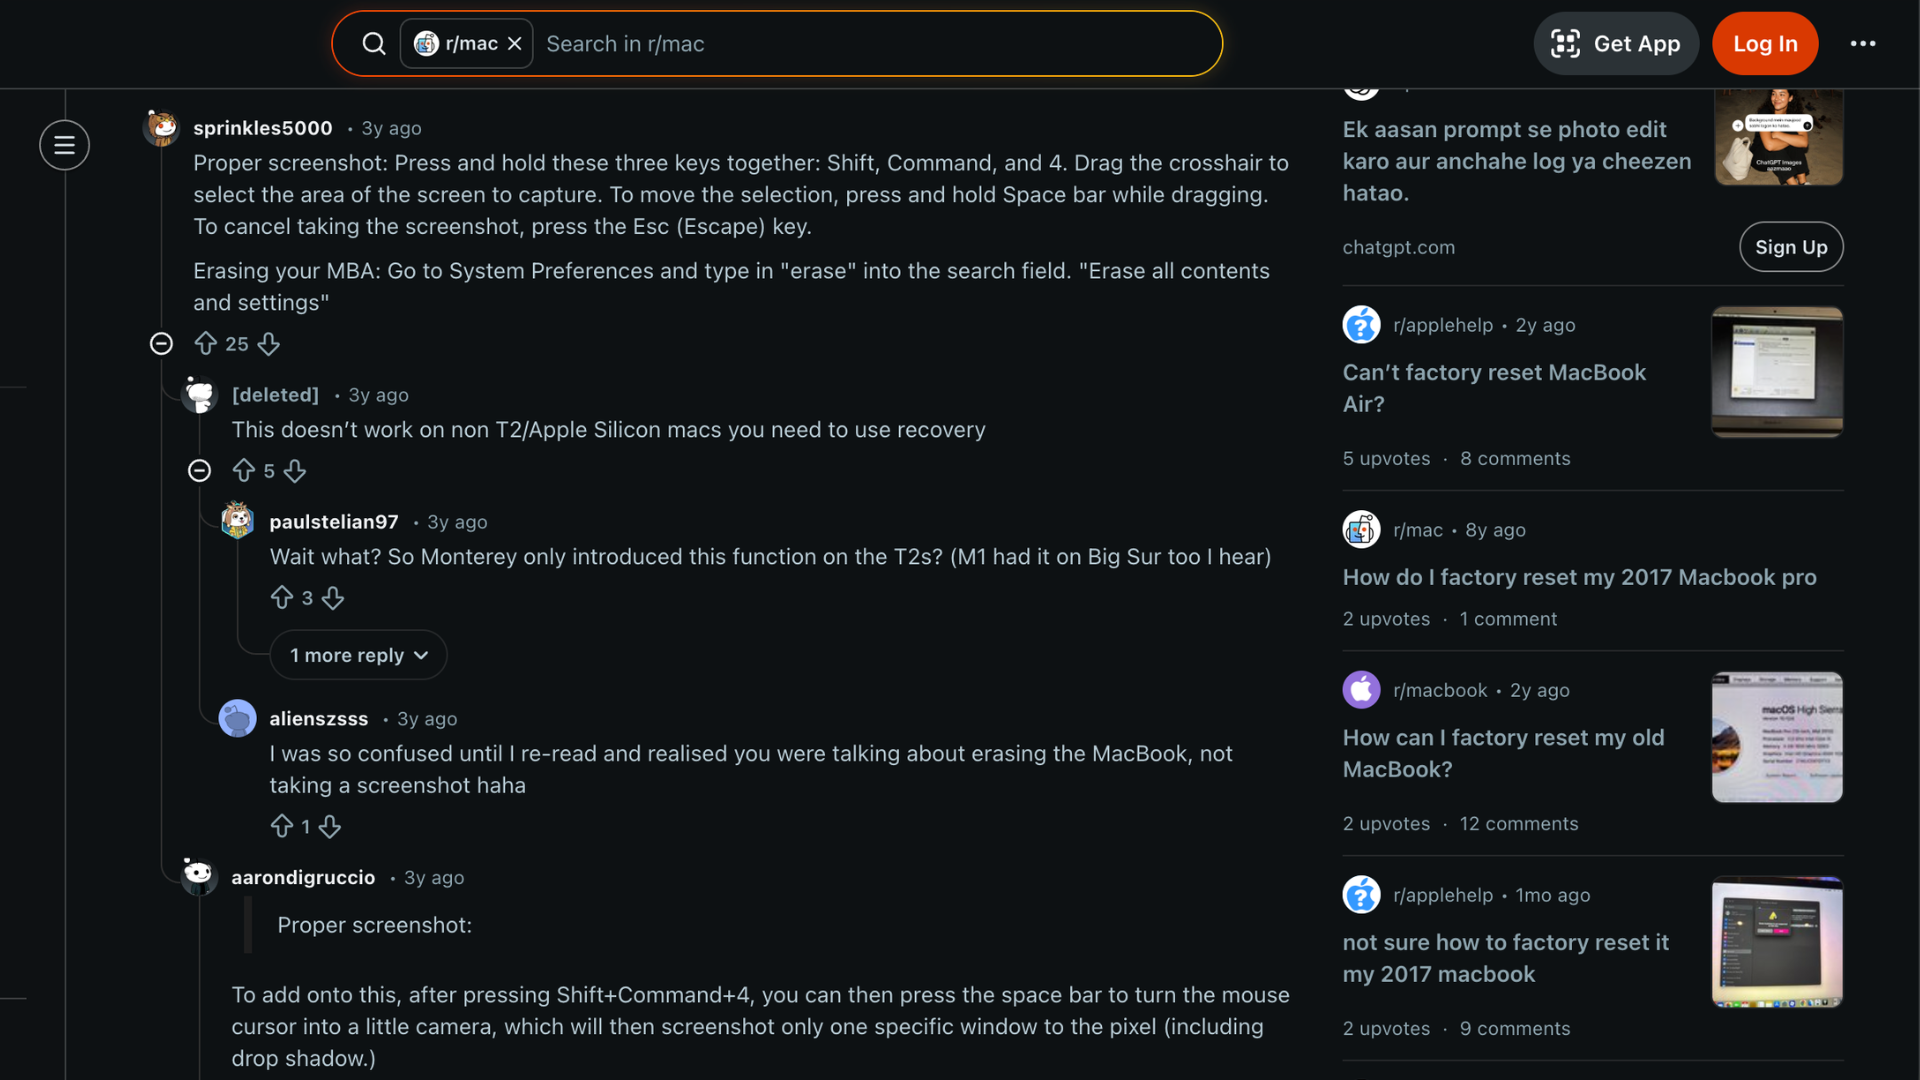
Reddit community discussions show that users often rely on simple built-in tools when learning how to factory reset a MacBook.
One common suggestion is to start by backing up files and capturing screenshots of important settings.
Some users recommend pressing Shift+Command+4 to take a screenshot of anything that might be needed later, such as login details or system preferences.
Several users also mention that newer macOS versions make the process much easier. With macOS Monterey and later updates, Apple introduced the Erase All Content and Settings option.
This feature removes personal data and restores the system without needing complex recovery steps.
A few Reddit users explain that the option can be found inside System Preferences or System Settings. Searching for the erase option or selecting the menu bar option usually brings up the erase assistant quickly.
How Long Does a MacBook Factory Reset Usually Takes?
The time required to complete a factory reset on a MacBook usually depends on the model and the method used.
In most cases, the process takes around 20 to 45 minutes from start to finish.
Newer MacBooks that use the Erase Assistant often complete the reset faster because the system automatically removes data and restores settings without manual steps.
Several factors can affect how long the reset takes. The amount of stored data on the device plays a role, since larger files take longer to erase.
Internet speed also matters when macOS needs to be reinstalled during the reset process.
Older Mac models using Recovery Mode may take longer because the system must format the disk and download macOS again before the setup screen appears.
When is a Factory Reset the Right Option?
A factory reset is usually considered when a MacBook starts showing consistent issues or when the device needs to be cleared before changing ownership.
- Slow system performance: A reset helps remove leftover files, unused apps, and system clutter that may slow down overall Mac performance.
- Preparing to sell the device: Resetting removes personal data, Apple accounts, and saved settings so the next owner receives a clean Mac.
- Persistent software problems: When apps crash frequently or the system behaves unpredictably, a reset can restore the system to default settings.
- Major macOS update issues: Sometimes updates create conflicts or bugs, and resetting the Mac can help restore stable system behavior.
- Giving the Mac to another user: Resetting ensures no personal files, passwords, or Apple services remain connected to the device.
Conclusion
Resetting a MacBook can help solve many common problems and prepare the device for a fresh start.
Whether the goal is to fix performance issues, clear system errors, or prepare the laptop for a new owner, the process is much simpler on modern macOS versions.
Understanding how to factory reset macbook also helps avoid mistakes that could lead to data loss or activation issues later.
Following these steps carefully ensures the reset process runs smoothly without affecting important information stored elsewhere.
Before starting any reset, always make sure a proper backup is available through Time Machine, cloud storage, or an external drive so files can be restored later if needed.
Did the reset process work smoothly on your MacBook, or did you run into any issues? Share your experience in the comments below.