A garage door that refuses to close properly can turn a normal day into a frustrating one. Often, the issue is not the opener or the motor.
Misaligned sensors are one of the most common reasons a garage door suddenly stops working the way it should.
Garage door sensors are designed to keep people, pets, and objects safe by stopping the door when something blocks its path.
When sensors lose alignment, the door may reverse, blink warning lights, or refuse to close.
Learning how to align garage door sensors can save time, prevent unnecessary service calls, and quickly restore normal door operation.
In this guide, you will learn how to align garage door sensors step by step and get simple troubleshooting fixes with safety precautions.
What Are Garage Door Sensors and How Do They Work?
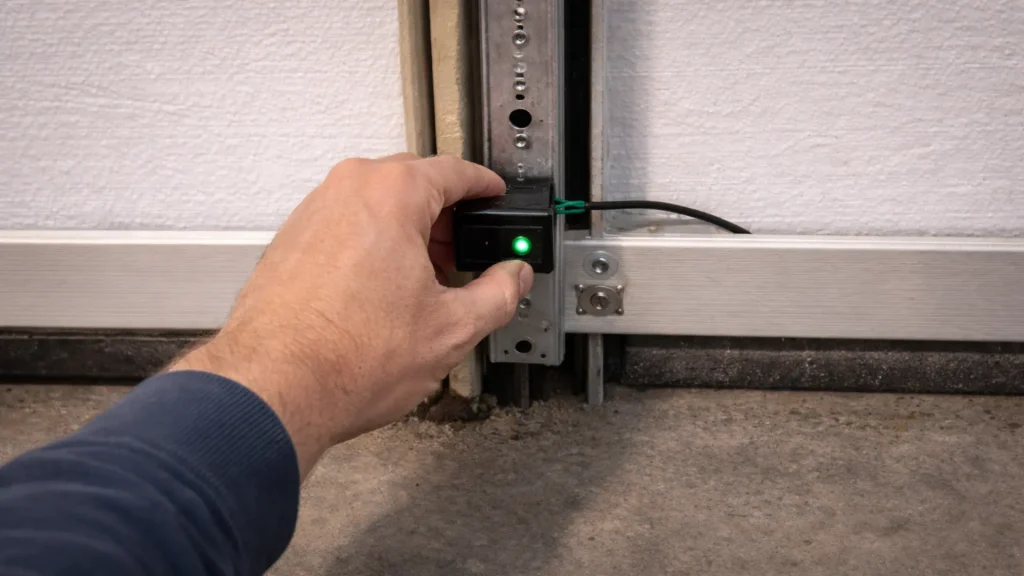
Garage door sensors serve as small safety devices placed on both sides of the garage door track, designed to protect your family and pets from accidents.
Typically mounted about 6 inches above the floor on each side of the door tracks, they stop the garage door from closing if something is in the way.
This safety feature is mandatory for residential garage door openers under guidelines from the U.S. Consumer Product Safety Commission.
Most garages use photo-eye sensors, in which one unit sends an invisible infrared beam to the other. If the beam is blocked by an object, pet, or person, the door immediately stops and reverses.
Another variety includes mechanical sensors, embedded along the door’s bottom edge. They detect physical contact rather than light, triggering the same reversal when obstructed.
The Door and Access Systems Manufacturers Association (DASMA) provides the technical standards for the installation and safety of garage door sensors.
Signs Your Sensors Need Alignment Now
Spotting misalignment in your garage door sensors early can prevent frustrating malfunctions and keep your home safe from potential accidents.
- The door reverses right after starting to close, even with nothing in the way.
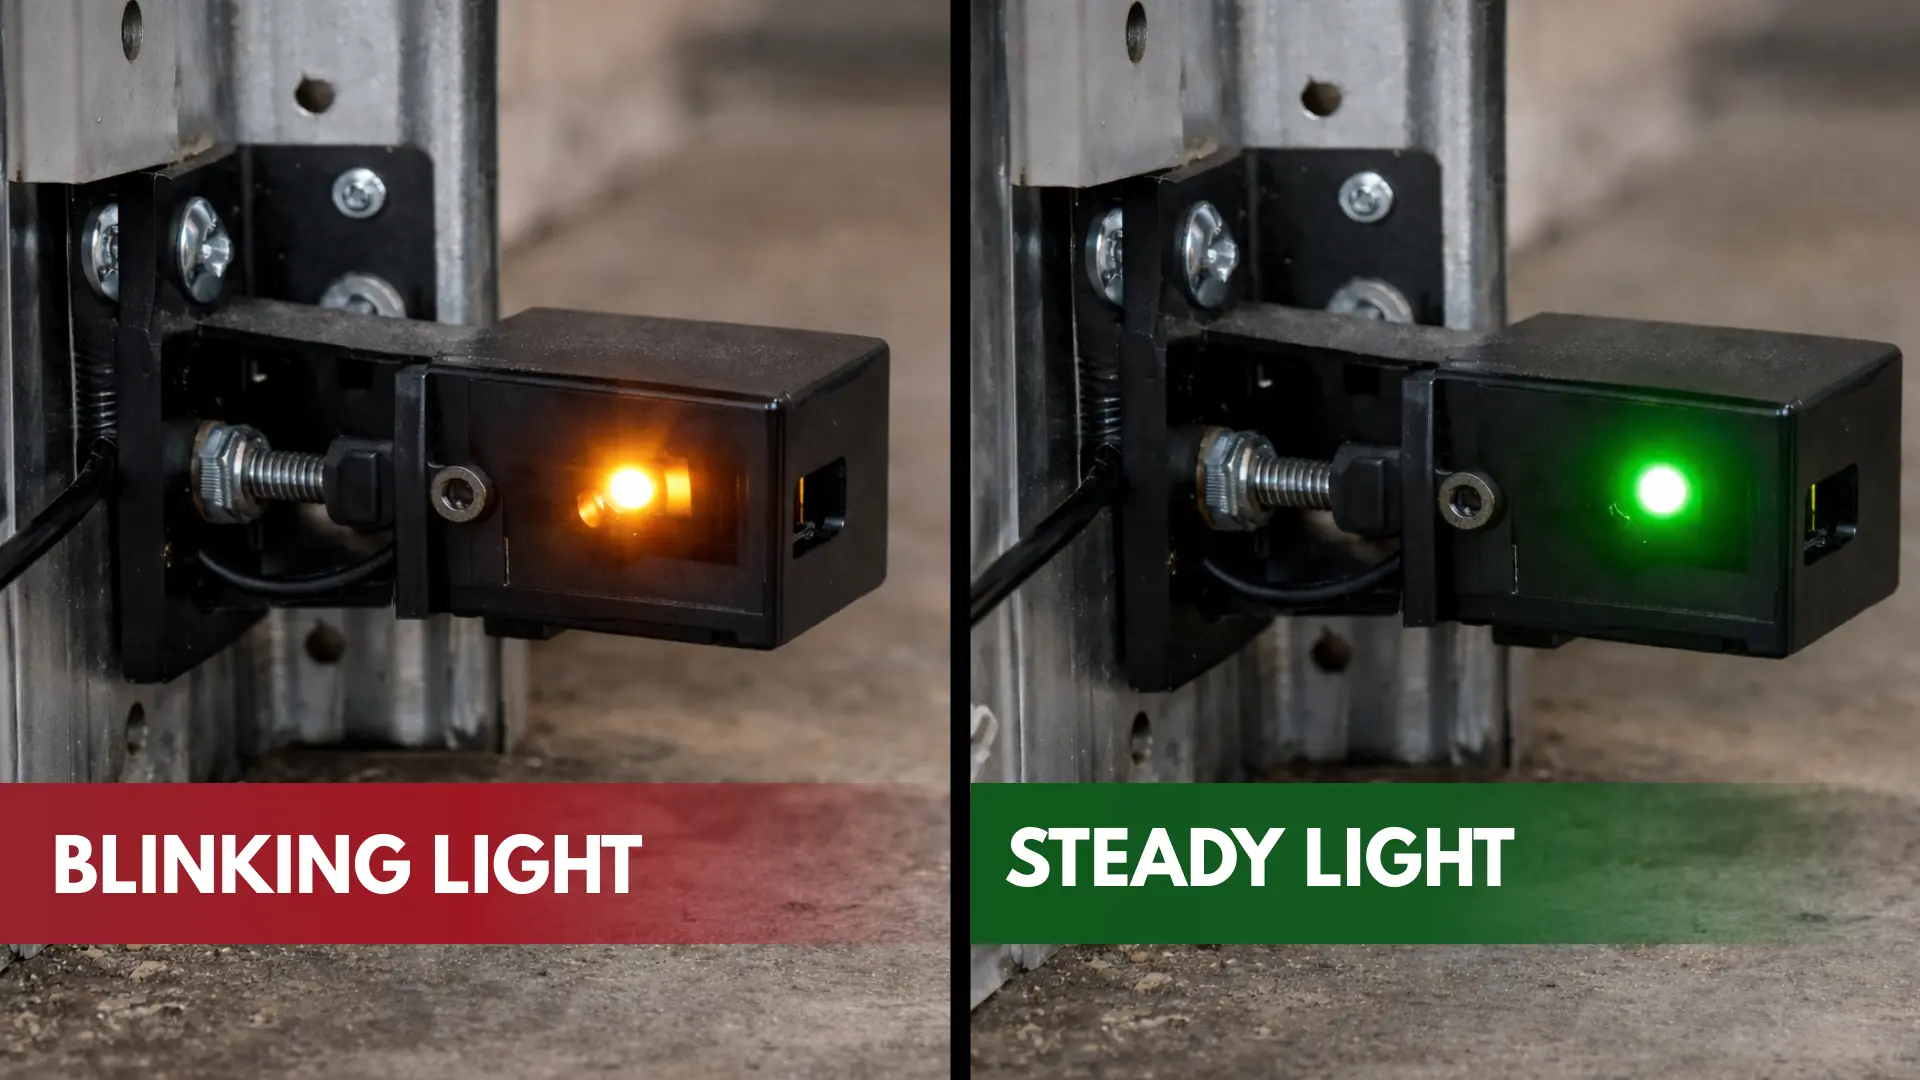
- Sensor lights blink, stay dim, or one turns completely off. Watch for amber or red indicators.
- The operation feels inconsistent, like it works perfectly one hour but struggles the next, especially in bright sunlight.
- The remote fails to close the door, though the wall button does the trick.
- You hear unusual clicking or humming from the opener as it strains without success.
If the wall button closes the door but the remote won’t, that’s a classic override sign: the button bypasses sensors, while the remote relies on them.
Tools Needed for Garage Door Sensor Alignment
Basic household tools help adjust garage door sensors accurately, making alignment easier while keeping the repair safe and controlled.
| Tool Needed | Purpose |
| Flathead screwdriver | To loosen and tighten brackets securely |
| Torpedo level | To ensure sensors sit even and parallel |
| Tape measure or ruler | To confirm the height from the floor |
| Soft microfiber cloth | For wiping lenses without scratches |
| String | To create a straight alignment guide across the door |
| Flashlight | To inspect dark corners for wiring or debris |
| Work gloves and safety glasses | To protect hands and eyes during adjustments |
| Optional mild cleaner | To clean tough lens grime |
Safety Precautions Before Adjusting Garage Door Sensors
Safety should always come first before working on garage door sensors. A few simple precautions can prevent injuries and equipment damage.
Start by disconnecting power to the opener by unplugging it or switching off the circuit breaker. Keep the garage area clear and ensure children or pets stay away while working.
Raise the garage door fully open and secure it using the manual lock or release. This prevents the door from moving during adjustments.
Wear protective gloves and safety glasses to protect your hands and eyes from sharp edges, dust, or debris. If using a ladder, choose a stable model and place it on a flat surface.
Avoid touching exposed wiring unless comfortable with basic electrical checks. You can also perform the 2×4 safety sensor test, which checks whether the door reverses when an object blocks its path.
How to Align Garage Door Sensors Step-by-Step
Correct garage door sensor alignment restores the infrared connection, allowing the door to close safely without sudden reversals or sensor warning lights.
Step 1: Inspect and Clean the Sensors
Begin by examining both sensor units for visible damage, such as cracks or loose mounts. Gently wipe the lenses with a soft microfiber cloth dampened in mild cleaner.
Avoid harsh chemicals that could cloud the surface. Dirt or smudges often mimic misalignment by blocking the infrared beam, so a thorough cleaning can resolve the issue immediately.
Hold the cloth lightly to prevent scratches, and let the lenses air dry for a minute.
Step 2: Check for Obstructions and Wiring Issues
Scan the sensor path for debris like cobwebs, leaves, or toys that might interrupt the beam. Use your flashlight to peer behind the units for frayed wires or loose connections.
Gently tug cables to ensure they’re secure, but don’t yank. If wiring appears damaged, twist exposed ends together temporarily or note it for replacement later.
This step prevents false positives during garage door sensor alignment.
Step 3: Loosen the Brackets
If needed, place a stable ladder near the sensor so you can reach it comfortably. Use a screwdriver to loosen the wing nuts or screws that hold each sensor bracket in place.
Do not remove them completely. Turn the screws slightly counterclockwise so the sensor can move for adjustment.
Keep one hand gently supporting the sensor while working so it stays at the correct height and position during the alignment process.
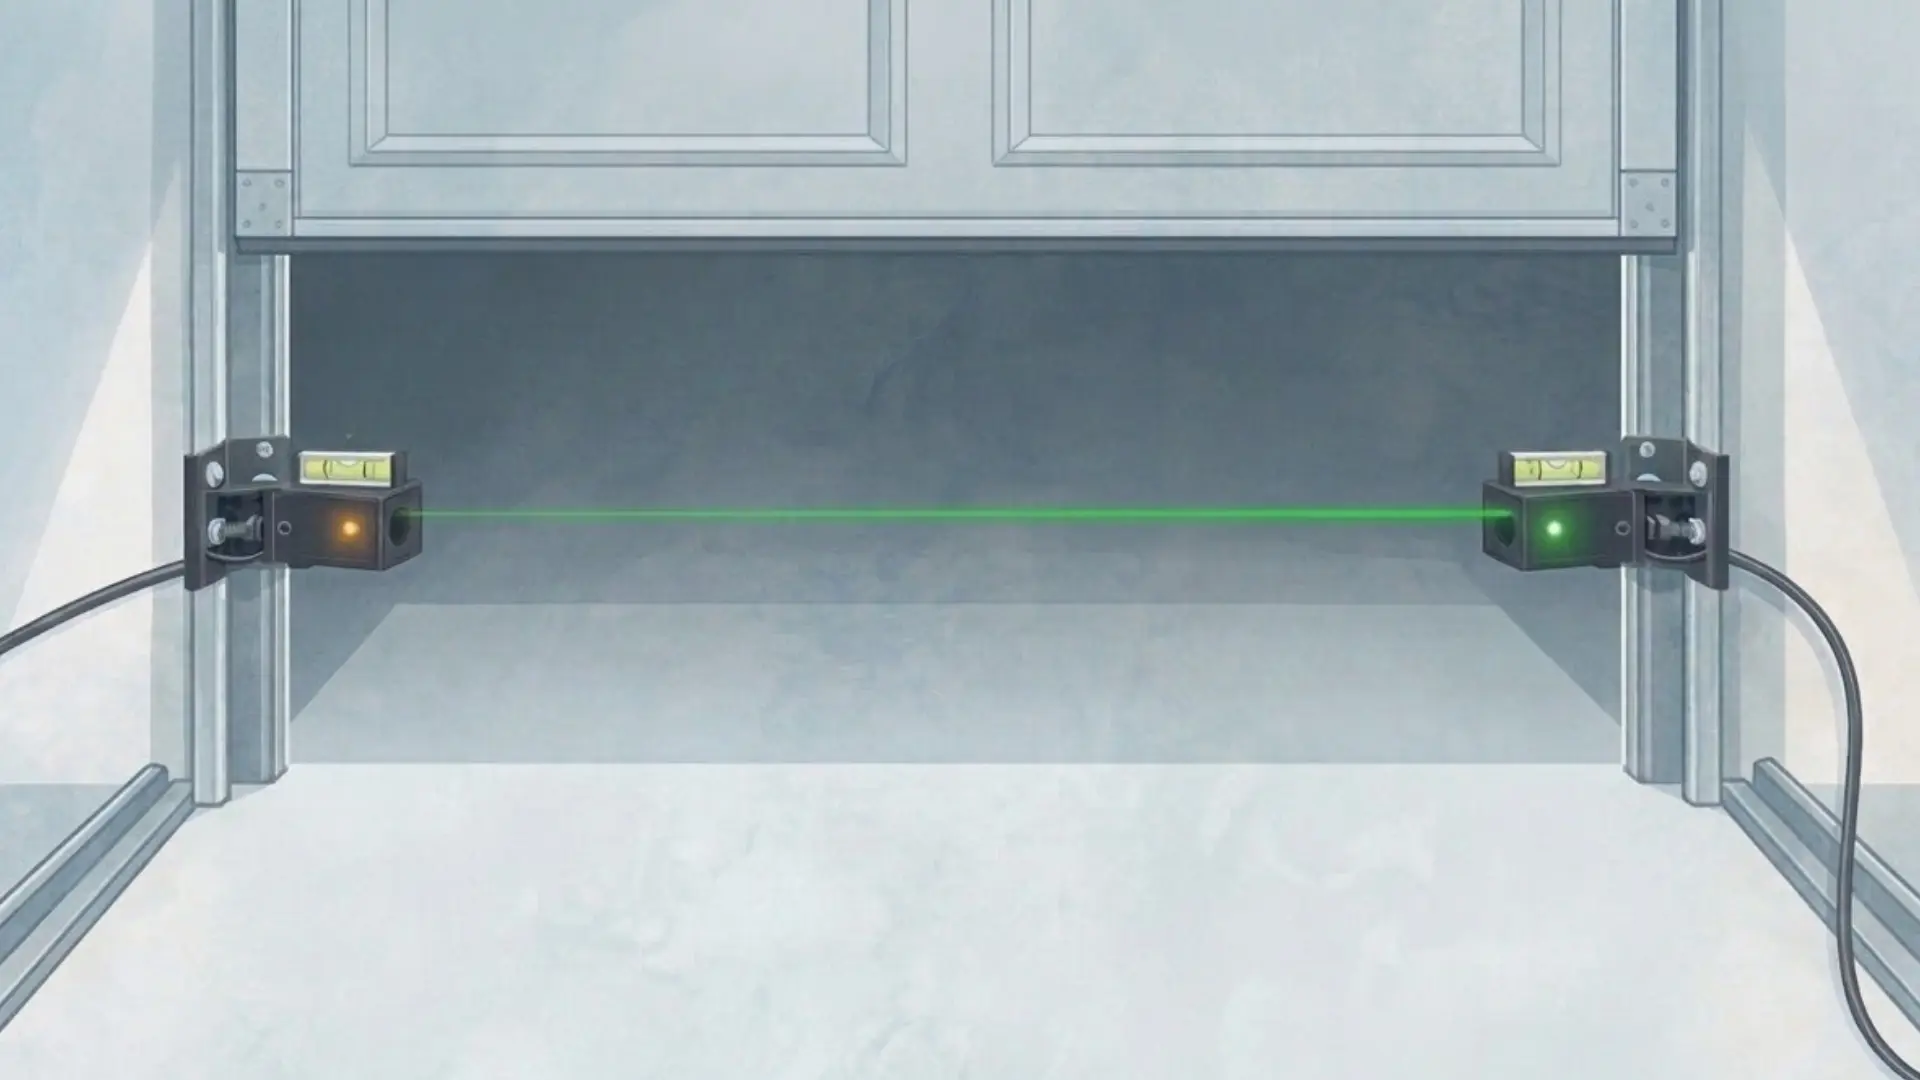
Step 4: Level and Align the Sensors
Tie one end of the string to the sending sensor bracket. Stretch it across to the receiving sensor and keep it level.
Slide both sensors down to exactly six inches from the floor using the tape measure. Place your level on top of each bracket to match their heights horizontally, aiming to center the bubbles.
Face the lenses directly toward each other: the sending unit (often an amber LED) points straight at the receiver (a green LED).
Note: For extra precision, an optional laser level can project a straight line, but the string method works reliably for most setups.
Step 5: Tighten the Brackets and Verify Lights
After aligning the sensors, tighten the mounting brackets using a screwdriver. Turn the screws clockwise until the sensors feel secure.
Avoid tightening too much because excessive pressure can bend the brackets and affect alignment. Restore power to the garage door opener by plugging it back into the outlet.
Look closely at the sensor indicator lights. Both lights should remain solid without blinking. If one light flickers or turns off, gently adjust the sensor position slightly until both lights stay steady.
Step 6: Test the Door Operation
After aligning the sensors, test the garage door to confirm everything works correctly. Use the remote or wall button to open and close the door several times.
While the door is closing, place a broom handle or your hand in the sensor path. The door should immediately stop and reverse. This confirms the safety system is working properly.
If the door does not reverse or hesitate, the sensors may still be slightly misaligned. Return to the alignment step and adjust the sensors until the door responds correctly.
Step 7: Final Tweaks and Lock In
Sometimes, direct sunlight can affect sensor performance. If this happens, try slightly adjusting the sensor angle and test the garage door again under different lighting conditions.
Once everything functions properly, tighten the bracket screws firmly to hold the sensors in place. This final step ensures the alignment stays stable.
Properly secured sensors help maintain reliable garage door operation and improve overall safety.
Align or Replace Garage Door Sensors: How to Decide
Deciding whether to realign your garage door sensors or replace them starts with a simple rule. Try alignment first, as it resolves most issues quickly and at no cost.
These devices are built to last, but if misalignment recurs despite adjustments or if the problem persists, evaluate for replacement.
Opt for new sensors when you spot physical damage such as cracks, melting from heat exposure, or water intrusion that fog the internals. These compromise the infrared beam and safety function.
Also, replace if the LEDs refuse to illuminate after power and wiring checks, or if the units are more than 5-10 years old. components degrade over time from vibrations and wear.
Replacement proves straightforward and affordable, with compatible pairs costing $20-60, depending on the brand, and installation taking 20 minutes.
Simply unplug the opener, unscrew the old brackets, mount the new sensors at 6 inches high, wire them securely, then realign per the steps above.
Maintenance Tips to Avoid Misalignment in Garage Door Sensors
As per the International Door Association guidelines, you can follow a practical, easy routine to maintain garage door sensor alignment and prevent common repairs.
- Clean Sensor Lenses Every Month: Wipe both sensor lenses with a soft cloth to remove dust, fingerprints, or grime that could block the infrared beam.
- Check Sensor Indicator Lights Regularly: Look for steady LED lights on both sensors. Blinking lights may signal early alignment issues that need quick adjustment.
- Test Sensor Alignment Every Few Months: Close the garage door and pass an object through the sensor beam. The door should stop and reverse immediately.
- Tighten Sensor Brackets when Needed: Inspect the mounting brackets and tighten any loose screws to keep sensors stable and properly positioned.
- Keep the Sensor Area Clear: Avoid placing boxes, tools, or equipment near the garage door tracks to prevent accidental bumps or misalignment.
Conclusion
Garage door sensors may look small, but they play a major role in keeping your home safe.
When alignment shifts even slightly, the door can stop closing properly, reverse suddenly, or display warning lights that create confusion.
Proper garage door sensor alignment restores normal operation and keeps the garage door system running safely.
By paying attention to early signs and following simple maintenance habits, you can tackle the small problems before they turn into something tedious.
If the door has been acting inconsistently lately, take a few minutes to check the sensors using the steps in this guide.
Do you have a tip or experience with garage door sensor alignment? Share it in the comments and help other homeowners keep their garage sensors running smoothly.
Frequently Asked Questions
How Long Does It Take to Align Garage Door Sensors?
Garage door sensor alignment usually takes 15 to 30 minutes. The time includes cleaning lenses, adjusting brackets, properly aligning sensors, and testing the door to confirm safe operation.
Why Does My Garage Door Close Only When Holding the Button?
Holding the wall button bypasses the safety sensors. This usually means the sensors are misaligned, blocked, or unable to properly detect the infrared beam.
Can Sensors Fail Without Visible Damage?
Yes, internal wiring corrosion or age-related beam weakening can cause failures. Test the power and replace it if the lights stay off after cleaning.