Watching something you enjoy on a small phone screen can feel limiting, especially when you want to share the moment with others.
Passing a phone around or squinting at details takes away from the experience.
A TV brings everything to life in a way that feels more relaxed and shared.
Connecting your phone to a TV is not just about technology but rather about comfort, ease, and enjoying time together.
Once your phone content appears on a bigger screen, watching, sharing, and staying connected feels more natural.
If you’re thinking how do you connect your phone to the TV, this blog explains the steps for both smart and non-smart TVs in a clear and simple way.
What You Need Before You Start?
Before connecting your phone to a smart TV, it helps to check a few basics to avoid setup issues and ensure smooth screen sharing. Making sure both devices are ready can save time and reduce frustration.
- An Android phone that supports screen casting
- A smart TV that runs on Google TV
- A stable Wi-Fi connection for smooth screen sharing
- For non-smart TVs: Roku Stick, Fire TV Stick, or HDMI Cable
Once these essentials are in place, the connection process becomes much simpler. Proper preparation helps reduce interruptions and allows screen sharing to work smoothly from the start.
How Do You Connect Your Phone to the Smart TV?
Connecting your phone to a Google TV works best when each setting is checked in order. Have a look at all the functions available.
Step 1: Check Wi-Fi on Your Google TV
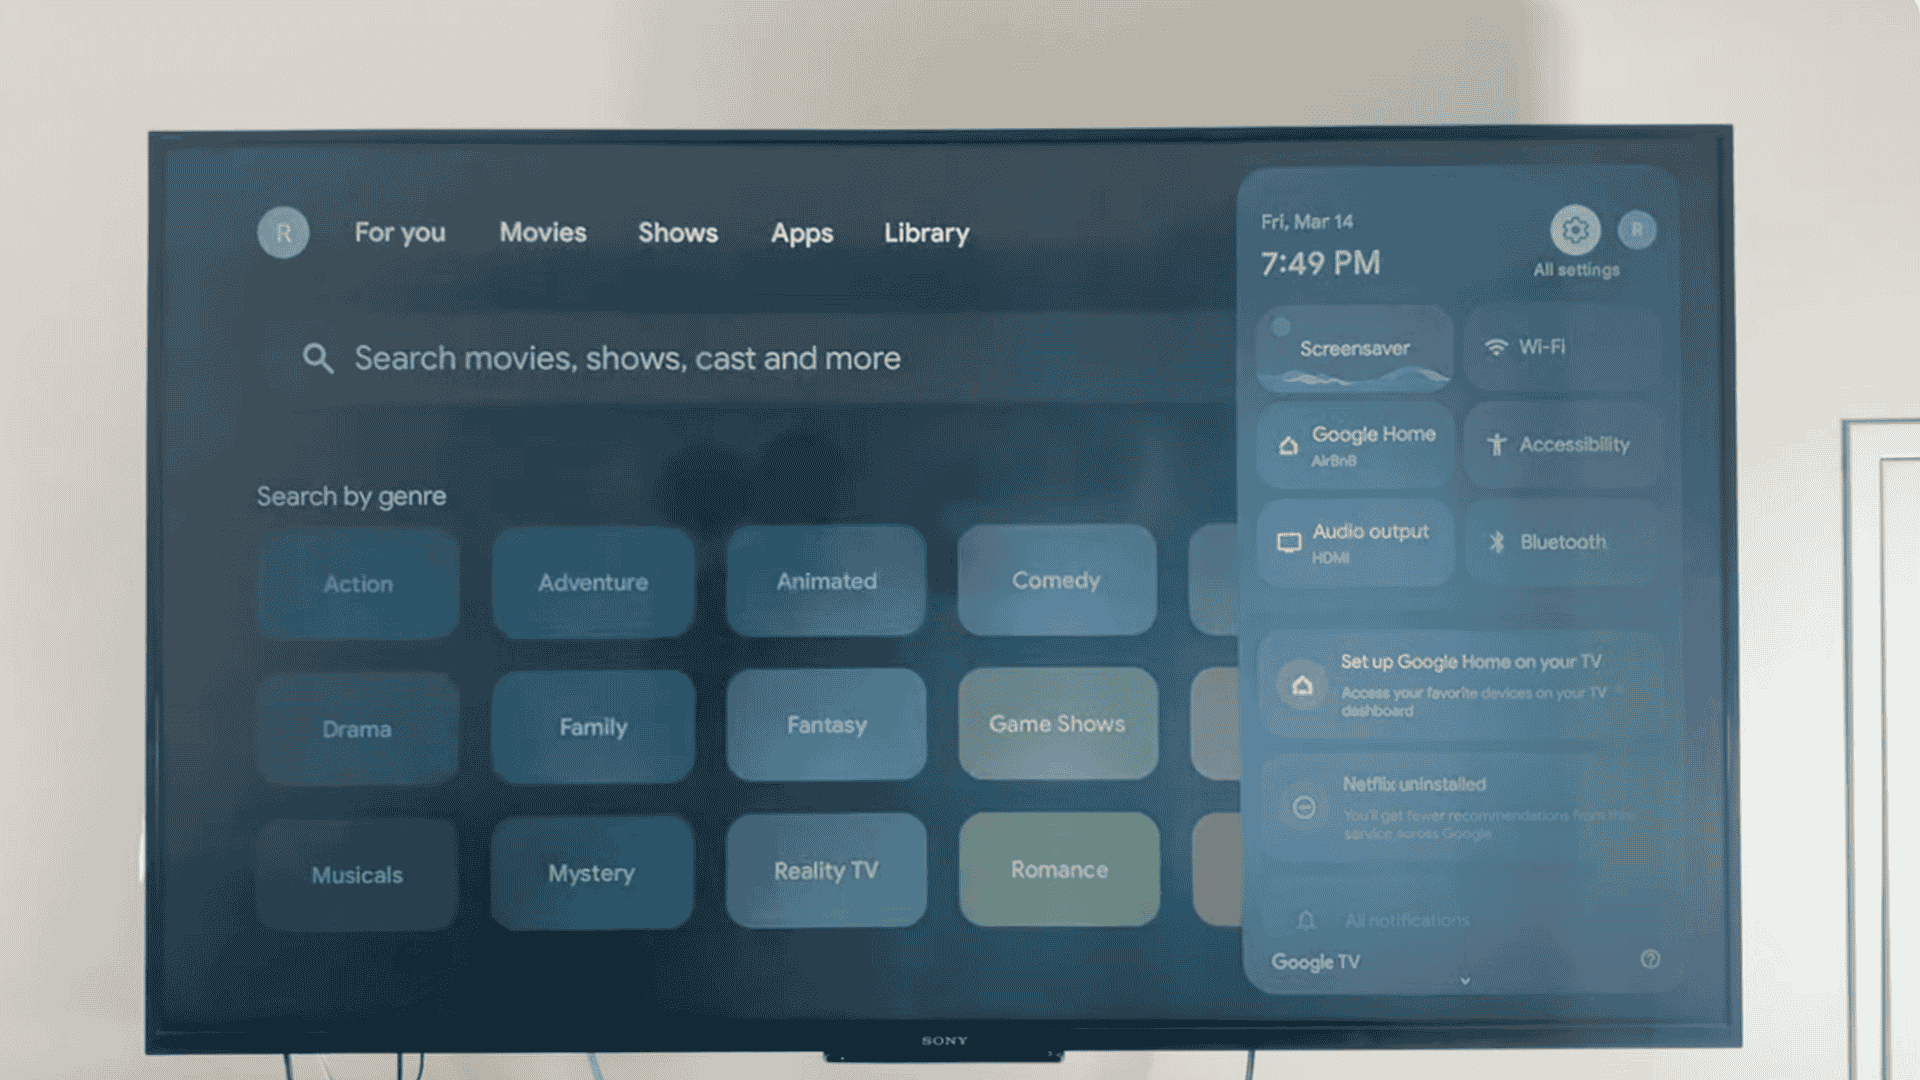
Start by checking the Wi-Fi network on your Google TV and open the Settings menu from the home screen.
Scroll down until you see Network and Internet, then select it, look at the Wi-Fi name shown on the screen, and take note of it.
This step matters because your phone must use the same network to connect.
If the TV is not connected, choose a Wi-Fi network and enter the password.
Once connected, leave this screen open briefly to confirm the network name before moving to the next step.
Step 2: Check Wi-Fi on Your Phone
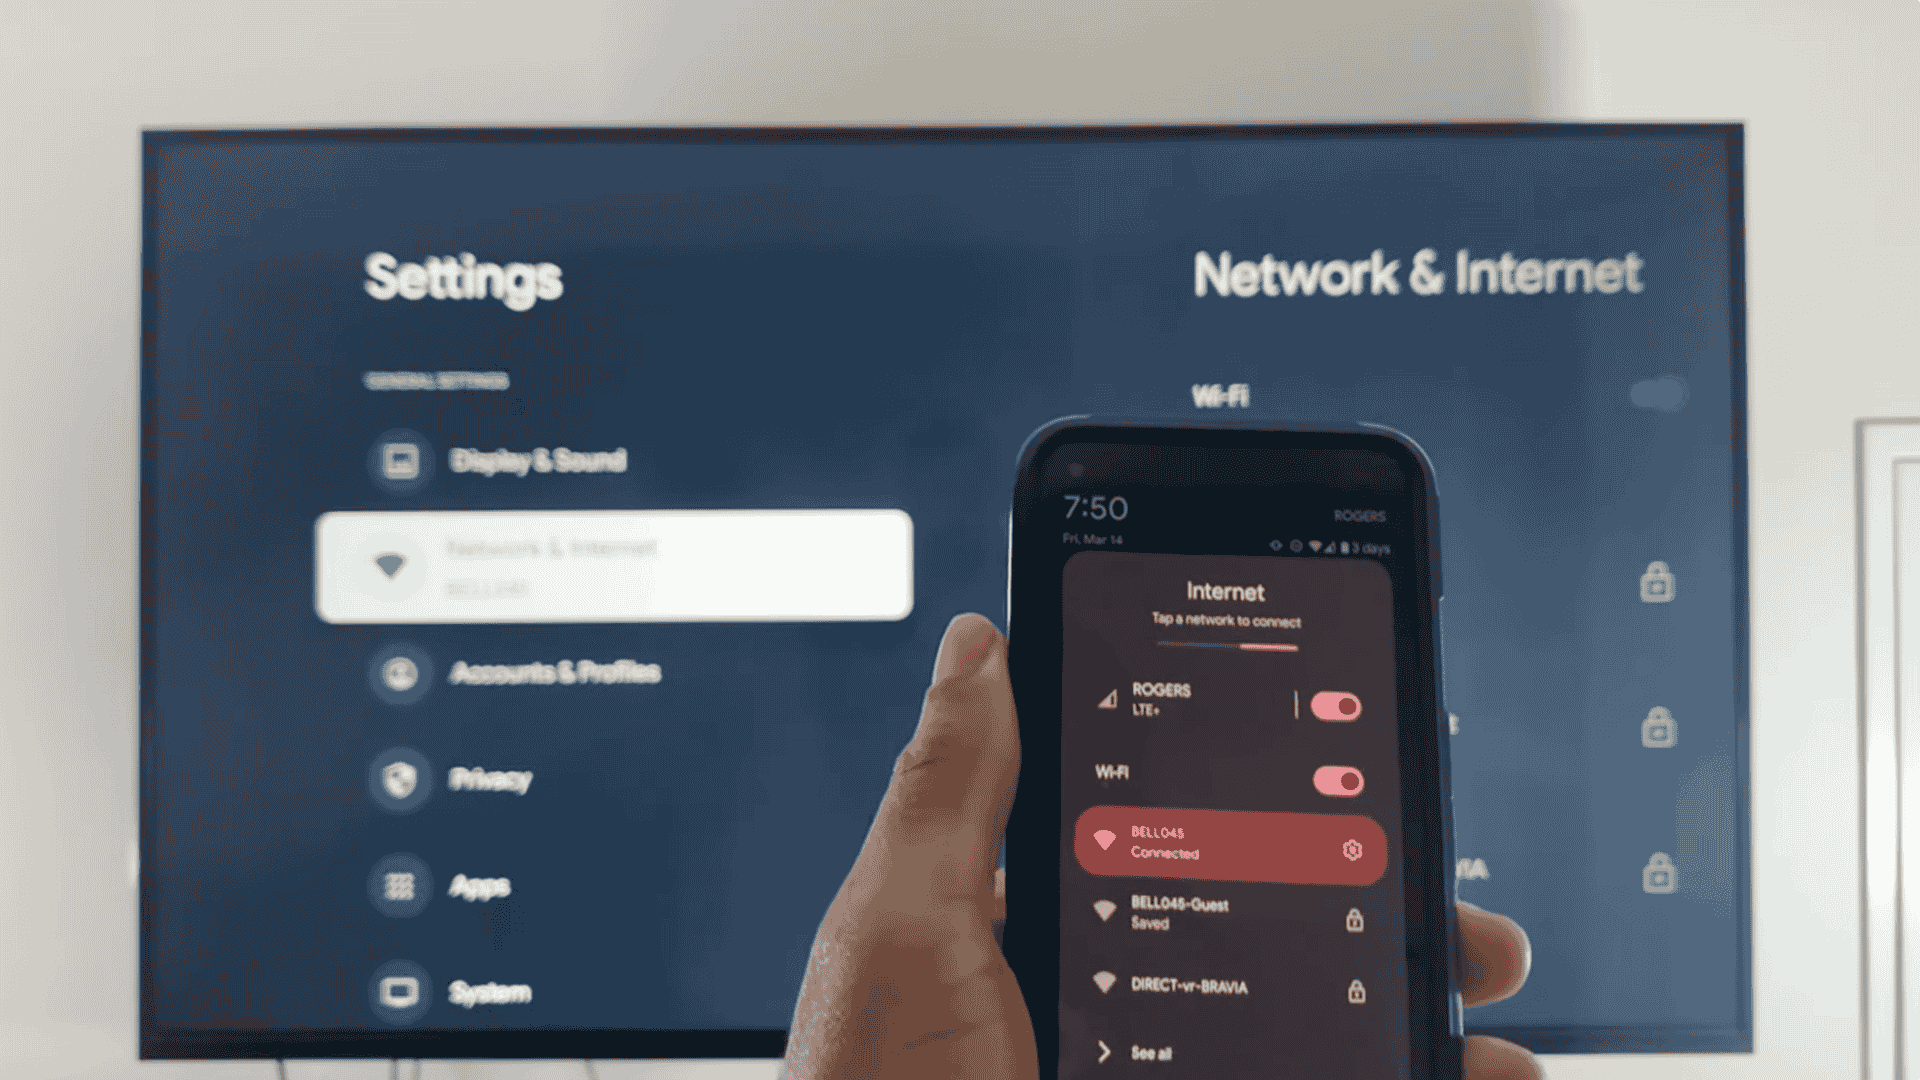
Now check the Wi-Fi connection on your phone and swipe down from the top of your screen twice to open quick settings.
Tap the Wi-Fi icon to see the network name your phone is using.
Compare it with the network shown on your Google TV, and if they do not match, switch your phone to the correct network.
Wait a few seconds for the connection to settle.
This step is important because devices on different networks cannot see each other during screen sharing.
Step 3: Turn On Cast in Google TV Settings

Go back to your Google TV and return to the Settings menu.
Scroll down and open the System option, and find and select Cast. You will see options that control how other devices connect to your TV.
Choose Always or While casting so your TV can accept connections.
If this option is off, your phone may not appear in the device list later and after selecting the option, exit settings, and keep the TV on.
Step 4: Open Cast on Your Phone
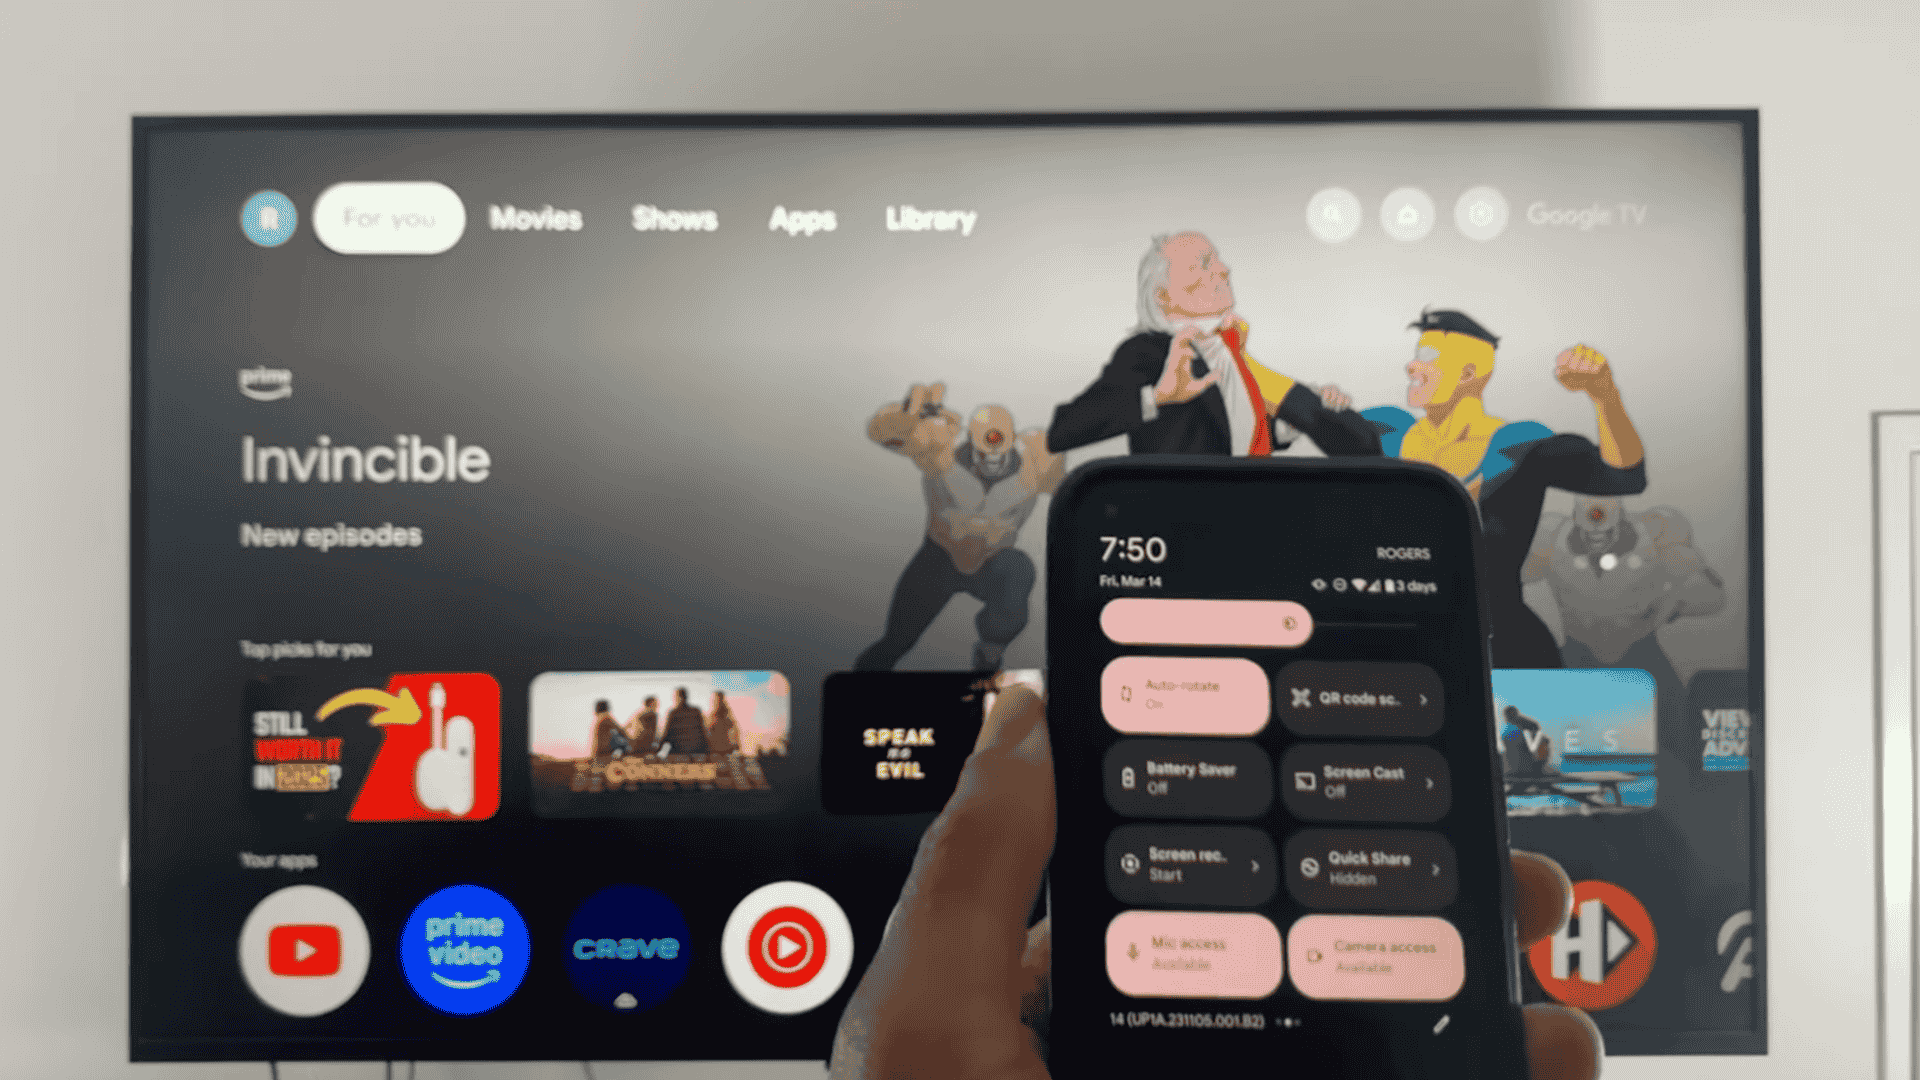
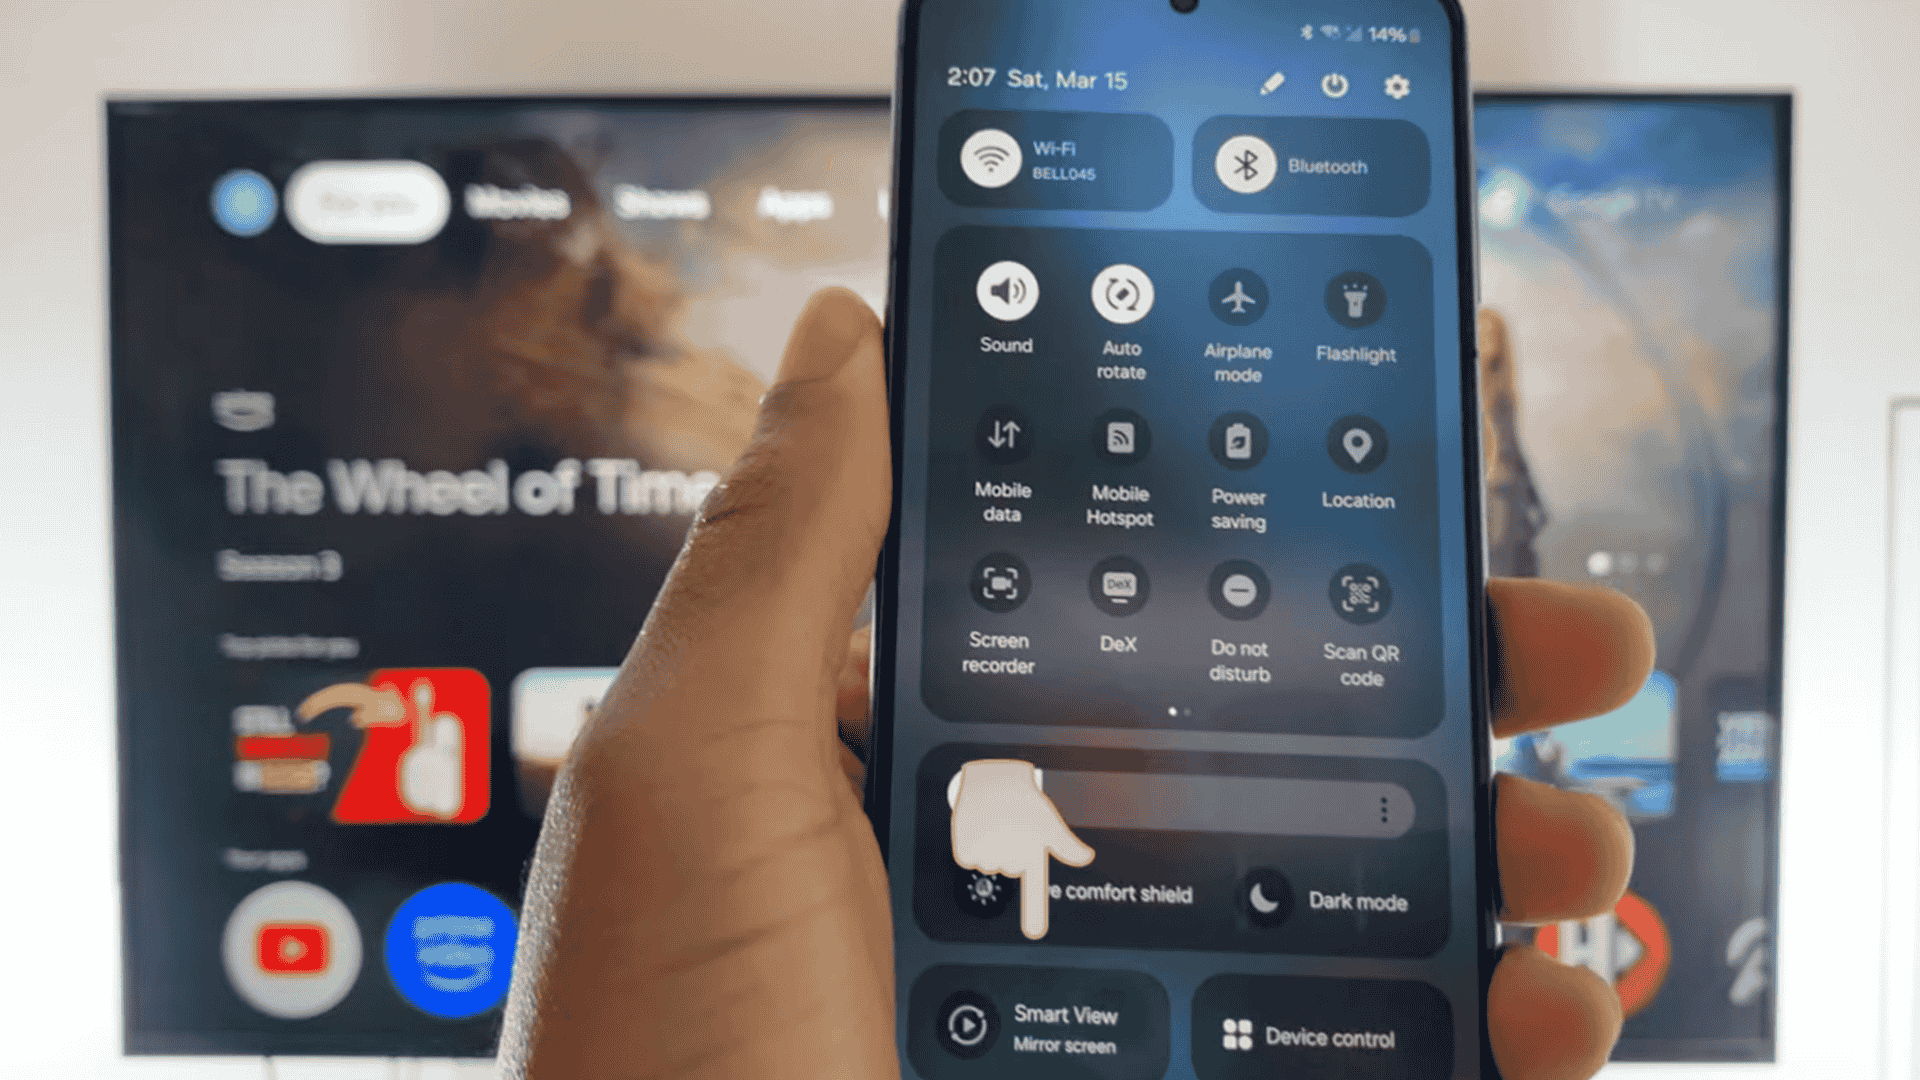
Pick up your phone and swipe down from the top of the screen twice to open quick settings again.
Swipe to the right until you see the Cast option and tap Cast to search for nearby devices.
If your phone supports casting, your Google TV name should appear.
If nothing shows up, wait a few seconds and try again, and make sure the TV is still on and connected to Wi-Fi.
Once the TV name appears, do not select it yet if you use a Samsung phone.
Step 5: For Samsung Phones Only
Samsung phones often use a feature called Smart View instead of standard cast.
Swipe down twice on your Samsung phone and tap Smart View or Mirror Screen. If your TV does not appear, tap the menu icon at the top of the screen.
Go to Settings, then open Labs and turn on Chromecast support from the list.
Your Google TV or Chromecast should now appear, and this extra step helps Samsung phones show compatible TVs correctly during screen sharing.
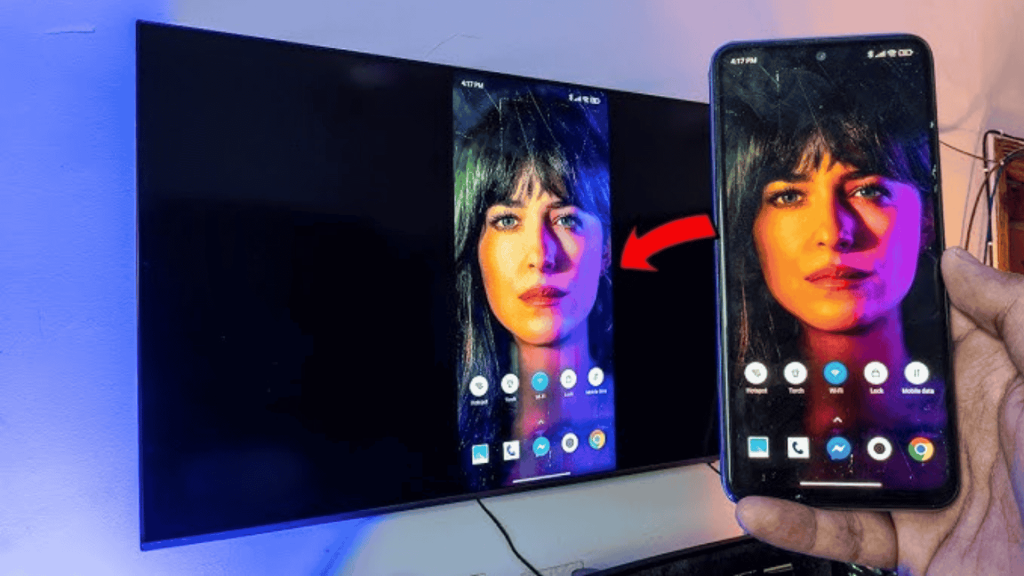
Step 6: Start Screen Mirroring
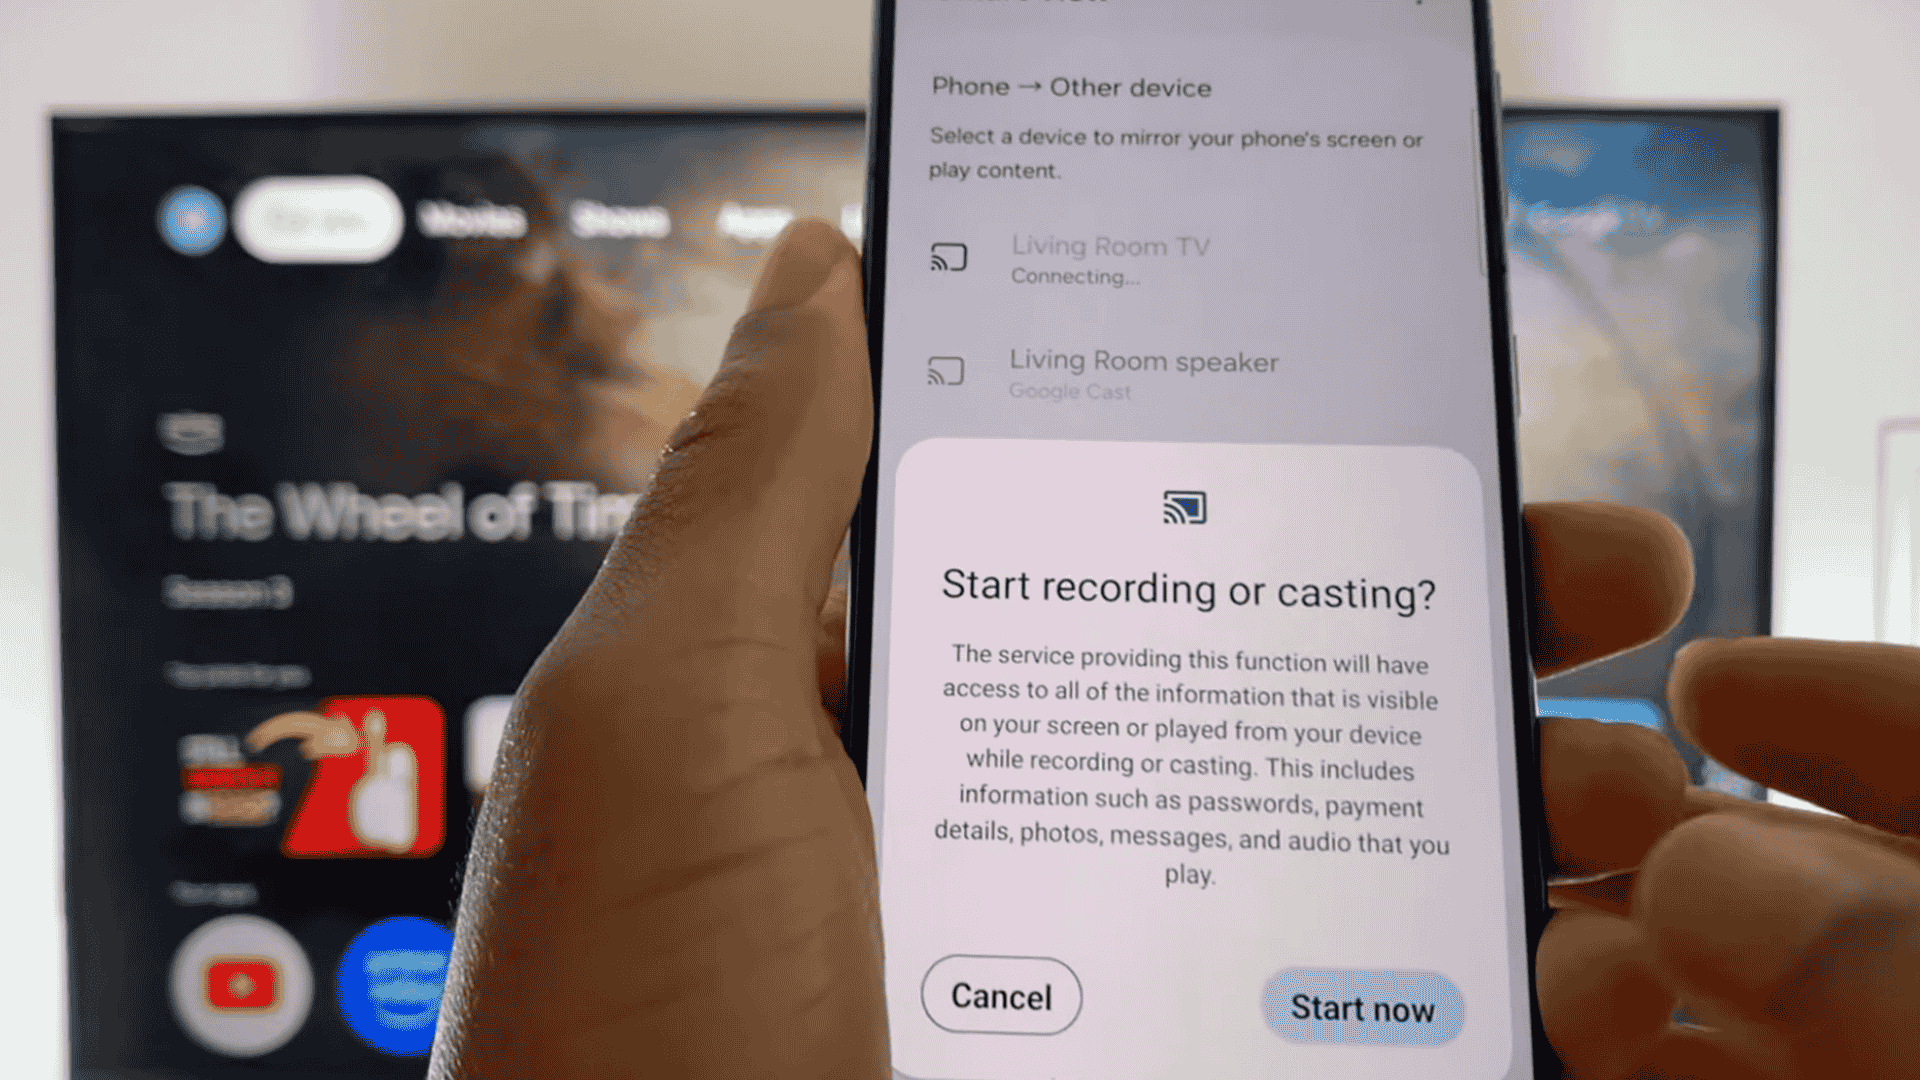
Once your Google TV appears on your phone screen, tap the TV name from the list to continue.
A prompt will appear asking for permission to start screen mirroring. Select Start and wait a few seconds for the connection to begin.
Your full phone screen will then display on the TV, and you can open apps, play videos, and scroll through photos.
Every action on your phone will appear on the TV at the same time.
When you are done, swipe down on your phone and tap Disconnect to end the session safely.
This tutorial is based on a helpful video by Lando Tech. You can check out the original video on their YouTube Channel here or watch it below.
How to Connect a Phone to a Non-Smart TV?
Watching videos or sharing photos on a small phone screen can feel limiting. Even if your TV is old and not smart, you still have options.
Step 1: Plug in the Roku Stick
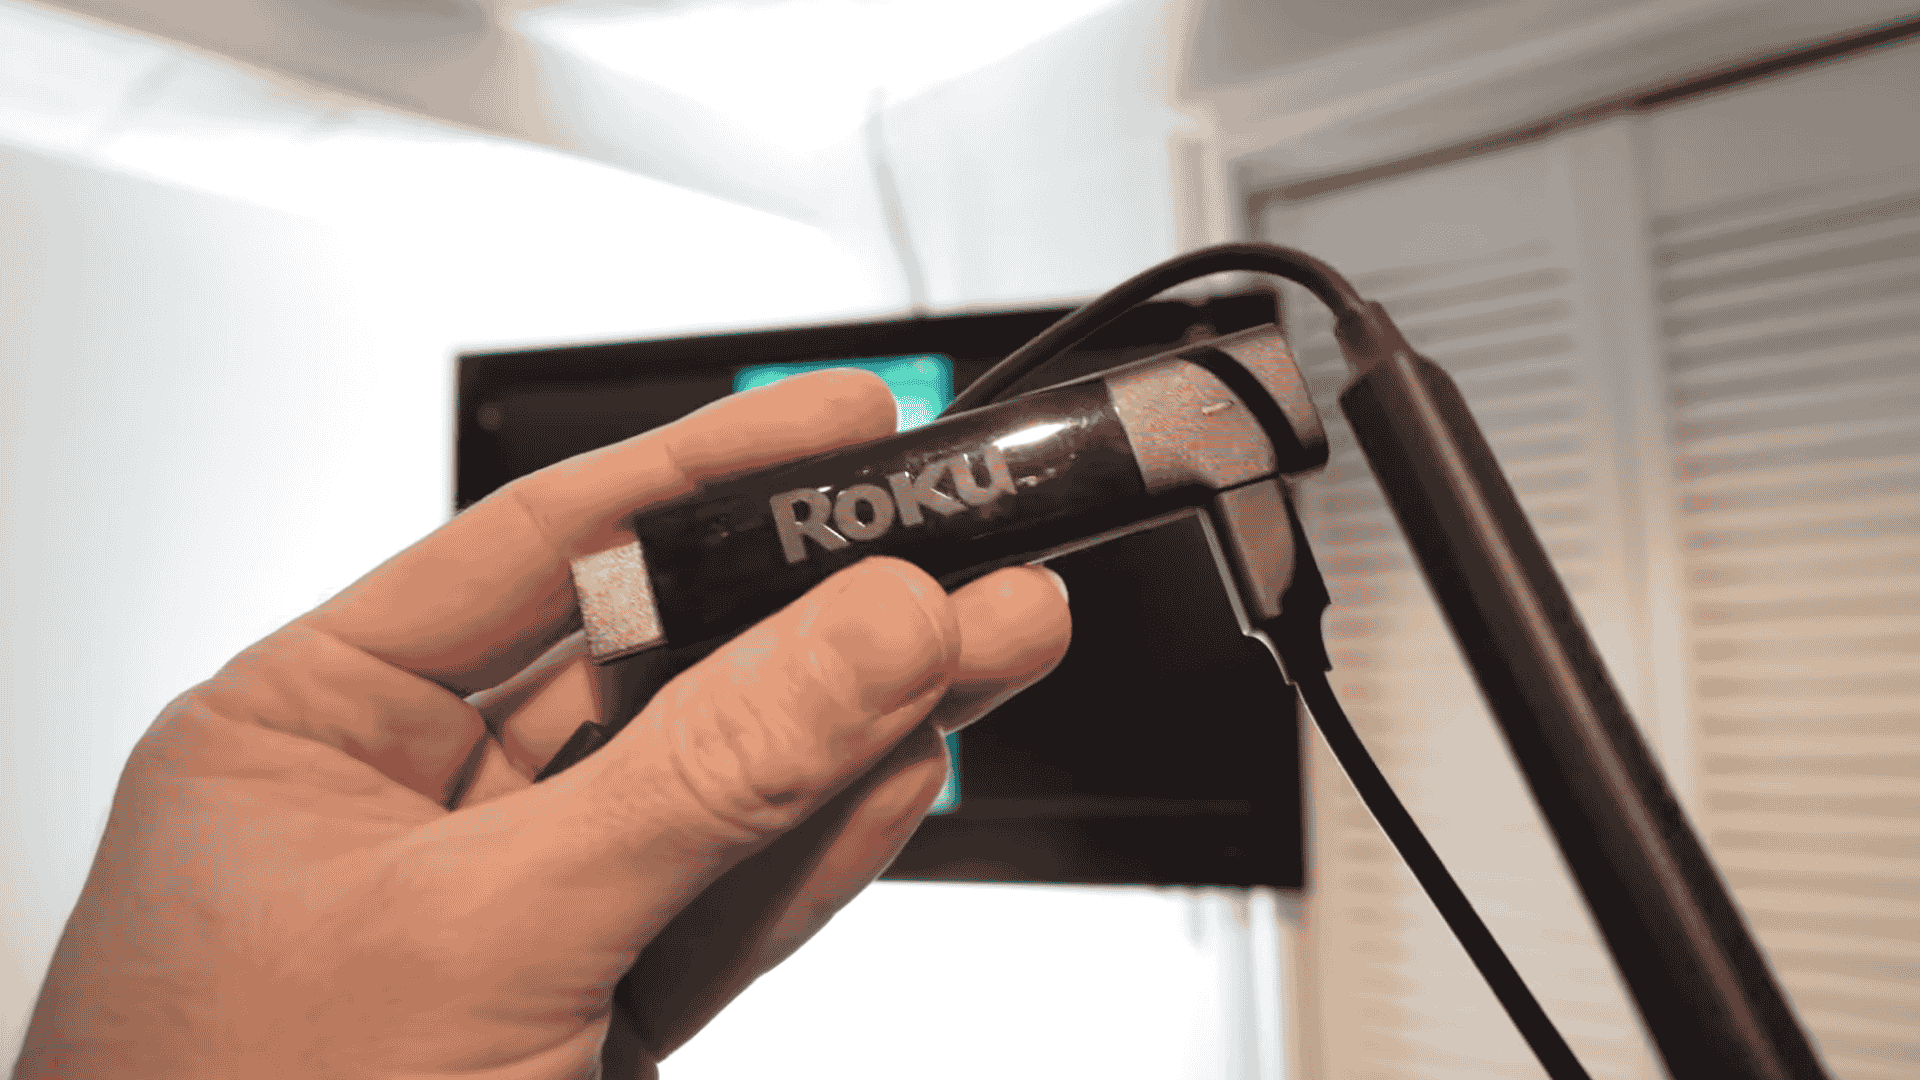
Start by plugging the Roku stick into an open HDMI port on the back of your TV.
Next, connect the Roku stick to a power source using the included wall adapter or the TV’s USB port if available.
Turn on your TV and use the remote to switch to the correct HDMI input where the Roku is connected.
Once setup is finished, stop at the Roku home screen before moving to the settings menu.
Step 2: Turn On AirPlay in Roku Settings
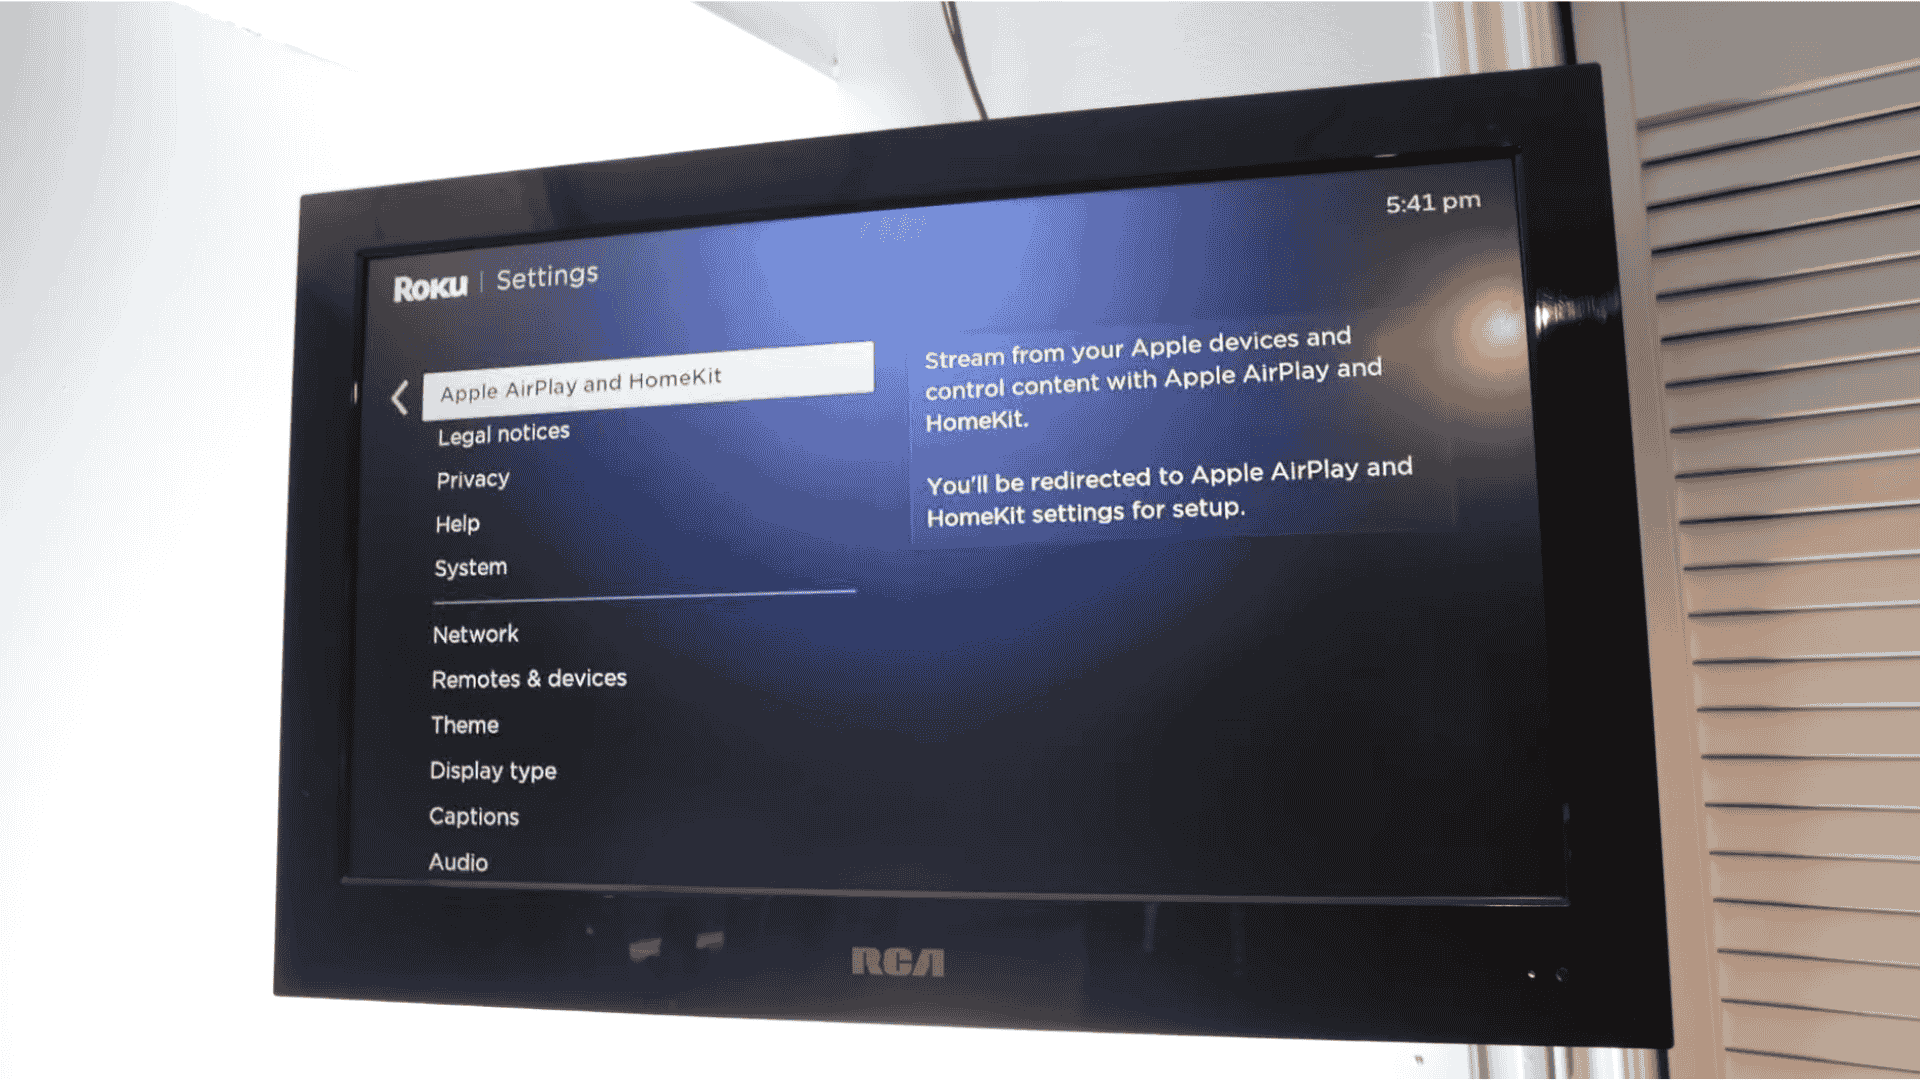
Using the Roku remote, go to the home screen and select Settings.
Scroll down through the menu until you reach the last option and press OK. Find and open Apple AirPlay and HomeKit from the list.
Inside this section, make sure AirPlay is turned on so you can also set a passcode to control who connects to your TV.
Choosing the “First Time Only” option helps keep things simple while still adding basic control.
Step 3: Start Screen Mirroring from iPhone
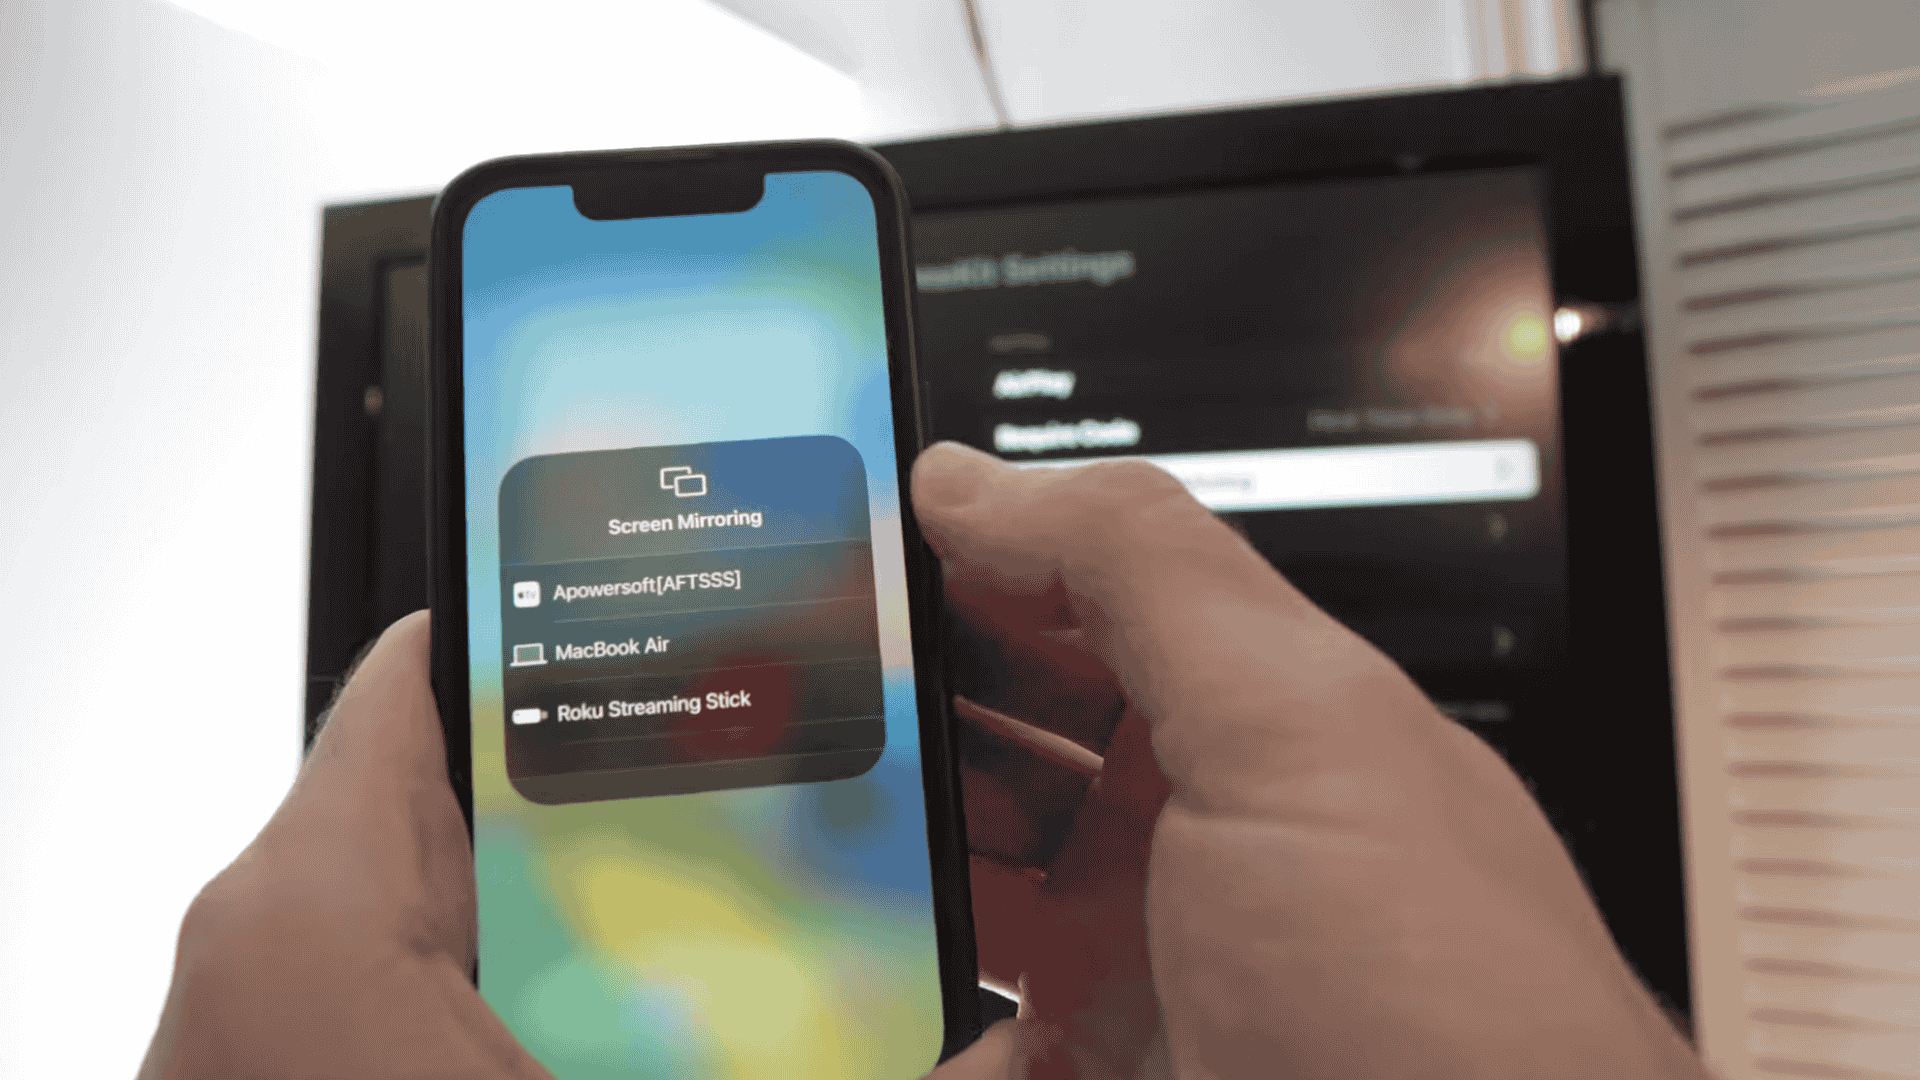
Pick up your iPhone and swipe down from the top-right corner to open Control Center.
Look for the screen mirroring icon that looks like two overlapping rectangles and tap it.
A list of available devices will appear on your phone screen.
Select Roku Streaming Stick from the list, and a code will then show on your TV screen. Enter this code on your iPhone and tap OK.
Your iPhone screen will now display on the TV in real time.
Step 4: Install the App on Fire TV Stick
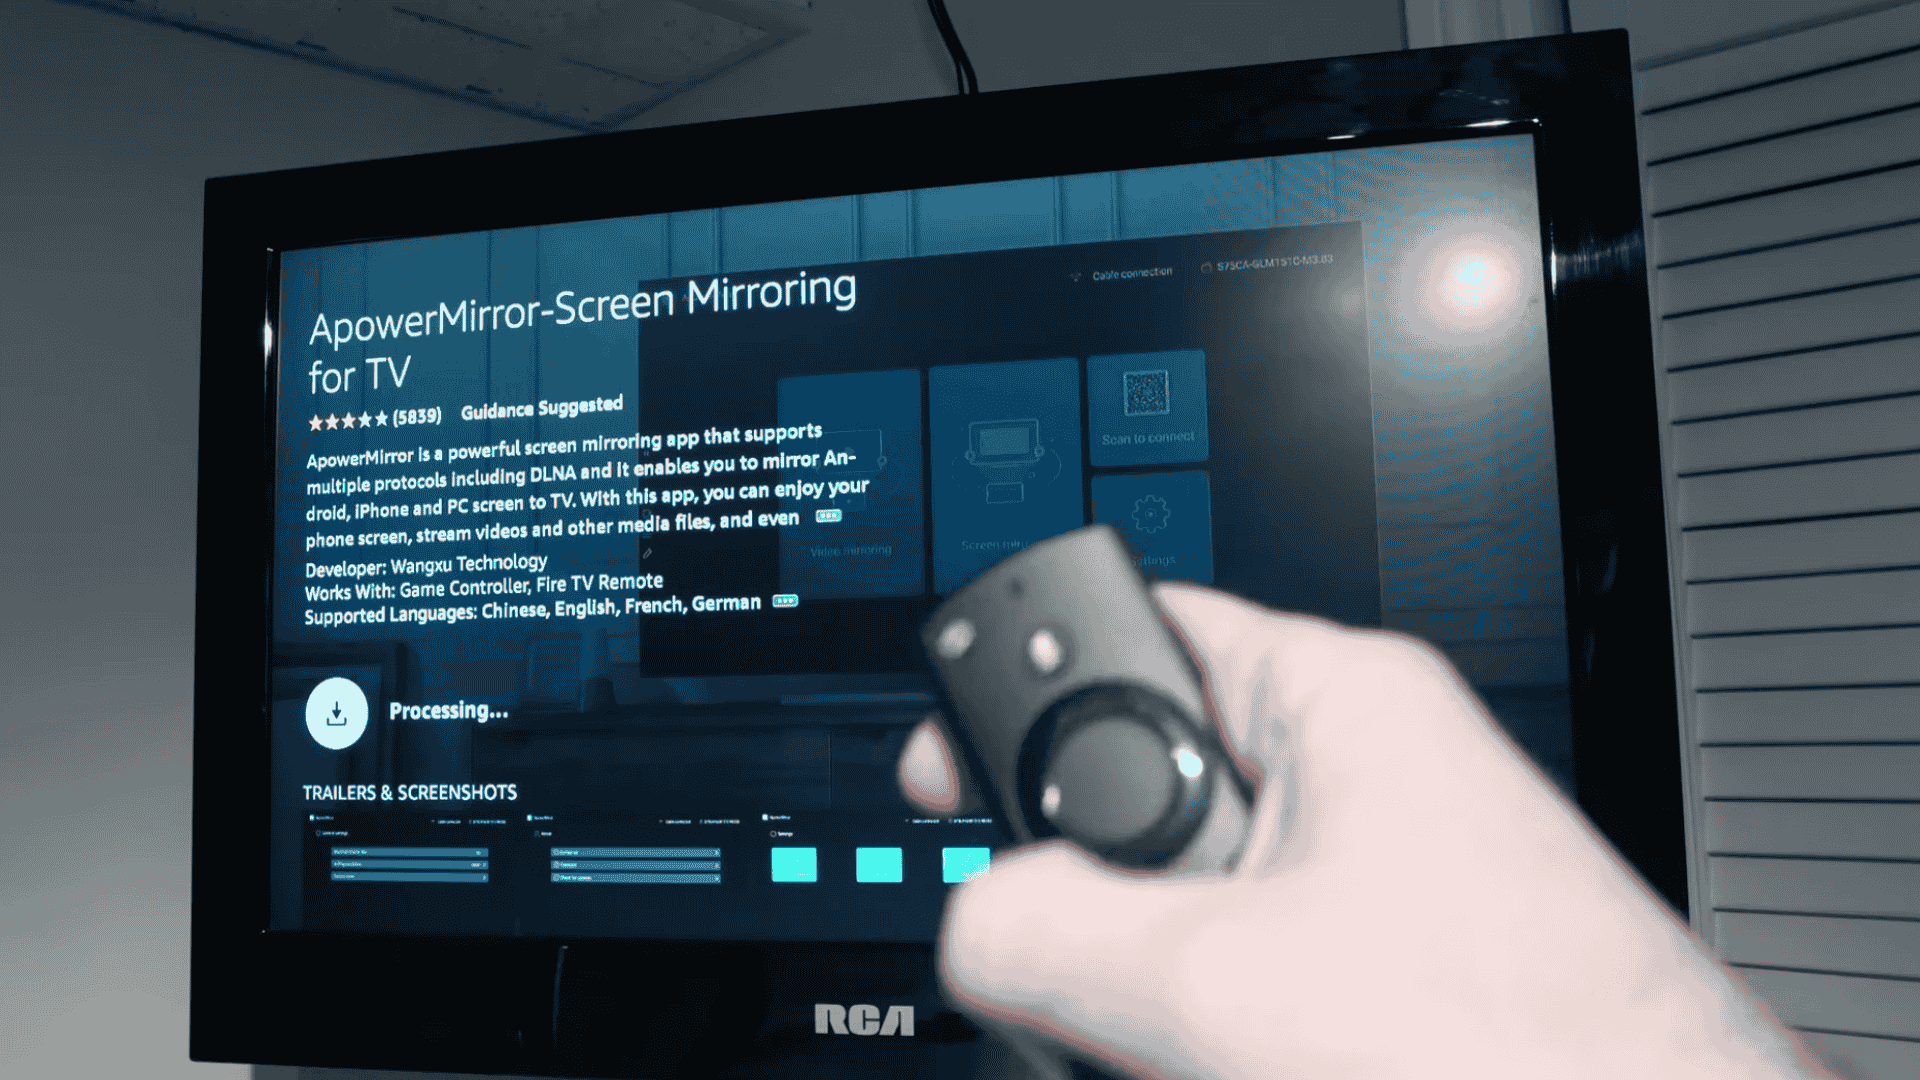
Turn on your TV and go to the Fire TV Stick home screen and select the Find option from the menu.
In the search bar, type ApowerMirror using the on-screen keyboard.
When the app named Screen Mirroring for TV appears, select it and press Get.
Once installation is complete, open the app on your TV and keep it running while you move to the next step on your phone.
Step 5: Install the App on iPhone
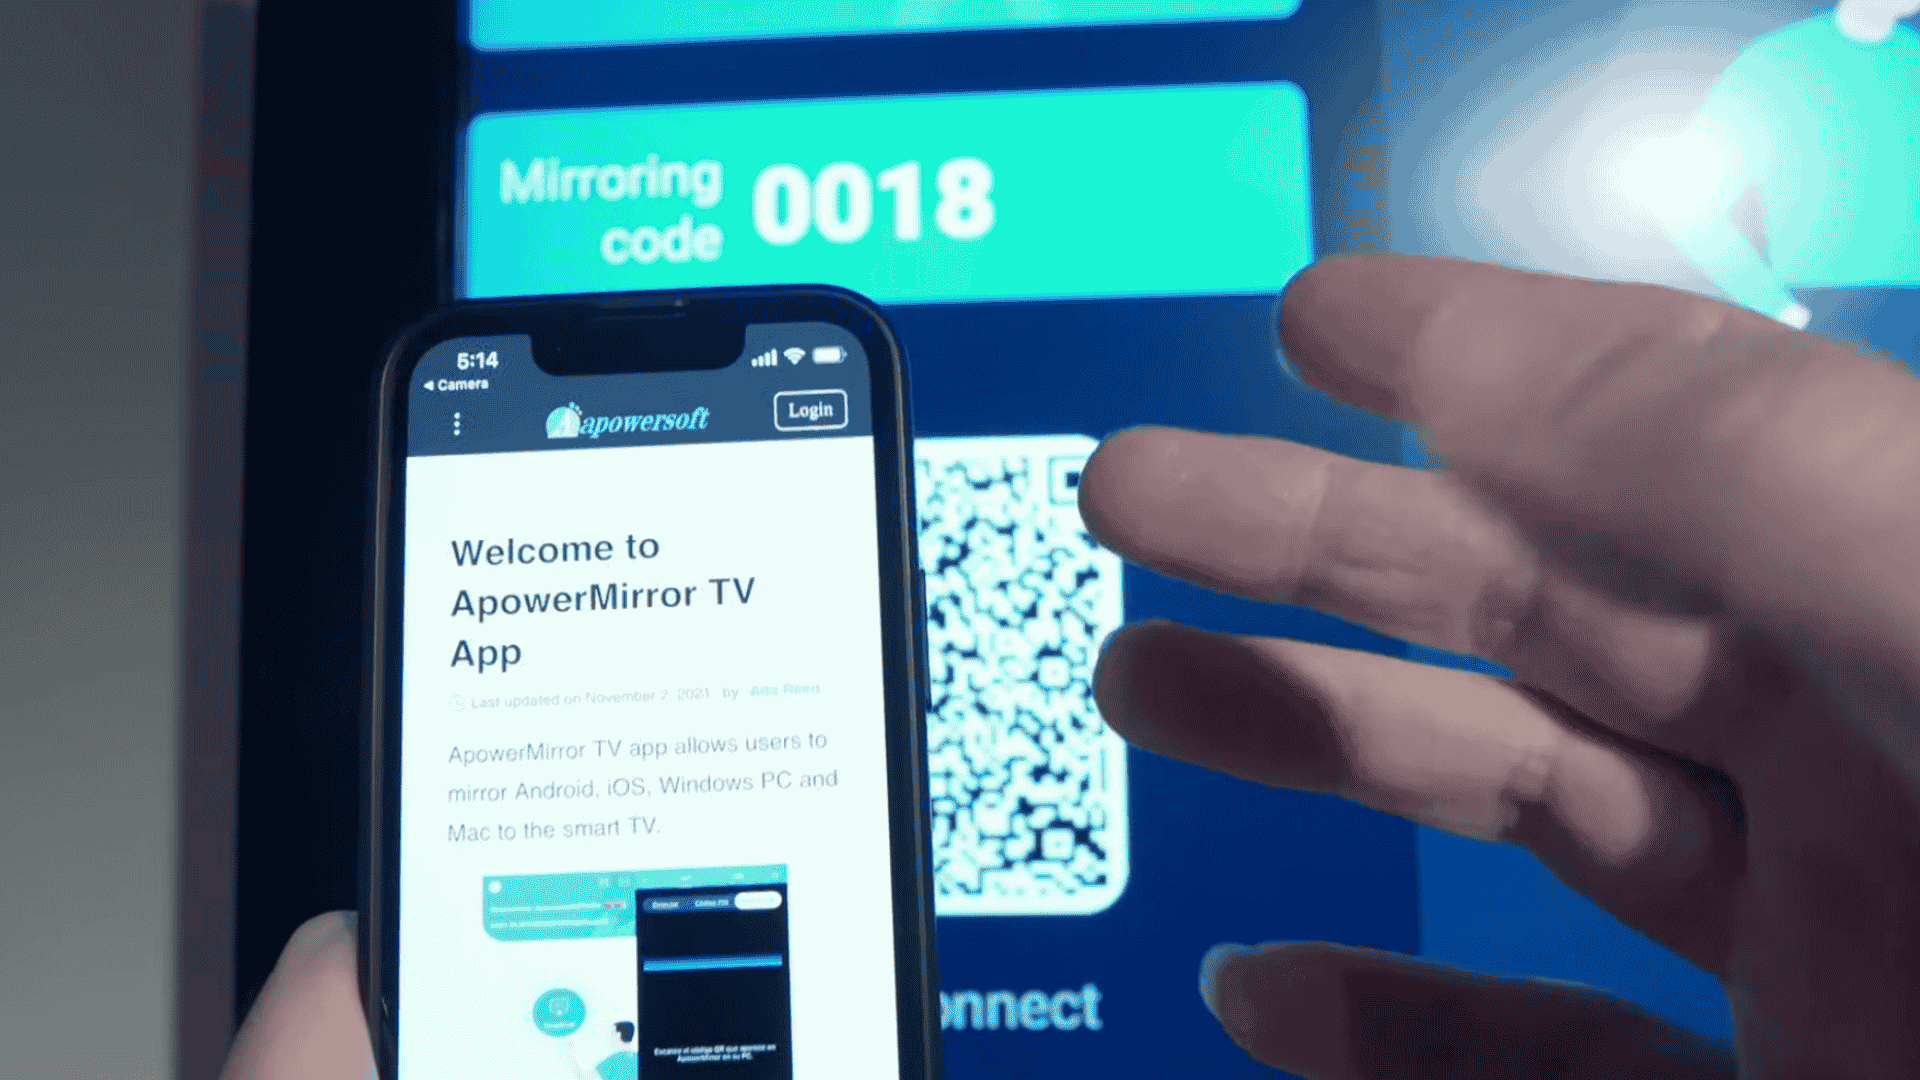
When the app opens on your TV, a QR code will appear on the screen.
Take your iPhone, open the camera app, and point it at the QR code until a link shows on the screen. Tap the link to open the App Store page.
Download the ApowerMirror app on your iPhone, and once the download finishes, open the app.
Make sure your iPhone stays connected to the same Wi-Fi network as the Fire TV Stick before continuing.
Step 6: Start Wireless Casting
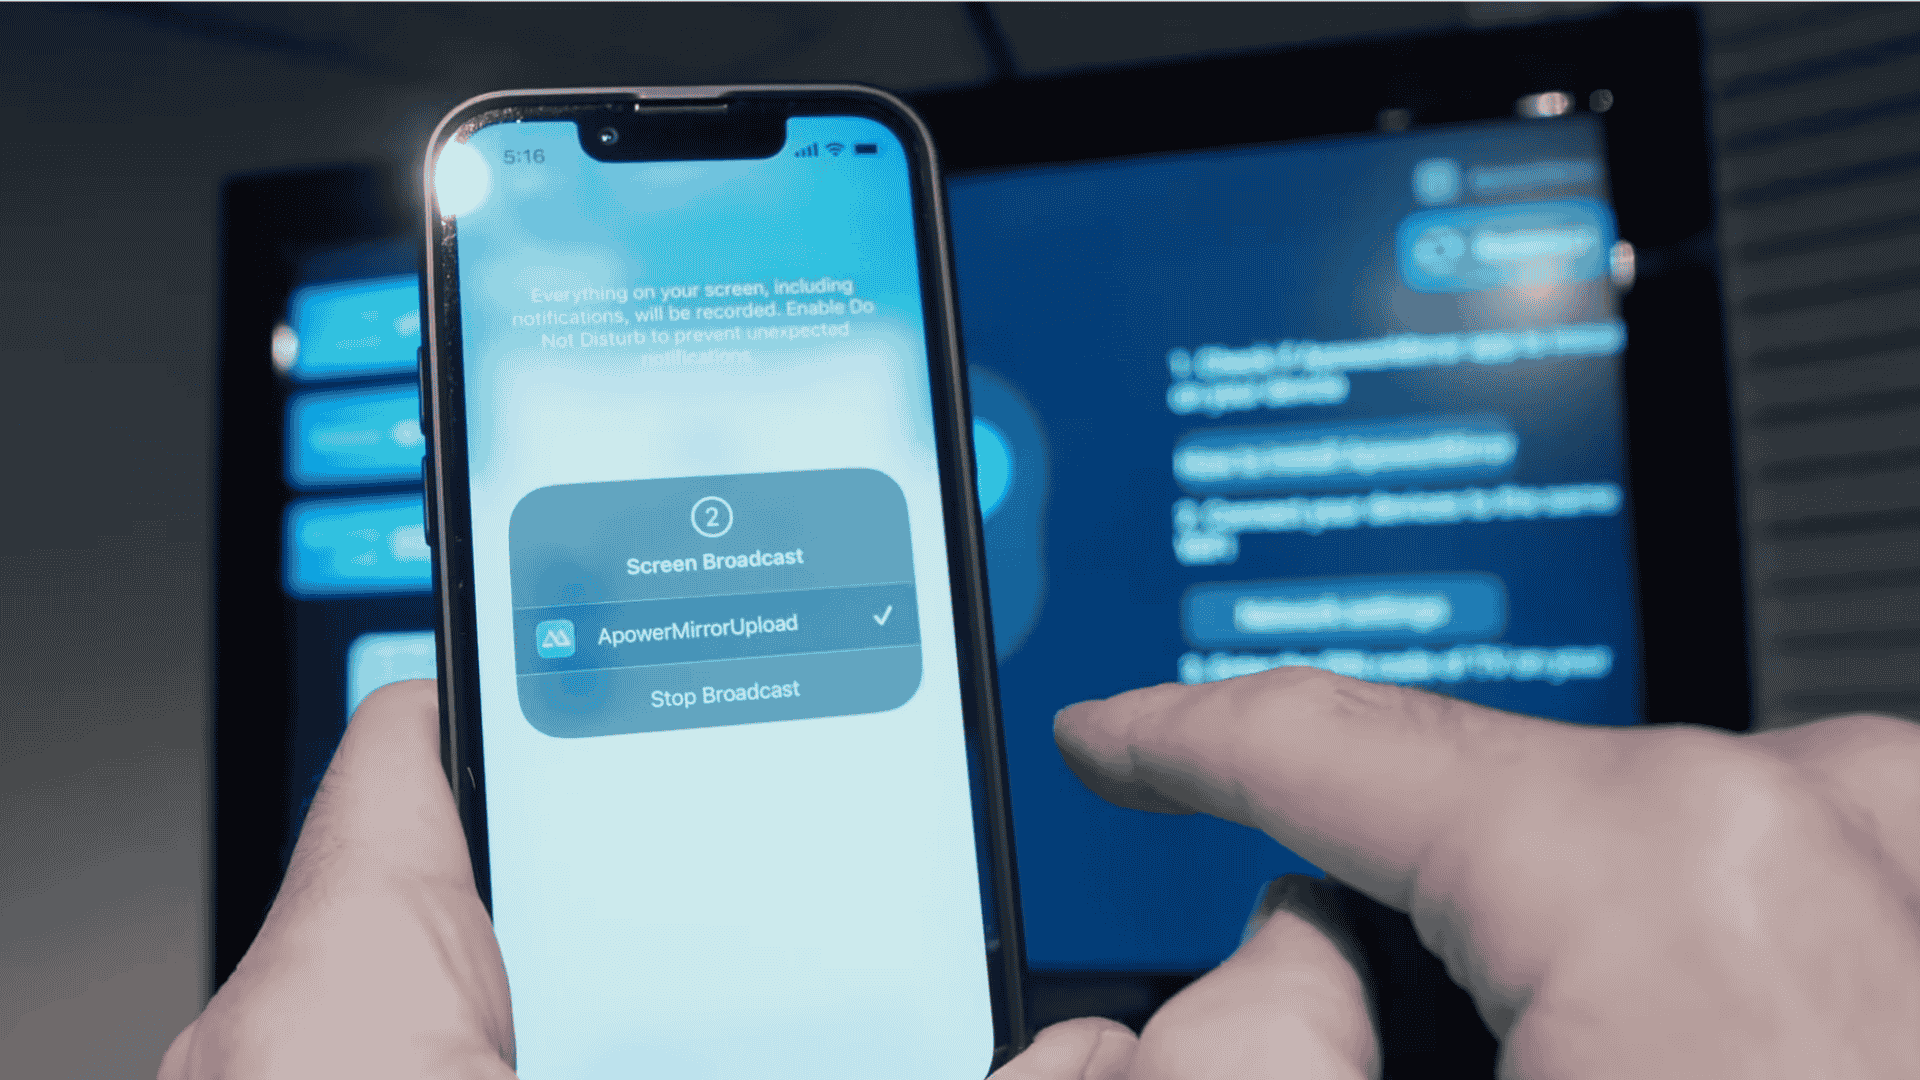
Open the ApowerMirror app on your iPhone and tap the Local Cast button on the main screen. The app will search for nearby devices using the same Wi-Fi.
When your TV appears in the list, tap on it to connect.
Select Start Broadcast and wait for the short countdown to finish. Your iPhone screen will now appear on the TV.
There may be a slight delay, which depends on your internet speed and network quality.
Step 7: Use the Lightning to HDMI Adapter
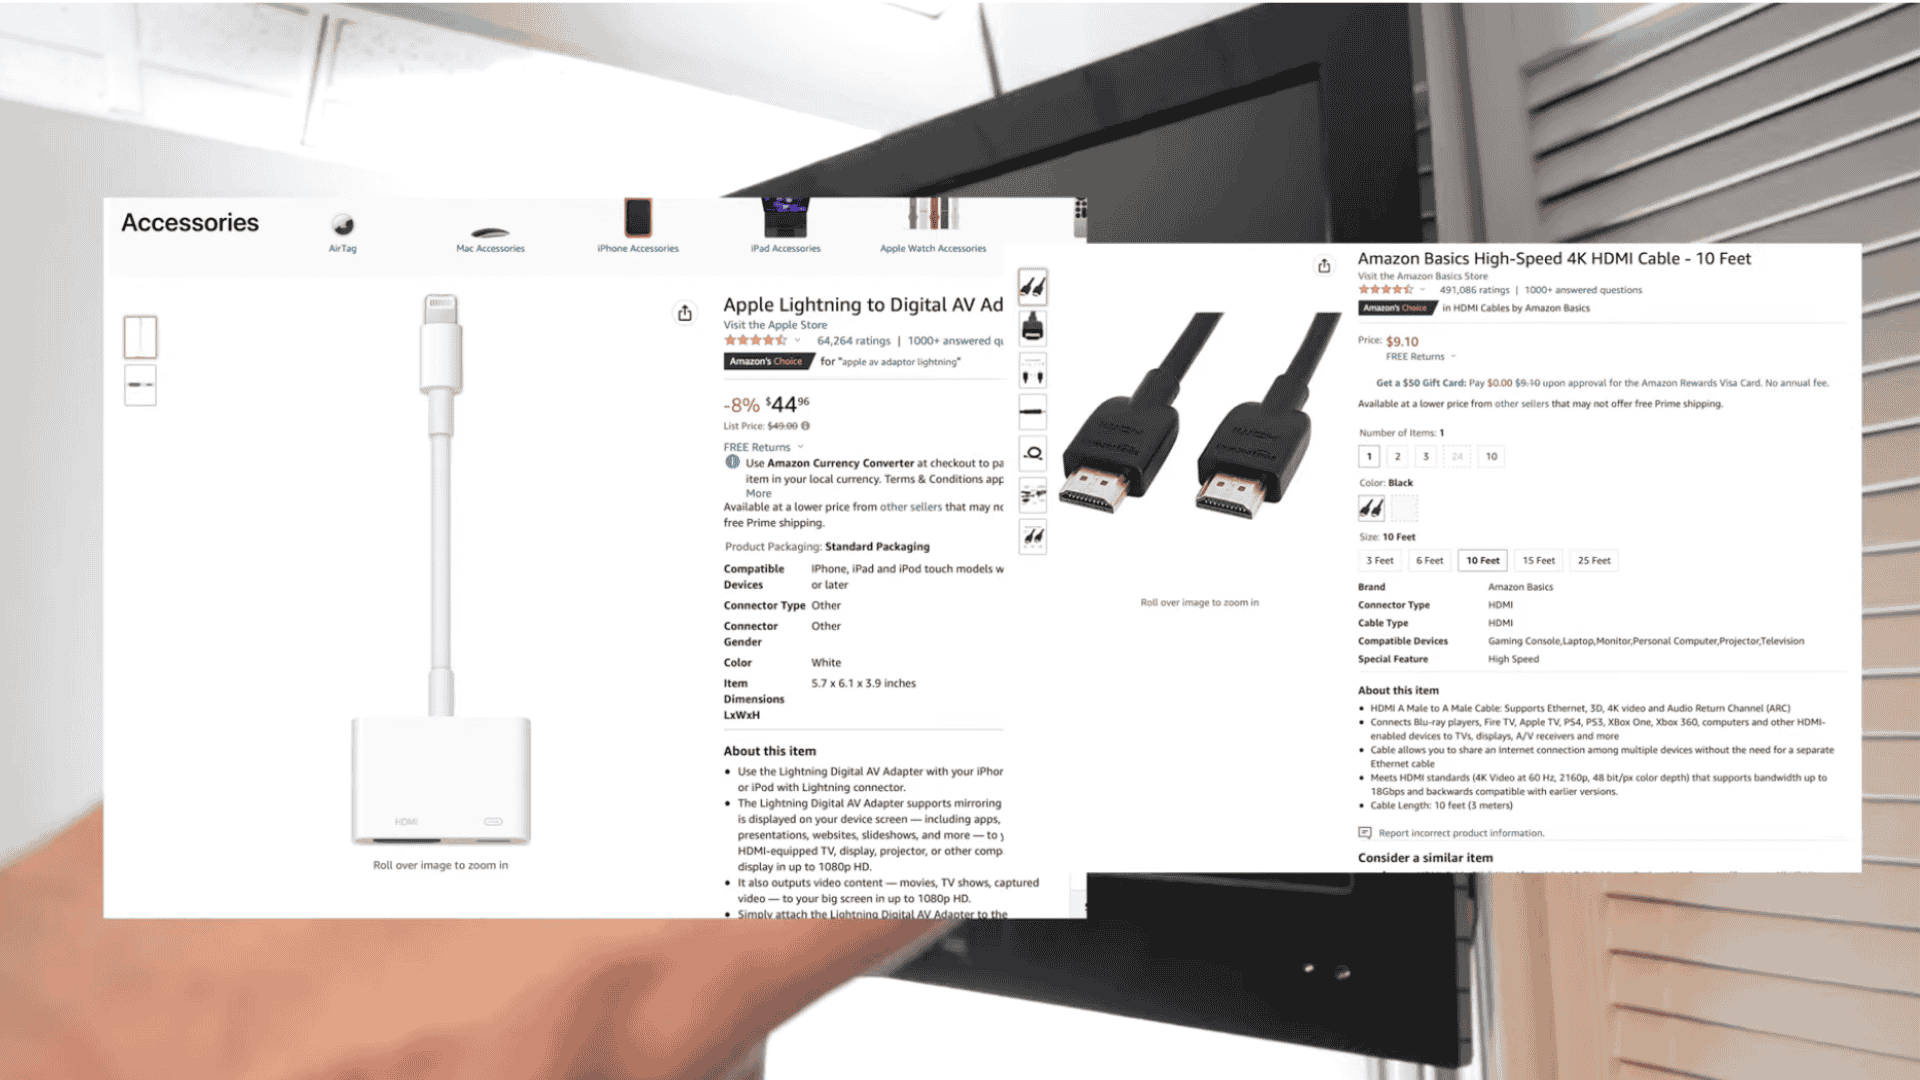
Start by plugging the Lightning end of the adapter into your iPhone.
Next, connect one end of an HDMI cable to the adapter and the other end to the HDMI port on your TV.
Turn on the TV and switch the input to the HDMI port, and the iPhone screen will appear.
This method costs more than wireless options, but it works reliably and does not depend on internet speed or network settings.
This tutorial is based on a helpful video by Tricks Tips Fix. You can check out the original video on their YouTube channel here or watch it below.
Common Problems & Easy Fixes
Connecting a phone to a TV is usually simple, but minor setup issues can stop it from working.
These common problems and quick checks can help fix most issues.
| Problems | Solutions |
| The phone cannot find the TV | Both devices must be on the same Wi-Fi network and powered on |
| Cast option not showing | The app may not support casting or needs an update |
| Connection drops often | A weak Wi-Fi signal or too many devices on the network can cause this |
| No sound on TV | TV volume may be muted, or audio is still playing on the phone |
| Screen lag or delay | Slow internet speed or running too many apps on the phone |
Safety and Privacy Tips When Casting
Screen sharing shows everything on your phone, so basic care is important. A few simple steps can help keep your connection safe.
- Avoid public Wi-Fi: Casting on shared networks can let others see or interrupt your screen.
- Use a private connection: Using home Wi-Fi or a personal hotspot is safer for screen sharing.
- Turn off casting when done: This stops your phone from staying connected to the TV and helps protect your privacy.
- Check cast settings: Disconnect your device after watching videos or photos to fully end the connection.
- Close personal apps first: Closing apps and notifications helps control what appears on the TV screen.
Conclusion
Connecting your phone to a TV makes it easier to enjoy videos and photos on a bigger screen.
The blog covered simple ways to connect an iPhone to both smart and non-smart TVs, using options like Roku, Fire TV Stick apps, or a direct cable.
Each method offers different benefits, so you can choose what fits your setup and budget.
Even older TVs can work well with the right connection.
The goal is not just screen sharing, but making everyday moments more enjoyable.
Now that you know the steps, try the method that works best for you and enjoy seeing your phone content on the big screen today.
Comment down below which method you find the easiest.