Many smart thermostats need steady power to run their screens and Wi-Fi, and that steady power usually comes from a C-wire.
Many people aren’t sure if their home even has one, which makes it harder to choose the right thermostat or understand what their system can support.
This guide focuses on giving clear answers so you know what to expect before you upgrade.
In this blog, you’ll learn what a C-wire is, why it matters, and how it helps a thermostat work the way it should. You’ll also learn how to check your system safely so you can confirm if a C-wire is already available.
If your setup doesn’t include one, this guide also covers the simplest options to add or create a C-wire without taking on complicated work.
What Is a C-Wire?
A C-wire, also called a common wire, is a wire that provides steady power to your smart thermostat. It doesn’t control heating or cooling.
Instead, it delivers a constant electrical path so the thermostat can stay on without relying on batteries.
Many older thermostats didn’t need this wire because they used simple controls, but most smart thermostats do. The C-wire is usually labeled C on the terminal block, and its color can vary, so labels matter more than color.
If your current thermostat doesn’t have one, it may still be connected at the furnace end. Some systems can use an adapter if no C-wire is available.
Having a C-wire makes the installation easier and helps the thermostat stay powered, stable, and connected.
It also prevents issues like random shutdowns, Wi-Fi drops, or the screen going blank while the system runs.
How a Proper C-Wire Improves Thermostat Performance?
A C-wire gives your smart thermostat the steady power it needs to run smoothly. These points explain how it helps your system stay stable, responsive, and efficient.
1. Provides Constant Power
A C-wire delivers steady electricity to your smart thermostat, allowing it to stay on at all times without relying on batteries or power-stealing methods.
This helps the thermostat avoid dropouts, restarts, or dim screens. Many users notice smoother performance and fewer glitches once a proper C-wire is in place.
With reliable power, your thermostat can run Wi-Fi, sensors, and display features without interruptions.
This consistent power source supports long-term stability and keeps the thermostat working the way it should.
2. Keeps Wi-Fi Connection Stable
Smart thermostats use Wi-Fi for updates, scheduling, and app control. Without a C-wire, some systems lose power for brief moments, causing Wi-Fi to disconnect or lag.
A C-wire prevents these small interruptions by supplying continuous power.
This means your thermostat stays connected, responds quickly in the app, and updates in real time.
A stable Wi-Fi connection also helps with features like remote temperature changes, alerts, and energy tracking. With steady power, the thermostat handles all these tasks more reliably.
3. Improves System Accuracy
A C-wire allows your thermostat to run its internal sensors consistently, helping it measure temperature and humidity more accurately.
Without steady power, sensors may delay or reset, which affects how well your system heats or cools your home.
With a C-wire, the thermostat can process real-time data smoothly and adjust your HVAC system more precisely. This leads to better comfort, fewer temperature swings, and more efficient energy use.
Over time, these improvements help your system run smarter and faster.
4. Supports Advanced Features
Many smart thermostat features, like learning modes, motion sensors, geofencing, and energy reports, work best with constant power.
A C-wire ensures these functions stay active and reliable throughout the day. Without one, some features may shut off, update slowly, or stop working during heavy system use.
With a C-wire connected, your thermostat can handle these advanced functions without strain.
This creates a smoother user experience and unlocks the full potential of the thermostat, especially in busy homes or changing climates.
Do All Thermostats Need a C-Wire?
Some thermostats can run without a C-wire, but many smart models require a steady power supply to work well. Not every thermostat needs a C-wire, especially older or basic models that only control heating and cooling.
These simpler thermostats often run on batteries or use power-stealing methods to stay on.
Smart thermostats, however, use more power because of their screens, Wi-Fi features, and sensors, so they work best with a steady 24-volt supply.
Without a C-wire, some models may reset, lose connection, or drain batteries quickly.
A few smart thermostats include built-in workarounds or adapters, but performance is usually better when a C-wire is available.
Checking your model’s requirements helps you choose the right setup.
How to Know If You Have a C-Wire?
You can usually check for a C-wire with a quick look behind your thermostat or at the HVAC control board. These steps help you confirm if your system already supports steady power.
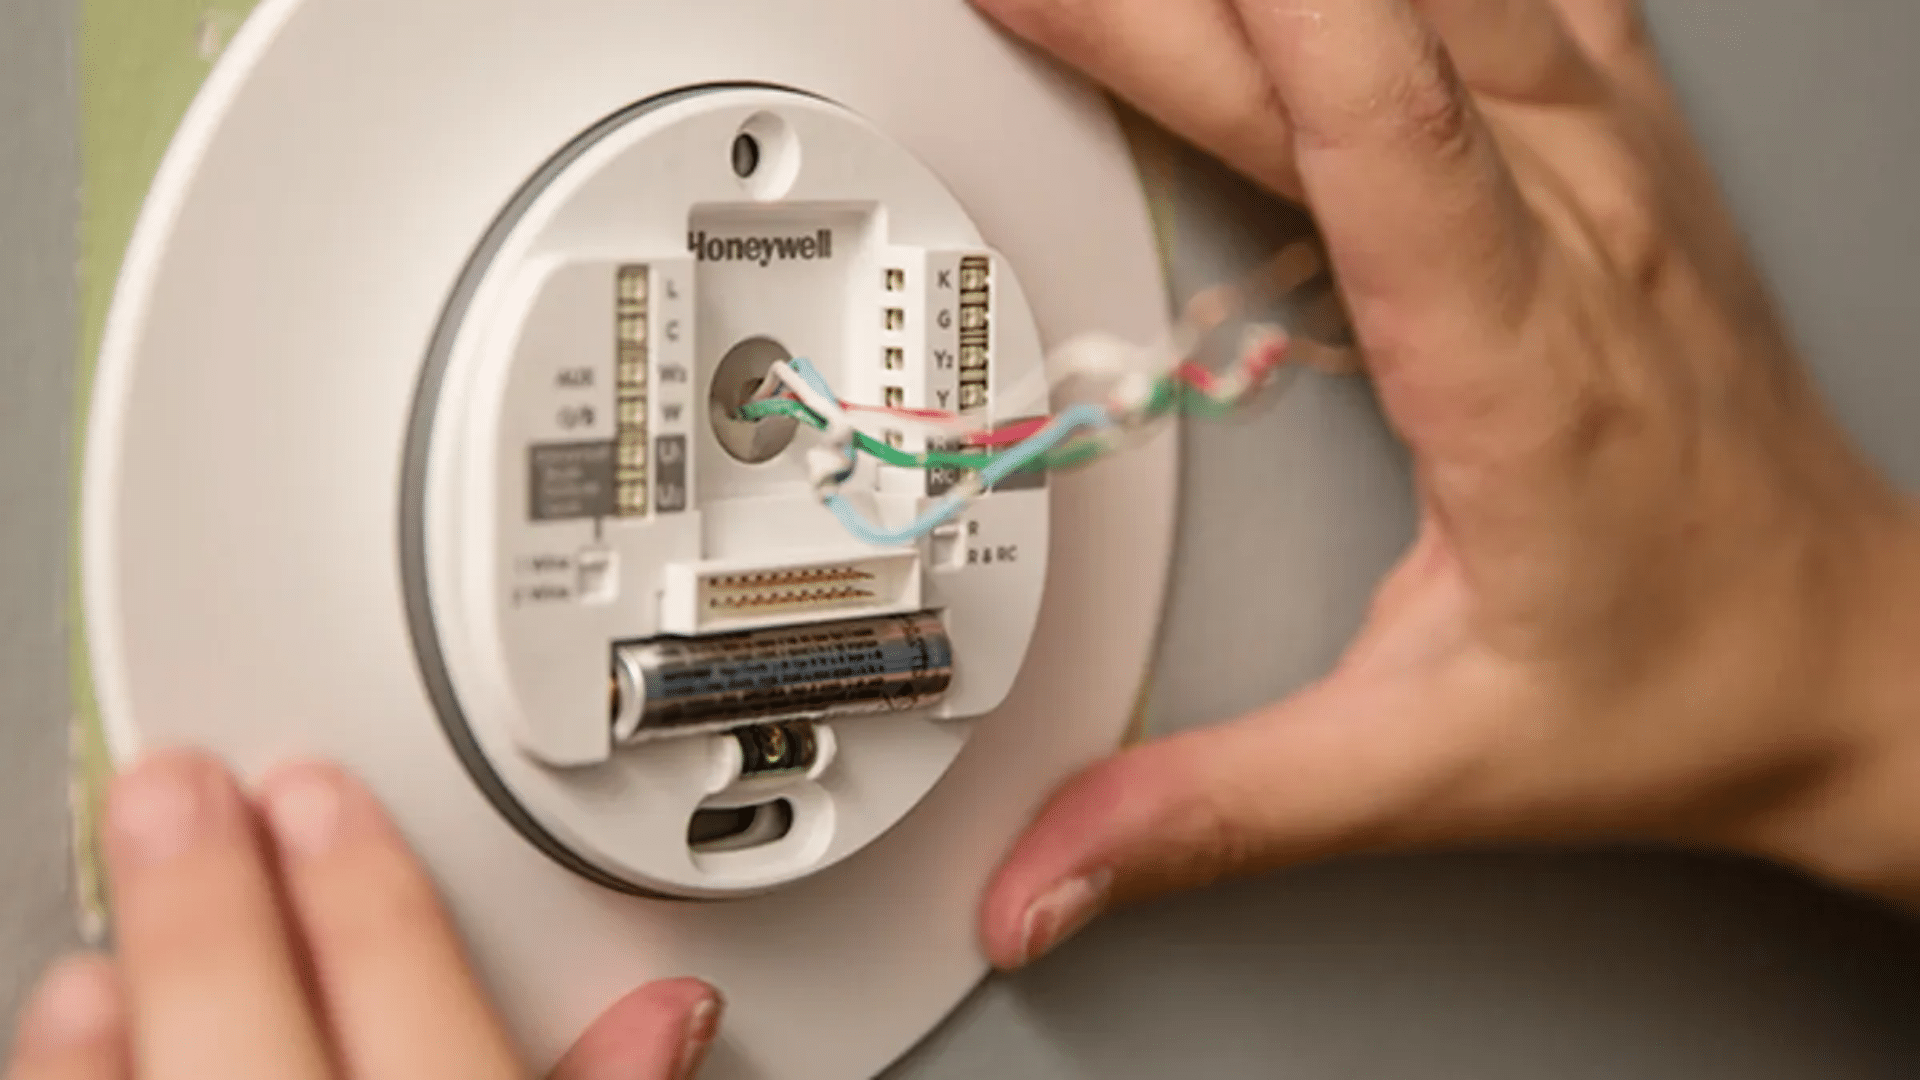
1. Look Behind Your Thermostat Cover
Start by removing your thermostat cover to see the wires connected to the terminals.
Look for a wire attached to the C terminal, which is the most direct sign that you have a C-wire. Many systems don’t follow standard wire colors, so the terminal label matters more than the wire’s color.
If you find an extra unused wire tucked behind the plate, it could be your C-wire waiting to be connected.
This first check helps you understand what you’re working with before moving to the furnace.
2. Check Your Furnace Control Board
Go to your furnace or air handler and remove the front panel to reach the control board. Look closely for the C terminal and check whether a wire is connected to it.
Even if the C-wire isn’t connected to your thermostat, it may still be wired at the furnace end.
Matching the wire colors or terminal labels between the thermostat and furnace helps you confirm whether a C-wire is available.
This step gives you clearer answers and helps you see if your wiring simply needs reconnecting.
3. Compare Thermostat and Furnace Connections
After checking both ends, compare the thermostat wiring with the furnace wiring.
If the same wire is connected to the C terminal at the furnace but wasn’t connected to the thermostat, you may just need to attach it to the new smart thermostat.
This comparison helps you spot inconsistencies, especially in older homes where wiring may not follow standard patterns.
It’s a simple way to verify what each wire does, and it prepares you to connect everything correctly during installation.
4. Use the Brand’s Compatibility Tool
Most smart thermostat brands offer an online compatibility checker or app tool that guides you through identifying your wiring.
You can enter the labels you see, and the tool will tell you whether a C-wire is required or if an alternative option, like a power adapter, will work for your system.
This is one of the easiest ways to confirm compatibility without guessing.
Using the manufacturer’s tool gives you clear answers and helps you avoid setup problems before starting your installation.
Signs You Don’t Have a C-Wire
Some HVAC systems work without a C-wire, especially older setups. These signs help you figure out quickly if your system might be missing one before installation.
- No wire connected to the C terminal behind your thermostat.
- Only two or three wires are visible, common in basic heating-only systems.
- An unused wire behind the thermostat that isn’t connected to the furnace.
- The furnace control board shows no wire on the C terminal.
- Your system shuts off when using a battery-powered thermostat, showing it lacks constant power.
If you’re still unsure about locating the C-wire, you can watch a helpful YouTube video for a clear visual guide on how to identify a thermostat’s common Wire, by One Hour Smart Home.
What to Do if You Don’t Have a C-Wire?
If your system doesn’t include a C-wire, you still have a few easy options. These choices help your thermostat get steady power without opening up complex parts of your HVAC system.
1. Use a Spare Wire Already in the Cable
Many thermostat cables include extra wires that were never used, and one of these unused wires can often work as a C-wire.
If you find a loose wire tucked behind the thermostat, it may simply need to be connected to the C terminal at both the thermostat and the furnace.
This is one of the easiest solutions because the wiring is already in the wall.
You won’t need to run a new cable or open up drywall, and connecting the existing wire can give your smart thermostat the steady power it needs.
2. Install a C-Wire Adapter
A C-wire adapter, also known as a power extender kit, creates the steady power a thermostat needs without installing a new wire.
Many thermostat brands include these adapters, and they are designed to connect easily to the furnace.
They work well in most homes and offer a simple way to support smart thermostats.
An adapter provides the same consistent power as a traditional C-wire, making it a reliable option when no spare wire is available.
3. Use the G-Wire as a Substitute
Some thermostats allow the G-wire, which normally controls the fan, to be used as a substitute for a C-wire.
This setup can provide the steady power a smart thermostat needs, but it changes how the fan operates because one wire ends up doing two jobs.
It works as a temporary solution, but you may lose full fan control.
Many people switch to a true C-wire or an adapter later for better performance and long-term reliability.
4. Run a New Wire
Running a new wire is a reliable long-term fix when your system doesn’t have a spare wire and an adapter won’t work well.
This method takes more time because you need to pull the wire through the wall from the thermostat to the furnace, but it creates a clean, stable setup once installed.
It’s especially useful for older HVAC systems that require steady power for smart thermostats.
Adding this new wire also helps prepare your system for future features that may depend on a strong, consistent connection.
5. Call a Professional
Working with low-voltage thermostat wiring is generally safe, but it can feel confusing if you’re not familiar with HVAC systems.
Calling a professional is a good choice when you’re unsure about connections, wiring routes, or anything inside the furnace.
A technician can add a C-wire, connect an adapter, or confirm your setup in a short visit.
This removes the guesswork, prevents wiring mistakes, and ensures your system stays safe and works the way it should.
Tips for Safe C-Wire Work
These tips help you handle thermostat wires with care so you can check or adjust them without risking damage to your system.
They keep the process simple and give you clear steps to follow, even if you are new to thermostat wiring.
- Turn off the power at the furnace or breaker before touching any wires.
- Label each wire before removing it so you know exactly where it goes later.
- Avoid touching bare metal terminals to prevent short connections or mistakes.
- Keep tools away from exposed wires unless you need to tighten something.
- Do not pull or twist wires with force because they can break easily.
- Make sure every wire sits firmly in its terminal before closing the panel.
- Restore power only after all parts are back in place.
How to Connect a C-Wire Safely?
Connecting a C-wire is simple when you follow the right steps. These sections walk you through the process so you can do it confidently and avoid common wiring mistakes.
1. Turn Off Power to the HVAC System
Start by switching off the breaker that controls your heating and cooling system.
This step protects you from electrical shock and prevents the furnace board from shorting while you handle the wires.
After turning off the power, remove the thermostat cover and gently pull the wires forward so you can work comfortably.
Checking for any loose or damaged wires is helpful at this point. Turning off the power first ensures a safe setup and keeps your equipment protected throughout the process.
2. Identify the C-Wire and Terminal
Look closely at the thermostat wiring and locate the wire that will connect to the C terminal.
If the wire wasn’t used before, it may be tucked behind the wall or wrapped around other wires. Make sure the wire end is straight, clean, and long enough for a solid connection.
Then, check the furnace control board for the matching C terminal to confirm it’s the same wire on both ends.
Identifying the correct wire prevents wiring errors and ensures your thermostat gets steady power.
3. Connect the Wire at the Furnace
Go to the furnace or air handler and remove the front panel to reach the control board.
Find the C terminal and attach the matching wire firmly. Tighten the screw or clip to secure the wire without pinching or damaging it.
Check that the wire is fully seated and doesn’t move when gently pulled. This connection is important because it delivers the continuous power your thermostat needs.
Once connected, neatly arrange the wires so nothing rests against moving parts.
4. Attach the Wire to the Thermostat
Return to the thermostat and connect the wire to the C terminal on the base plate.
Push it in until it locks or tighten the terminal screw, depending on your model. Make sure the wire sits flat and doesn’t wiggle loose.
After securing it, give the other wires a quick visual check to confirm nothing shifted while you worked.
A clean, tight connection ensures your thermostat powers up correctly. Once everything looks good, you can reattach the display.
5. Restore Power and Test the Thermostat
Turn the breaker back on to restore power to your HVAC system. Your thermostat should light up within a few seconds and begin its startup process.
If it doesn’t turn on, double-check both C-wire connections to make sure they’re secure.
Once the display is active, complete the on-screen setup and confirm that the system responds when switching between heating and cooling.
Testing right away helps you catch any wiring issues early. A successful test means your C-wire is working the way it should.
Common Wiring Mistakes to Avoid
Small wiring mistakes can cause thermostat issues, system errors, or even prevent your HVAC from turning on. These points help you avoid the most common problems before they happen.
- Mixing up wire colors instead of following the terminal letters
- Forgetting to turn off the breaker before touching any wires
- Leaving wires loose or not fully seated in the terminals
- Not checking the wiring at the furnace control board
- Ignoring unused wires that could serve as a C-wire
- Pinching or stripping too much insulation from the wire
- Skipping photos before removing the old thermostat
- Connecting high-voltage wiring to a low-voltage thermostat
Conclusion
A C-wire gives your thermostat the steady power it needs for the screen, Wi-Fi, and everyday features.
Once you understand what it does, choosing a new thermostat becomes much easier.
When I first learned about it, I realized how simple it is to check for one, and you can do the same by looking behind your thermostat or at the furnace control board.
If your system doesn’t have a C-wire, you still have practical options. You can use a spare wire, add an adapter, or run a new wire if needed.
Each choice supports stable power and helps your thermostat work the right way.
With these details in mind, you can move forward with a clearer understanding of your system and feel more confident when upgrading to a smart thermostat.